跳到主要内容

5 篇博文 含有标签「nft」

查看所有标签

· 6 分钟阅读
Brileigh
Matthew

How to sell NFTs on Juicebox

Juicebox enables creators and communities to create and launch NFT projects with powerful yet simple tools tailored to your needs in an ongoing basis. In this tutorial we’ll guide you through how to configure a Juicebox project to sell NFTs in less than 10 minutes. Whether you’re a creator selling content, managing a DAO, NFT project or cryptocurrency crowdfund, you can sell NFTs easily on Juicebox with complete control and transparency.

You can follow along in this article or the Youtube video.


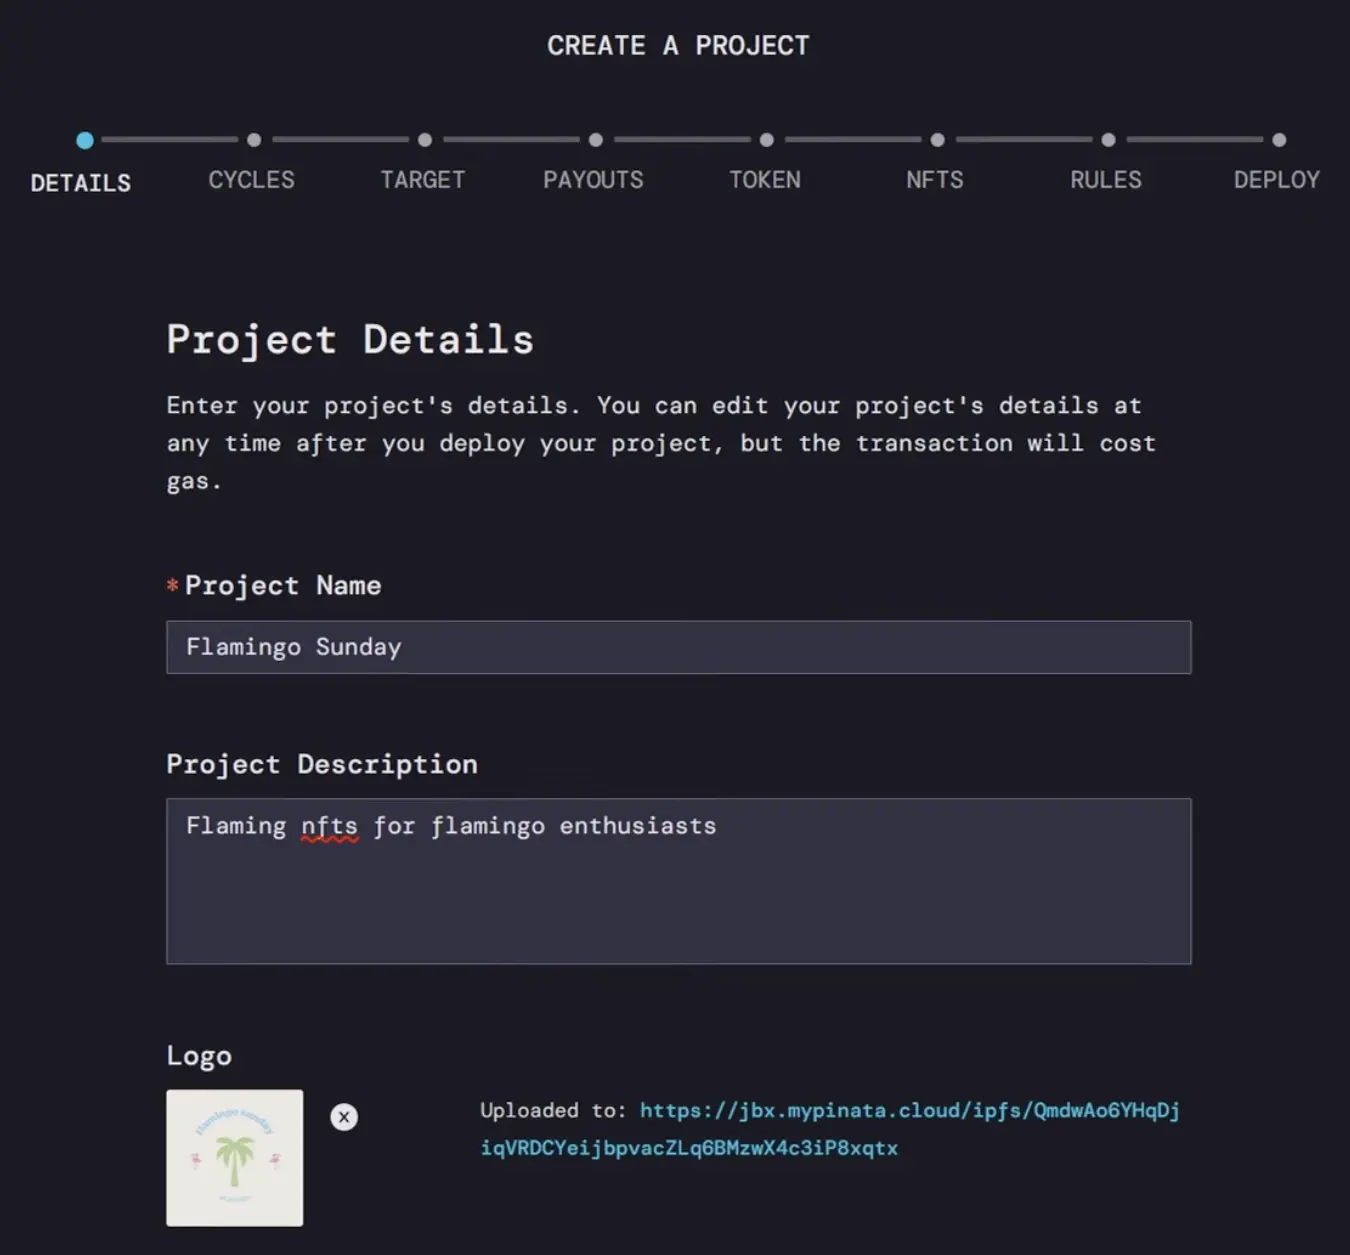
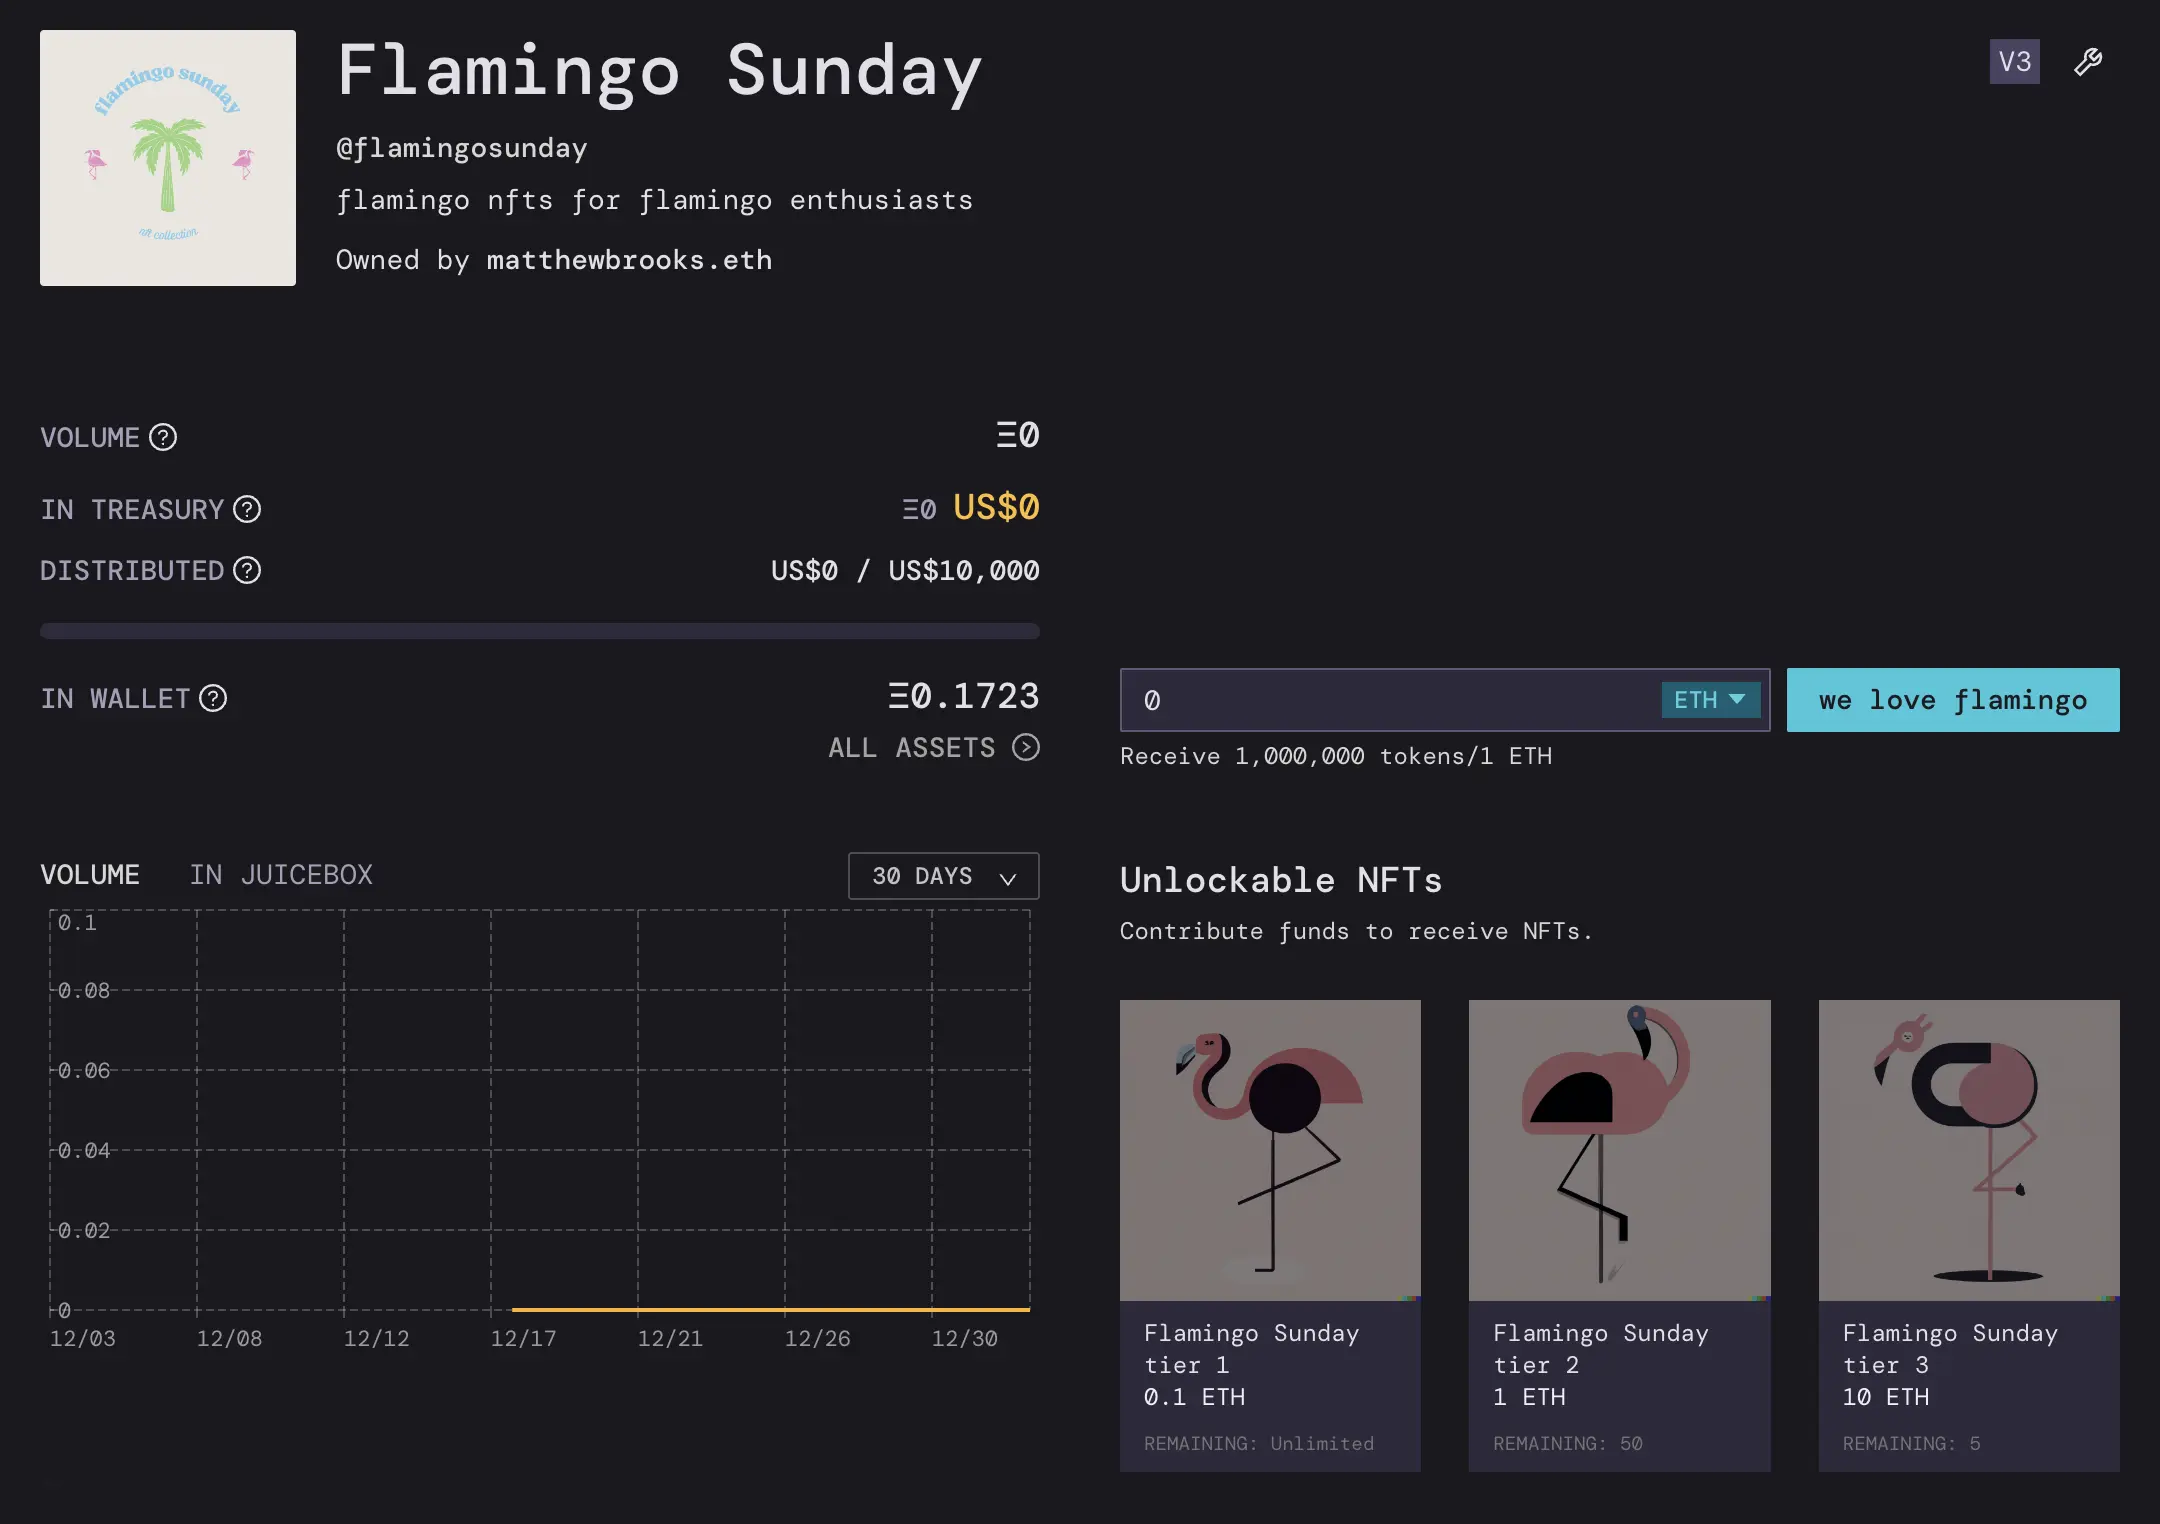
The example for this tutorial is an NFT project called Flamingo Sunday. We’re using Juicebox to sell flamingo NFTs at 0.1, 1, and 10 ETH tiers and anyone who contributes at those amounts will receive the corresponding NFT.

So head to juicebox.money, connect your wallet, and click Create a project.

Create a project

Step 1: Project Details

Here you’ll provide general information about your Juicebox project including the name, description, a logo, and add social links. You can even customize the Pay button, for this example we could make it say “we love flamingos.” Once you’re done, click Next.

Project details

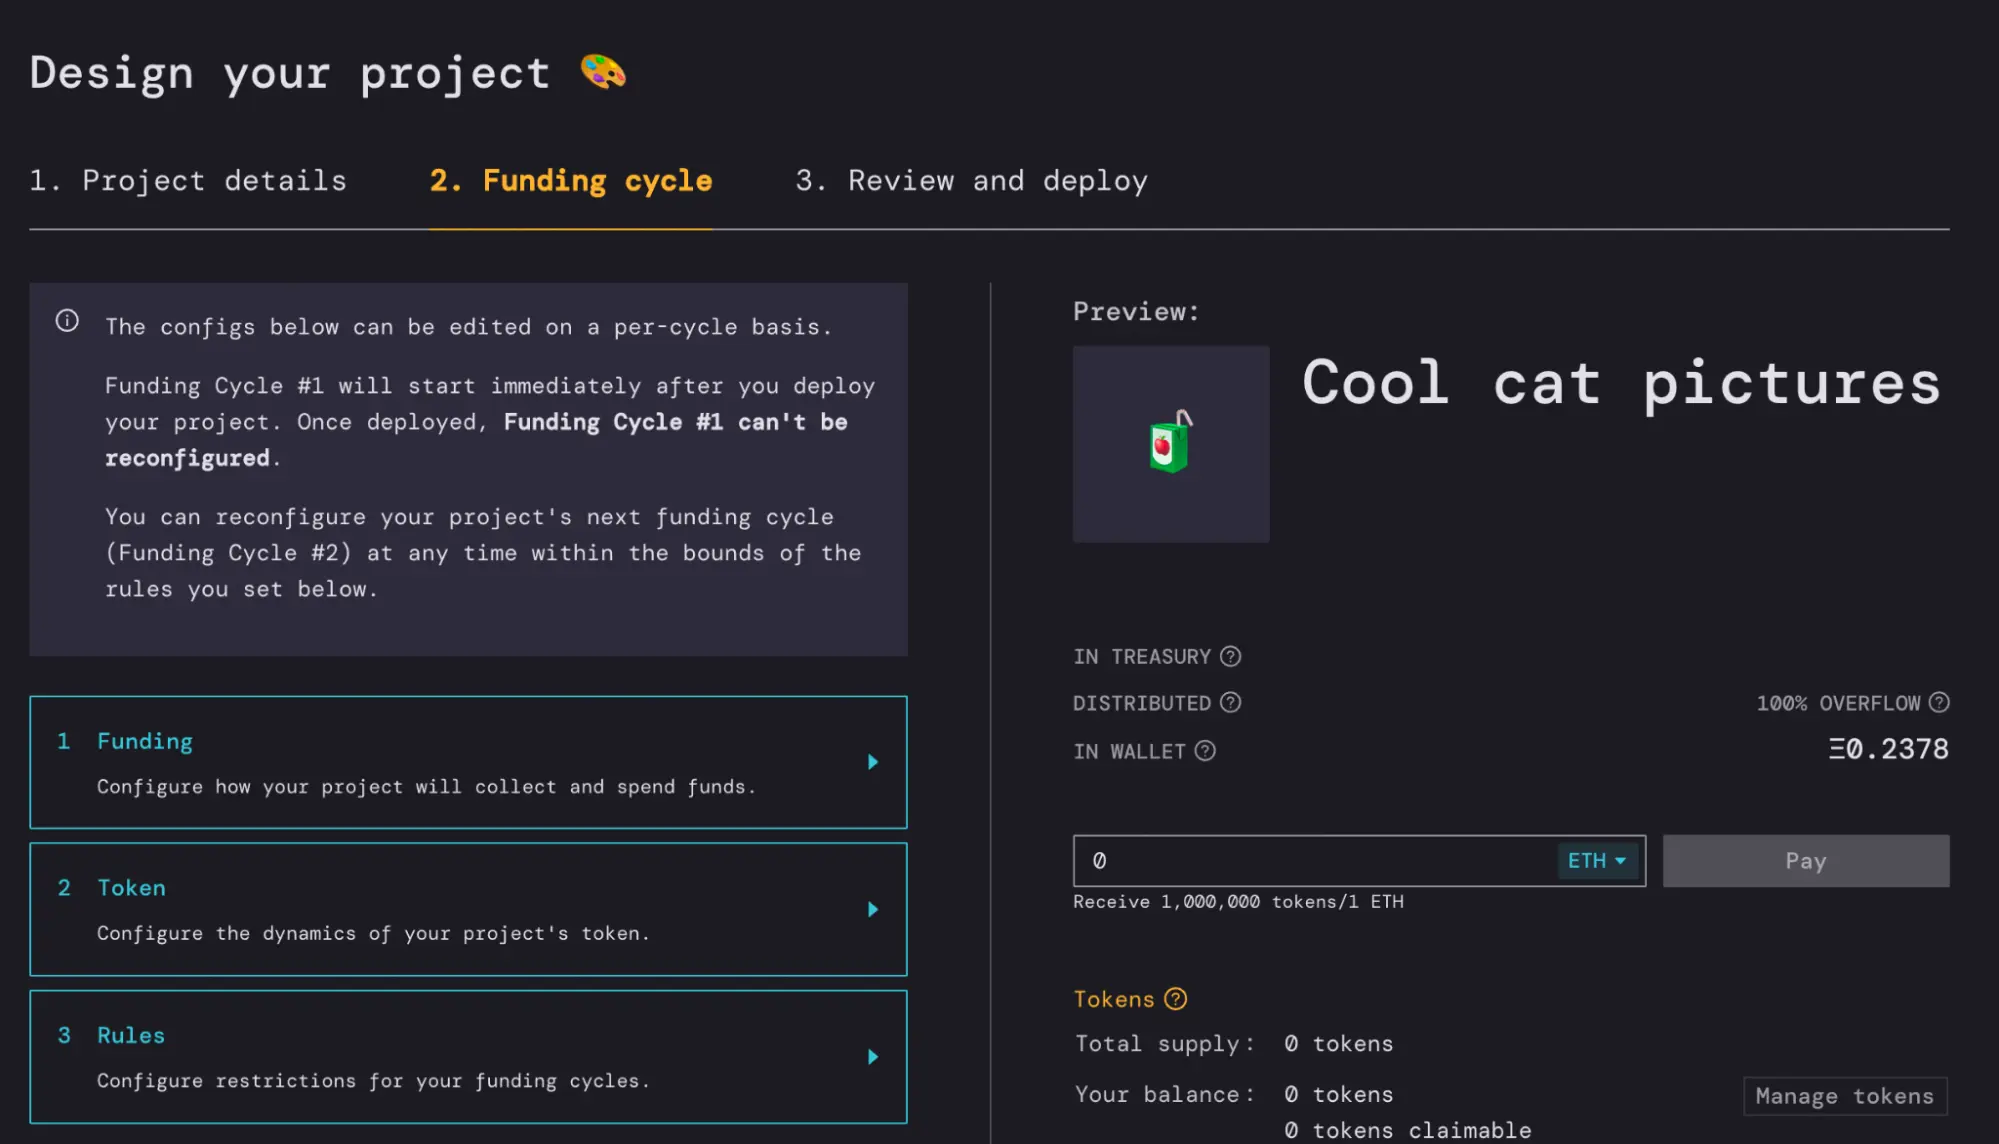
Step 2: Funding Cycles

If we set this to 14 days then all of our project settings will be locked for 14 days and we can only distribute funds from the treasury once during that 14-day cycle. This helps build trust so contributors feel safe that they won’t get rugged.

You can decide what’s best for your project and if you need the flexibility to change at any time, you can choose Manual Funding Cycles. If you’re not sure, you can start with Automated Funding Cycles.

Funding Cycles

提示

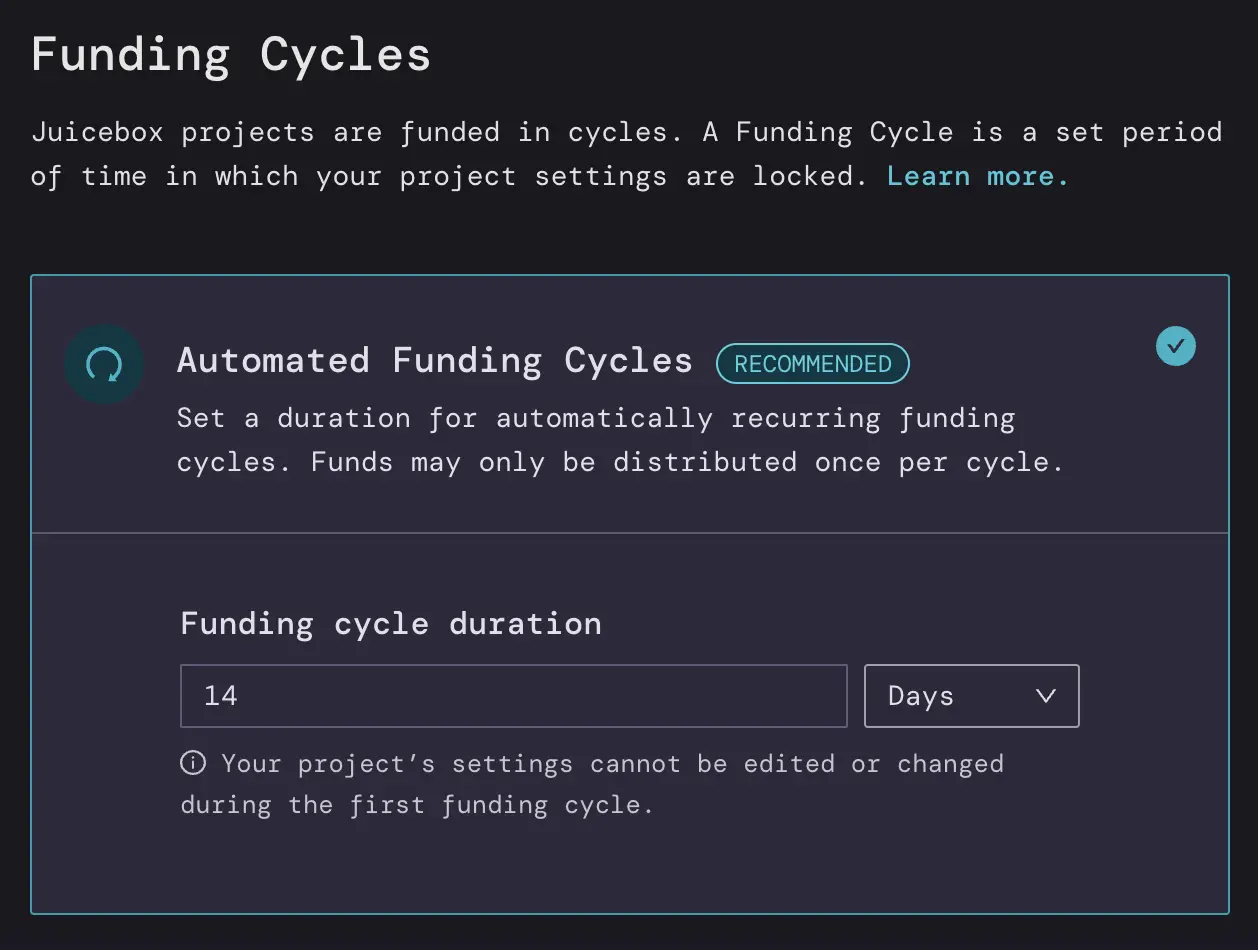
Remember, you can always reconfigure your project later to reflect your needs for the project

Step 3: Funding Target

This is where you decide how much money from the project can be distributed per 14 days (the length of your funding cycle)

If we set a Specific Funding Target of 10,000 USD, we can distribute up to 10,000 USD worth of ETH per 14-day funding cycle. This is like a hard cap on the amount that can be distributed from the treasury so the project owner can’t take all the funds and disappear. Anything over 10,000 USD worth of ETH will be considered Overflow and can be redeemed by anyone who contributed to the project, almost like a refund.

Funding Target

提示

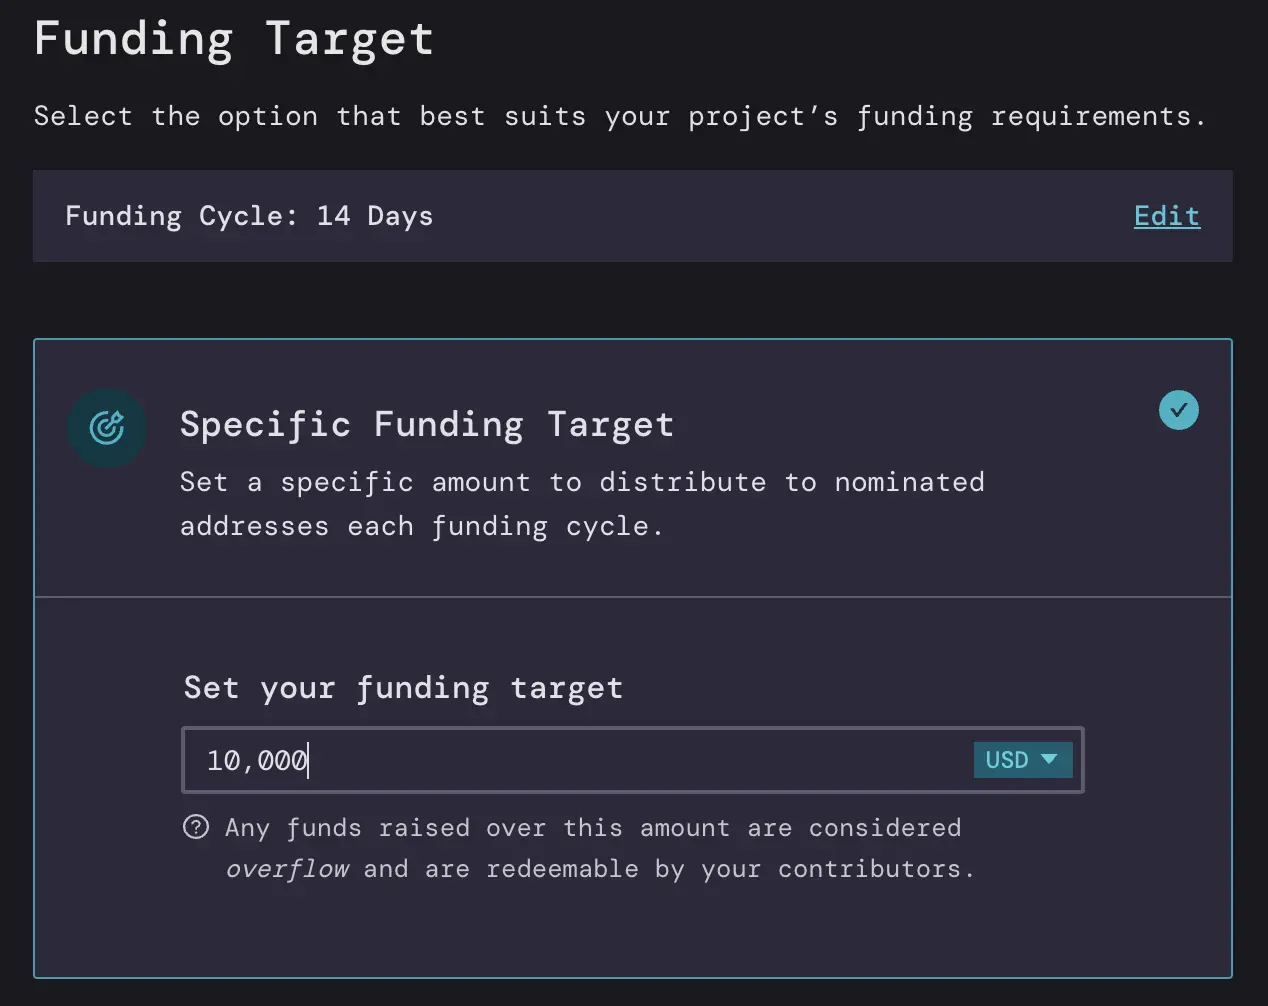
You can also set this in ETH instead of ETH denominated in USD.

Another way to do this is an Infinite Funding Target which means you can distribute as much as you want from the treasury, but this can be perceived as risky to contributors to your project because you could take all the money and run. So for this example, we’ll go with a Specific Funding Target of 10,000 USD worth of ETH.
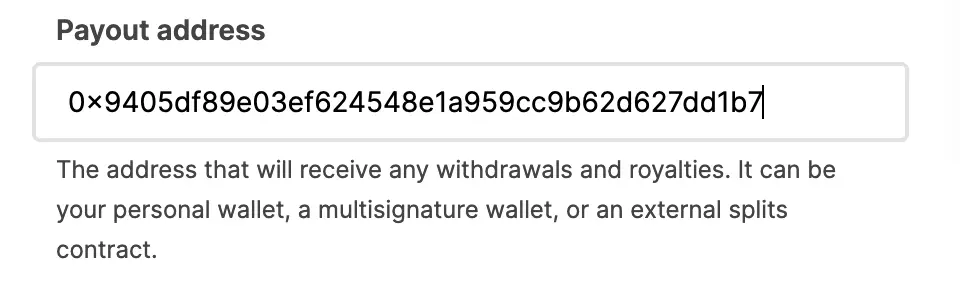
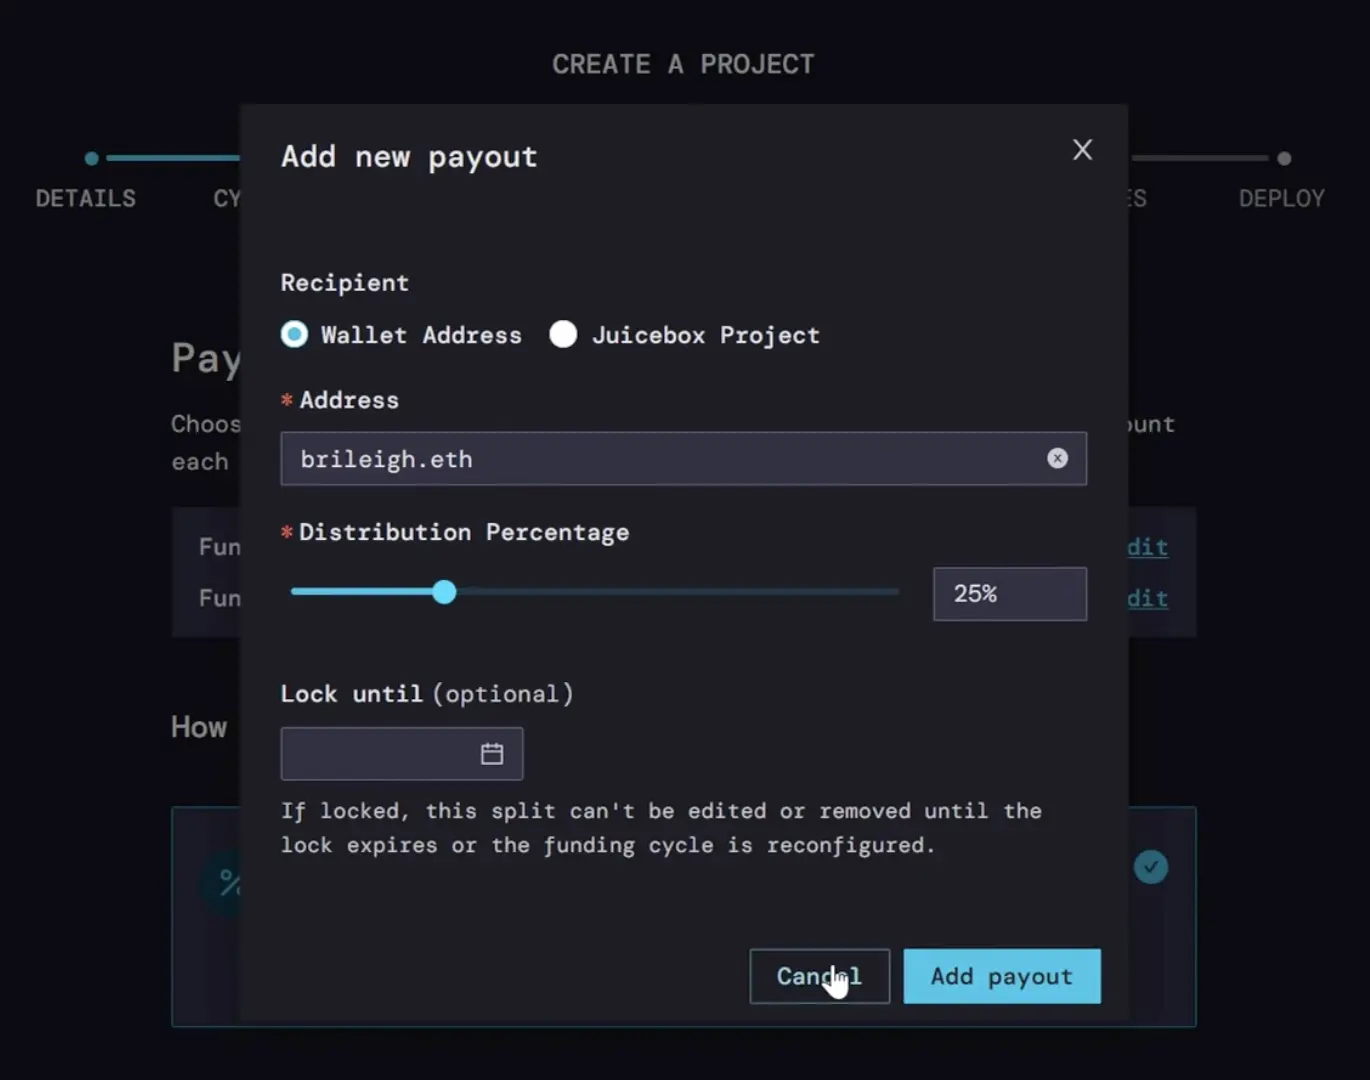
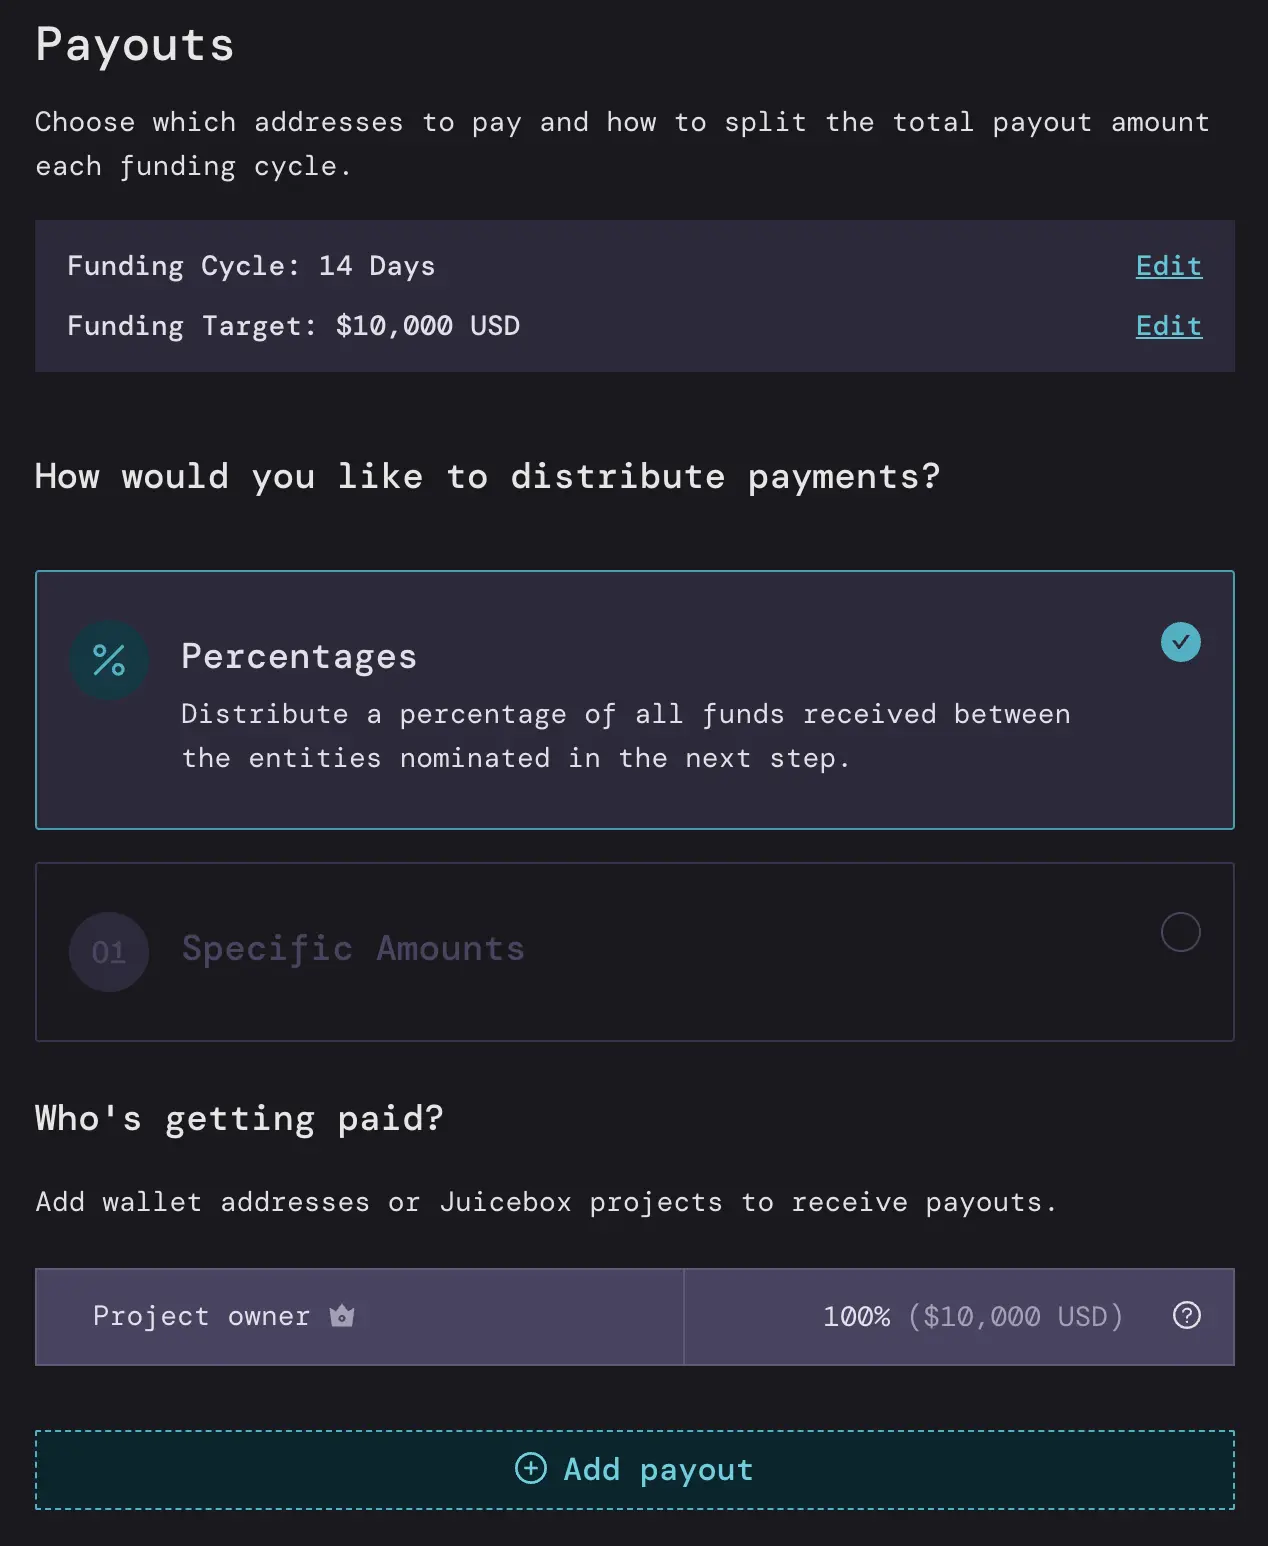
Step 4: Payouts

Here you can decide where to distribute the ETH that we receive every 14 days. We can do this with percentages or specific amounts.

For example, with percentages, let’s say I am the artist that made Flamingo Sunday and I want to receive 100% of the funds that come in every 14 days.

If we were doing specific amounts, I could say that I want to receive 10,000 USD worth of ETH which is the total amount that can be distributed every 14 days to myself.

Both of these can be configured to add other people, for example if you had a team of four people (including yourself) working on the project, you could split the payouts 25% to each address by clicking Add Payout and adding their address and 25%.

how to add a payout

But for this tutorial we’ll keep it simple and stick with 100% going to the project creator.

Payouts

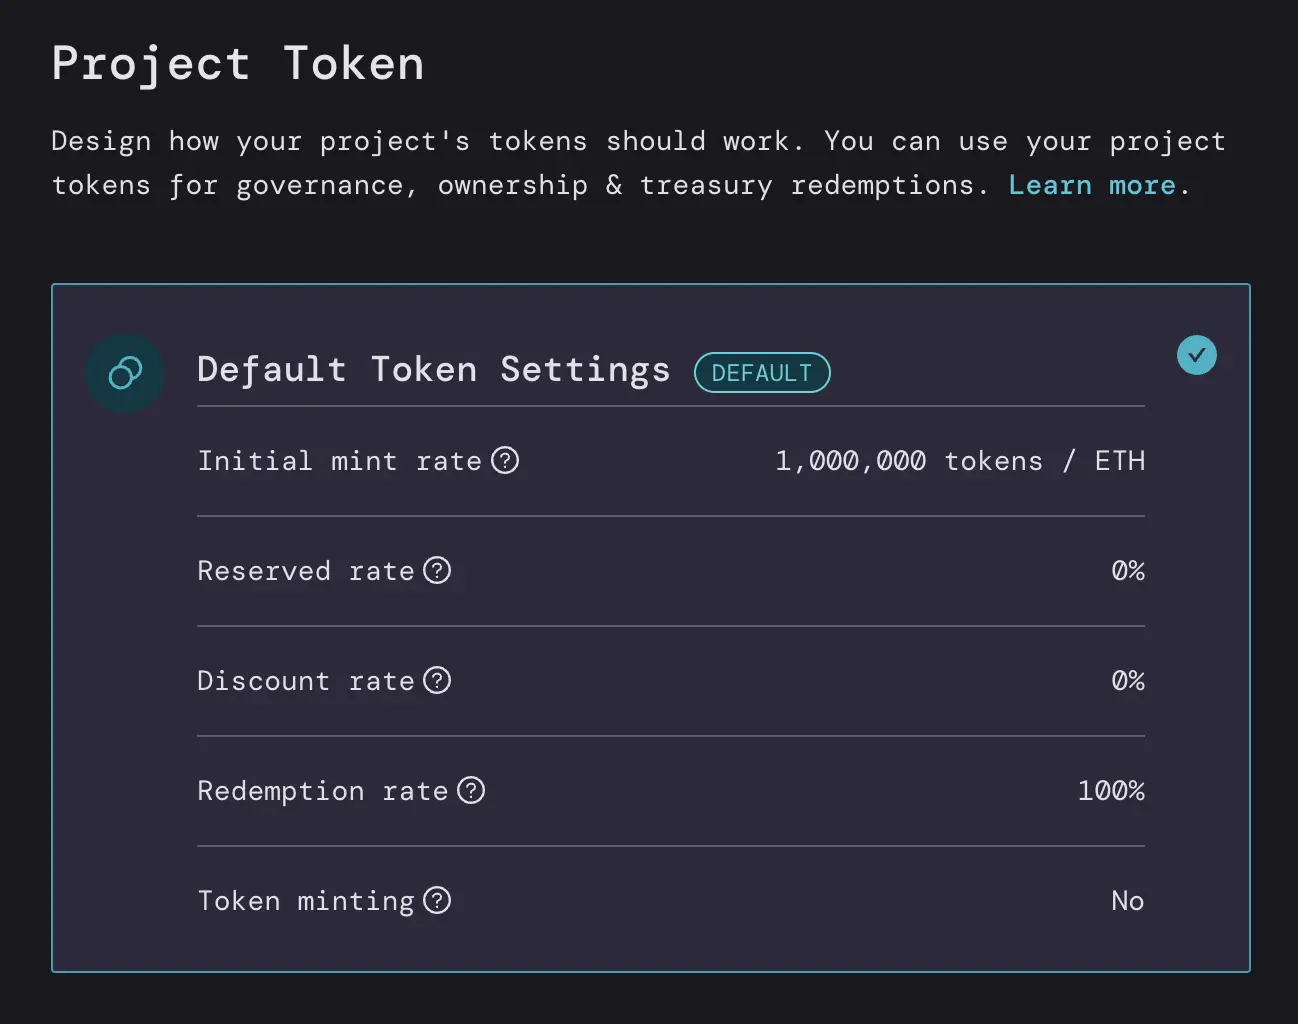
Step 5: Project Token

Here you can decide how your project’s tokens will work. There’s a lot of things you can customize here but the Default Token Settings will work for most projects. You can always reconfigure this setting in the future, depending on the roadmap for your NFT project.
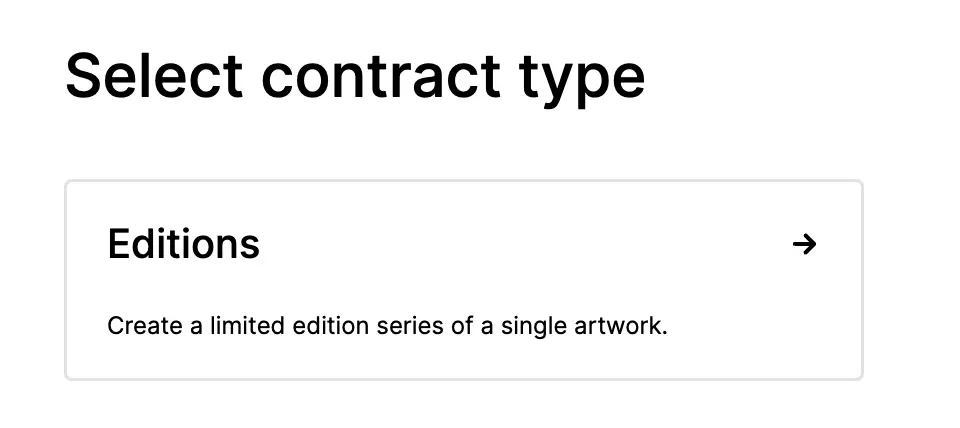
project token

Step 6: NFTs

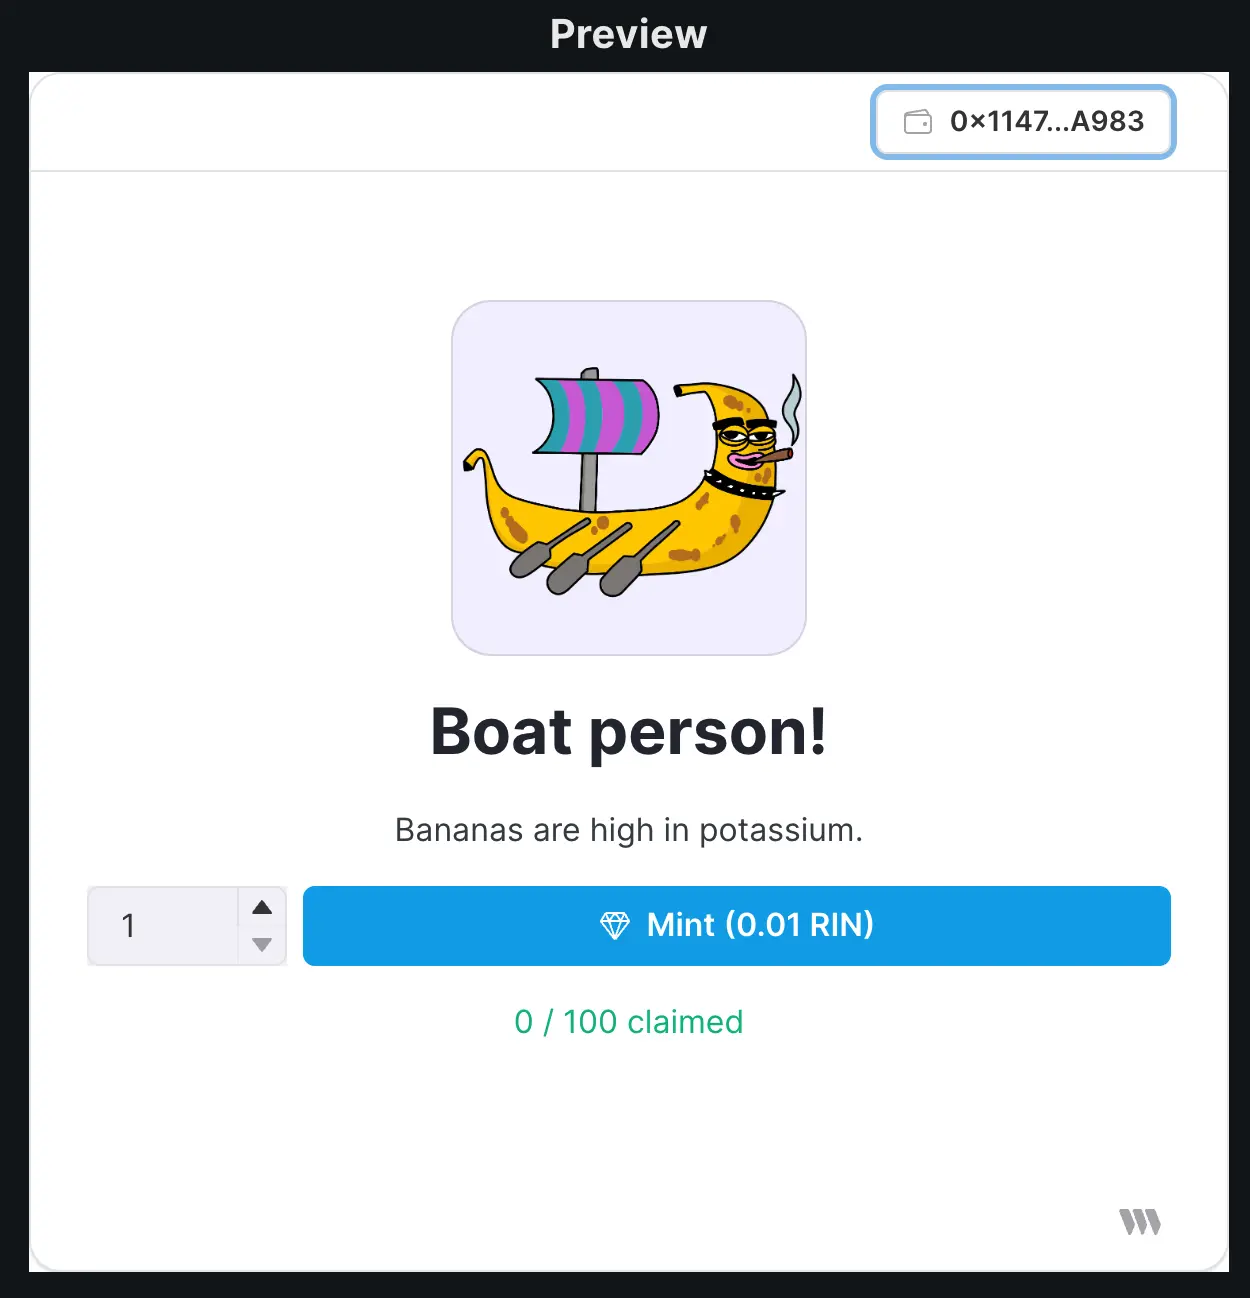
Click Add NFT choose an image, and give it a name, a description, and the minimum ETH contribution in order for someone to buy the NFT. This is also where you can decide the supply. You can either have a limited supply—for example, only 10 can be minted—or an unlimited supply. You can also add an external link to point to a website of your choice.

add nft

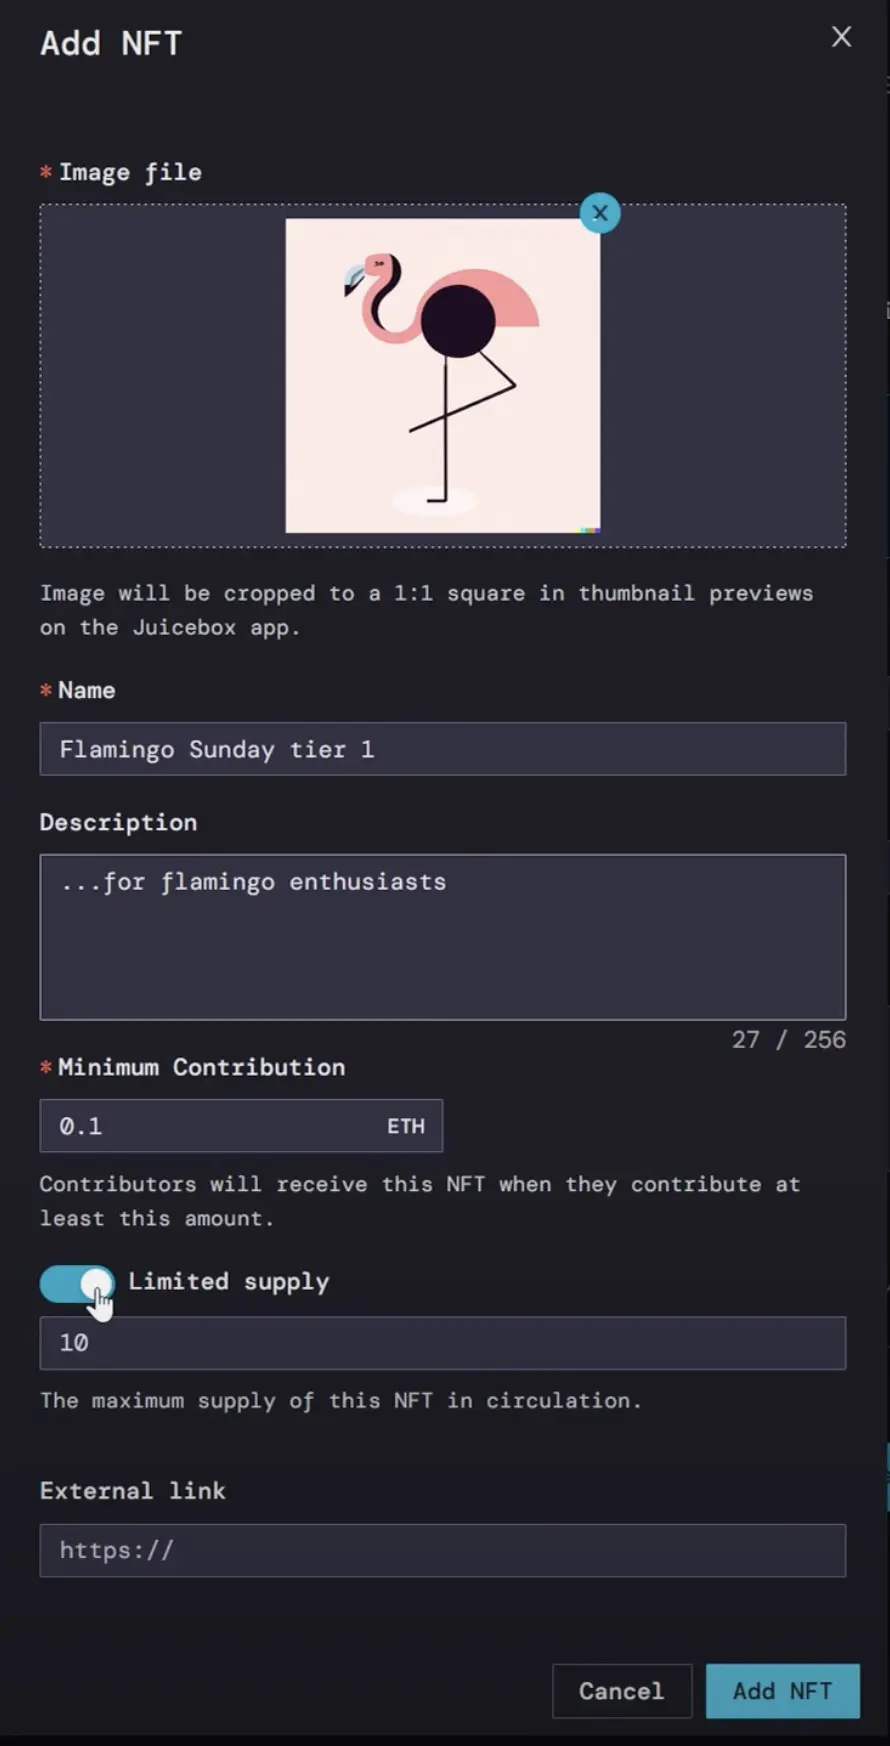
You can repeat this process as many times as you like for each NFT you have. They can be priced and supplied all the same, or you can create tiers. Using tiered NFTs is a great way to create different incentives for people to support your Juicebox project at different price points.

Once you have all your NFTs added, you can create a collection name, description, and custom token symbol. For this project, we’ll call it “Flamingo”

collection settings

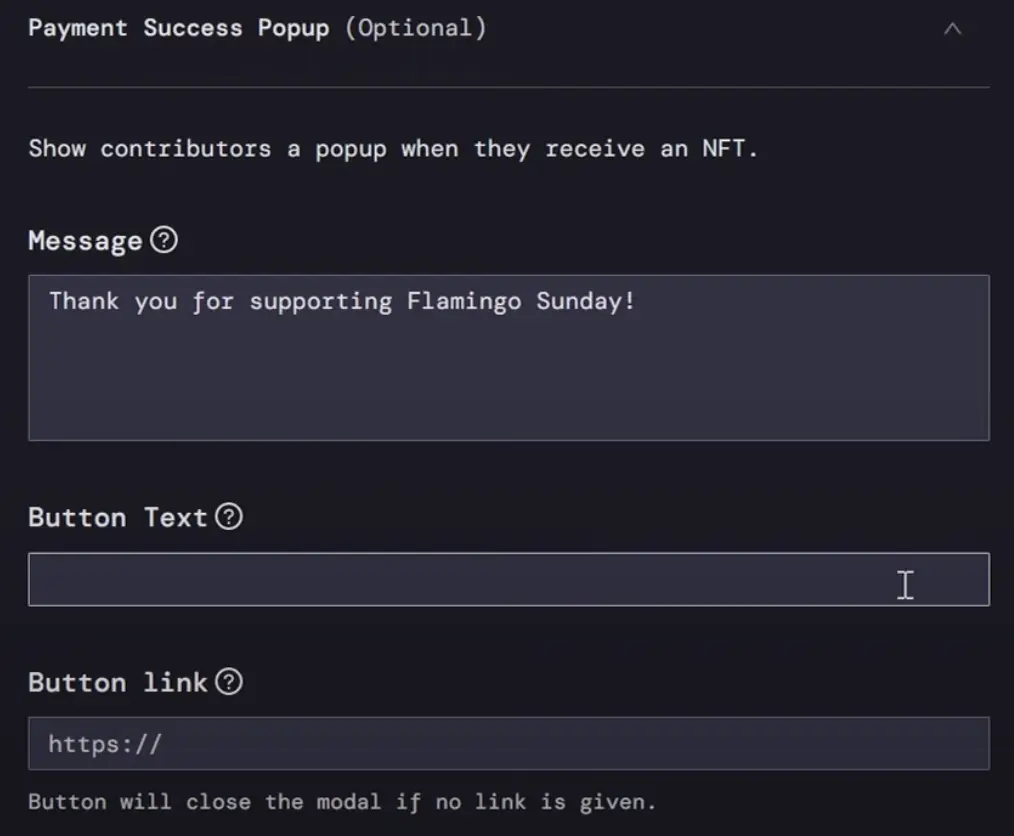
There’s also an option to add a message that appears when contributors receive an NFT as well as a button with a link, this could be a project website, Twitter, Discord, etc.

pay button

Step 7: Confirm all settings (rules)

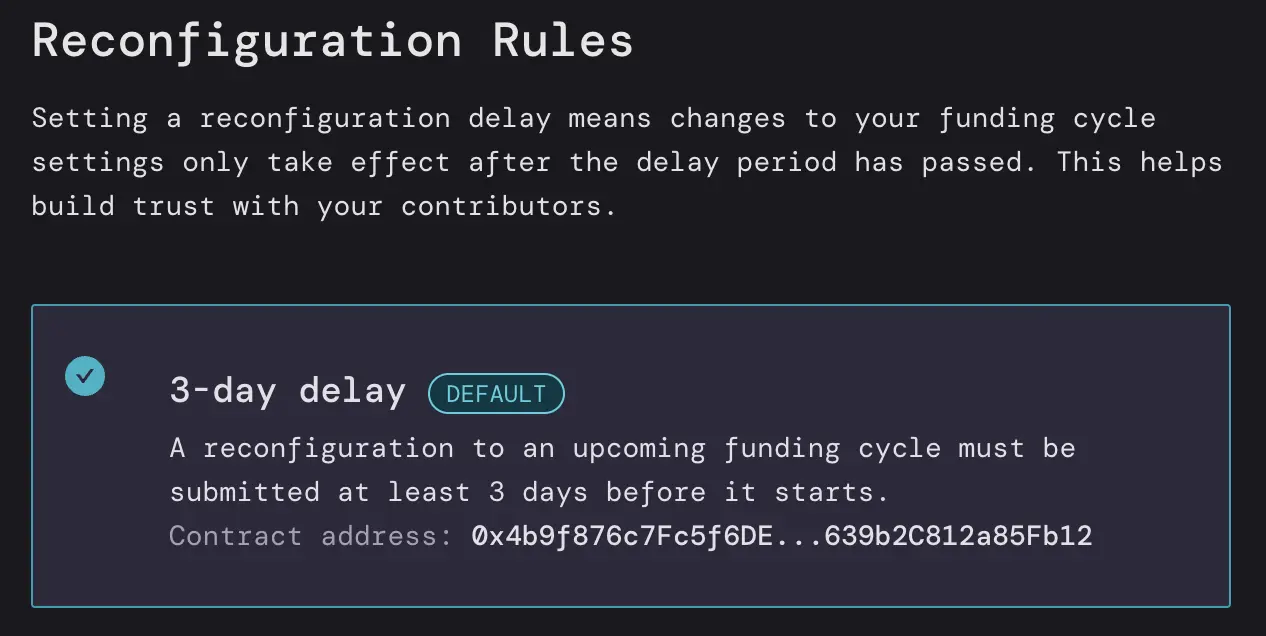
The default is a 3-day delay, which means that any changes to the project settings need to be submitted at least 3 days before the next funding cycle starts. You can think of this as a safety measure. In other words, the project can’t suddenly change all of their settings.

You can change this to be longer, shorter, or no delay, but we’ll stick with the 3-day default.

3 day delay

Before deploying, review your settings and make any changes needed. You can always go back and tweak things before you deploy. Check the Terms of Service box and you’re ready to go! Click Deploy, confirm the transaction in your wallet, and your project is live!

project deployed

提示

You can go through this entire process on Goerli testnet before launching your project on mainnet. If you have any questions, please come by the Support channel in the Juicebox Discord.

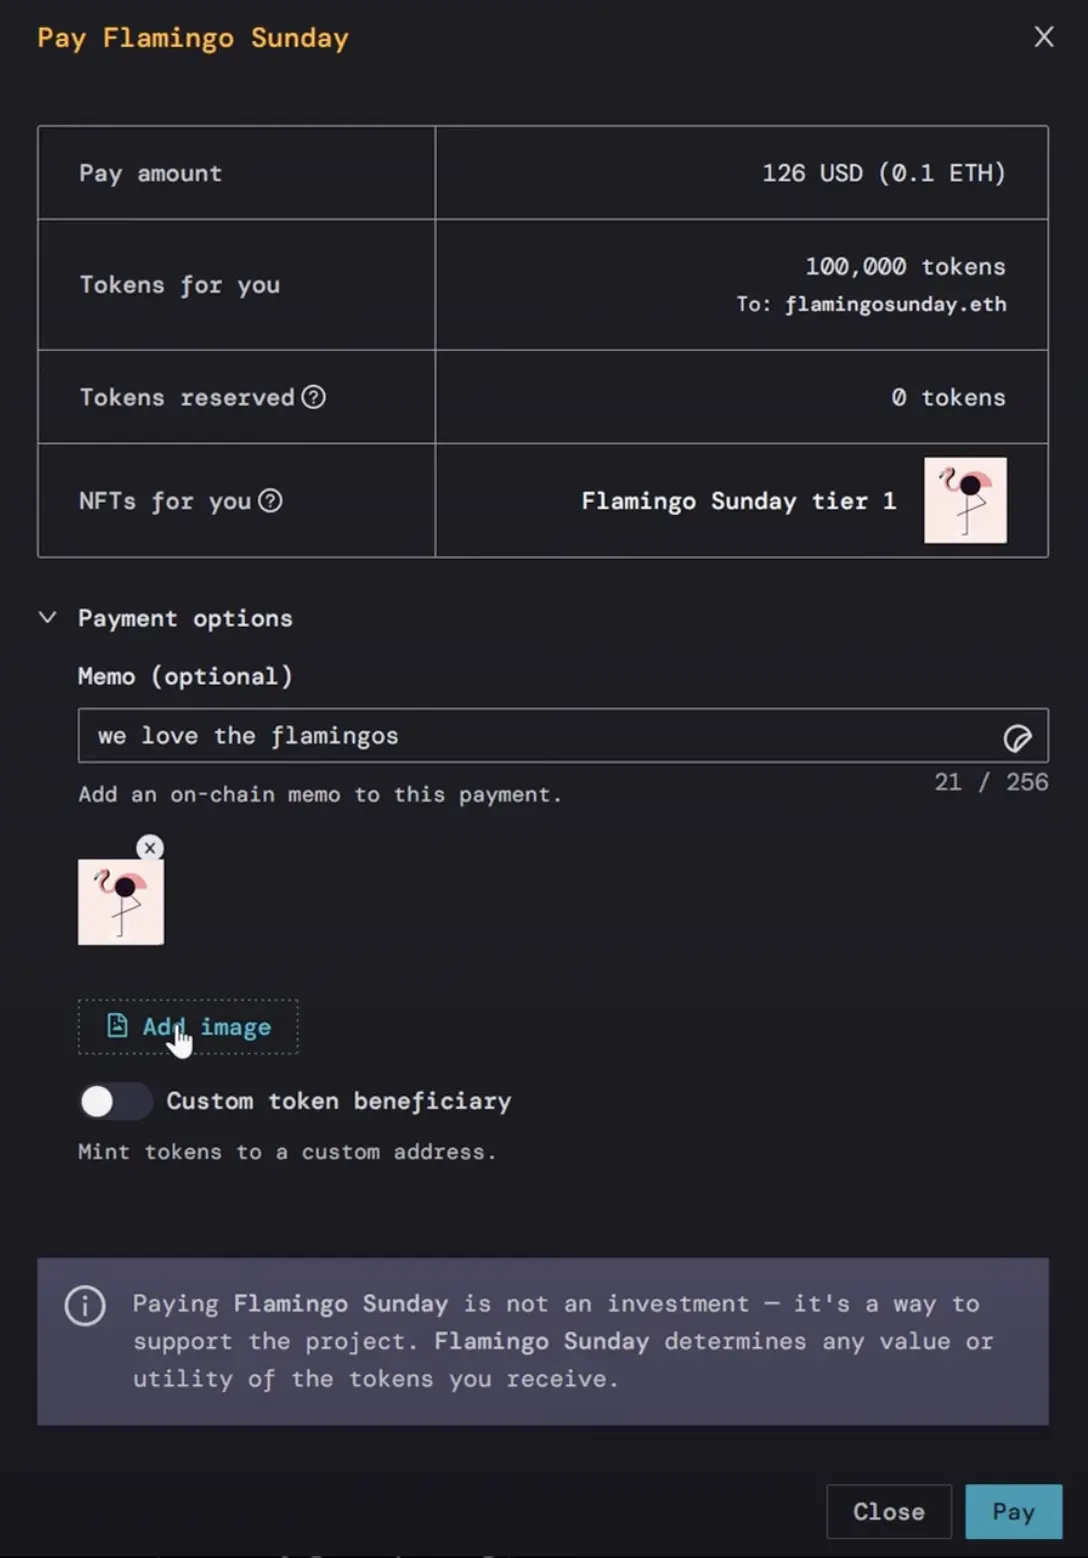
Note that the NFT images might take awhile to display properly. If someone wants to purchase an NFT at the 0.1 ETH tier, for example, they just click on the NFT, click the customized pay button, click I understand to acknowledge the safety warning, and then click Pay. You can even leave a little on-chain memo like “we love the flamingos”, an image, or Banny sticker with your contribution.

How to pay

So we’ll refresh the page and now you can see the NFT that we just purchased in the Activity feed on the right.

If you need help along the way, jump into the Support channel in the Juicebox Discord.

🐦 Follow Juicebox on Twitter: @JuiceboxETH

🚀 Trending projects on Juicebox

📚 Project Creator Docs

📹 YouTube Tutorials

· 3 分钟阅读
nnnnicholas

In this guide, I’ll show you how to deploy an NFT to Ethereum with Thirdweb's NFT Edition Drop and forward the mint sale proceeds to a Juicebox Project.

Thirdweb contracts have no fees.

Before you start, you should have:

  • At least one piece of artwork for your NFT (image, audio, video).
  • A Juicebox project you’d like to fund. This can be your project or someone else’s.

1. Navigate to Project tools

Go to the project you would like to pay on juicebox.money. Click the Tools button at the top-right of the page.

Project tools on juicebox.money

2. Create payable address

Click Deploy project payer contract in the project tools.

3. Deploy your Project Payer

Click Deploy project payer contract. Leave the Advanced features set to their defaults. Verify that the transaction looks good in your wallet, then sign it.

Bonus: If you include text or an ipfs://Qm... link to an image in the memo field, every contribution to the project made via this Project Payer will have that text and/or image in the Juicebox project's activity feed. An image representing your colleciton is a good choice.

4. Copy Project Payer address

When the transaction succeeds, a pop-up will display the new Project Payer’s address.

Project Payer creation successful pop-up.

A new event called “Created ETH-ERC20 payment address” will also appear in the project’s activity feed with the same information. Copy the Project Payer address to your clipboard.

The new Project Payer in the project's Activity feed.

5. Create your NFT Collection

Go to thirdweb's drop page and select an NFT drop type, or browse the differences between their drop types in their docs. I’ll be selecting Edition Drop.

First, fill out your NFT Collection’s metadata. Then, paste the Project Payer address we copied earlier into the Funds Recipient input. Click Deploy to create your NFT collection.

I'm going to do an Edition Drop.

Paste the Project Payer address into the Primary Sales and Royalties recipient inputs.

6. Create an NFT

On the Collection page, click Create to create your first NFT in the collection.

Click Create on the Collection page.

Input your NFT's metadata and click Create Edition Drop

Input your NFT's metadata.

7. Create a Claim Phase

Return to the Collection page, click Claim Phases, then Add Initial Claim Phase

Create a new Claim Phase.

Set a start date, price, and quantity for your claim phase, then click Save Claim Phases when you are satisfied.

Configure the Claim Phase and Save.

Switch to the Embed tab, then copy-paste the iframe embed code into your own website.

Switch to the Embed tab and click `Copy to clipboard`

You can mint from the preview at the bottom of the page if you would like to test the NFT drop and Juicebox integration.

Mint embed preview.

NFT mint proceeds are forwarded directly to the Juicebox project and show up on the Juicebox Project's Activity feed.

That’s it! Try minting an NFT to see it in action!

For support, visit discord.gg/juicebox.

· 2 分钟阅读
nnnnicholas

In this guide, I’ll show you how to deploy an NFT drop to Ethereum with Zora’s creator tools, and forward the mint sale proceeds to a Juicebox Project.

As of 2022-08-01, Zora charges a 5% fee on primary sales. This may change in future.

Before you start, you should have:

  • At least one piece of artwork for your NFT (image, audio, video).
  • A Juicebox project you’d like to fund. This can be your project or someone else’s.

1. Navigate to Project tools

Go to the project you would like to pay on juicebox.money. Click the Tools button at the top-right of the page.

Project tools on juicebox.money

2. Create payable address

Click Deploy project payer contract in the project tools.

3. Deploy your Project Payer

Click Deploy project payer contract. Leave the Advanced features set to their defaults. Verify that the transaction looks good in your wallet, then sign it.

Bonus: If you include text or an ipfs://Qm... link to an image in the memo field, every contribution to the project made via this Project Payer will have that text and/or image in the Juicebox project's activity feed.

4. Copy Project Payer address

When the transaction succeeds, a pop-up will display the new Project Payer’s address.

Project Payer creation successful pop-up.

A new event called “Created ETH-ERC20 payment address” will also appear in the project’s activity feed with the same information. Copy the Project Payer address to your clipboard.

The new Project Payer in the Project's Activity feed.

5. Create your NFT

Go to create.zora.co/create and select an NFT drop type. I’ll be selecting Editions. Fill out your NFT’s data and upload the NFT media. Paste the Project Payer address we copied earlier into the Funds Recipient input.

6. Forward ETH to the Juicebox Project

As your NFTs sell, ETH accumulates in the NFT contract. To move the funds to the Juicebox project, navigate to create.zora.co/collections, select your NFT collection, then click Withdraw, and sign the transaction. The payment to the Juicebox project will appear in the Activity feed when the transaction succeeds.

That’s it! Try minting an NFT to see it in action! For support, visit discord.gg/juicebox.

· 5 分钟阅读
johnnyD

In case you don’t know, Juicebox is the best way to fund and operate any Web3 business, especially NFT projects. If you’d like to know why we’d recommend reading ‘WHY Juicebox for NFT projects’ if you haven’t already done so first.

For now, we’ll be going deeper into Juicebox lore and fleshing out all the weird and wonderful options, looking at how to leverage them ideally for an NFT project. By the end of it, you’ll have set up a system where:

  1. Buyers of your NFT will automatically receive a quantifiable stake in your project’s treasury in the form of ERC20 tokens.
  2. People can invest in your project without having to own an NFT.
  3. Automate payments to your key team members and display them transparently to your community.

In this article you’ll learn:

  • How to create and configure a Juicebox project suited for an NFT collection
  • How to link royalty fees from your NFT sales to your shared Juicebox treasury

1. Create your project

https://juicebox.money/#/create or https://rinkeby.juicebox.money/#/create (testnet)

I’ll go from the Funding cycle section of our create flow and recommend some possible starting points for your NFT project.

1. Funding

Funding cycles

We highly recommend using a funding cycle. This is the time period over which distributions will be made and other Juicebox settings such as the discount rate will be applied. Common funding cycle lengths are 1 week, 2 weeks or 1 month.

Distributions

You can specify the amount you’d like to distribute to each member of your team per funding cycle from the treasury. If you don’t raise the total amount of funds you’ve planned for your whole team, then each team member will be paid the percentage you’ve specified for them from any funds you have raised. For instance, if you planned for Mike and Bob to get 1 ETH each per week, but you only raised 1 ETH total in a certain week, then they will just get 0.5 ETH each.

If you’re opting not to go for the shared treasury approach, you can route all funds from the treasury straight to the owner, or a percentage cut to any other wallet address.

Token

Reserved rate

As mentioned earlier, whenever new tokens are minted as a result of someone buying an NFT or contributing for tokens straight up, this percentage of those new tokens will be reserved and the rest will go to the buyer. By default, these tokens are reserved for the project owner, but you can also allocate portions to other wallet addresses. A reserved rate of 50% will ensure the project owners maintain a majority share of the treasury and may be a good option for your project.

Discount rate

The discount rate incentivises people to get in early on your project. It controls how the issue rate of your community ERC20 token changes over time. A higher discount rate means people who buy your NFT in the early days will receive more tokens / ETH than those who come in later. An exact figure is hard to give, but with a funding cycle length of 2 weeks, a discount rate of 10% may be a good place to start.

Redemption rate

This redemption rate encourages token holders to hodl and stick with your project token for the long term. On a lower redemption rate, redeeming a token increases the value of each remaining token, creating an incentive to hold tokens longer than other holders. Similar to the discount rate, you’ll have to gauge how aggressively you want to pull this level, but a redemption rate between 50 and 75% is probably a good place to start.

3. Rules

Pause payments

You probably don’t want to check this. Check it only if you want to hold off payments for a certain period after you create your project.

Allow token minting

You probably don’t want to check this either, it allows project owners to mint any amount of tokens to anyone on demand. Whenever you have this enabled, your project will have a warning flag on its Juicebox page warning contributors of the possibility of their tokens being diluted.

Reconfiguration

This is important. It restricts how long before the next funding cycle reconfigurations must be submitted before they are able to take effect. For example, with a 3-day delay (a good starting point), a reconfiguration to an upcoming funding cycle must be submitted at least 3 days before it starts. It’s a great way to ensure your community against any malicious owner behavior.

2. Create a payable address

This will create an Ethereum address that can be used to pay your project, rather than having to go through the Juicebox interface. It will be necessary in the model of the Juicebox NFT project we’re going for, since you will use this address as the destination for your royalty fees. You will be prompted to do this when you create your project, but can do it later at any time in the ‘Tools’ section of your project page pictured below.

3. Do your thang on Opensea, or wherever. Send royalty fees to the payable address. Let the magic happen

And that’s it! Congratulations. You’ve set up a system where buyers of your NFT will have a quantifiable stake in your project with community tokens (ERC20), and have allowed people to invest in your project without having to own an NFT.

Conclusion

We hope you’ve enjoyed digging into the details of Juicebox and how you can leverage the protocol for your NFT project. If you’re interested in having a crack at the setup described here, have a play on Rinkeby. If you’ve still got some questions, come shoot us a message in our Discord or arrange an onboarding call. As always, happy Juicing!

Disclaimer: This is not financial or legal advice. As always, speak with an expert and do your own research.

· 6 分钟阅读
johnnyD

Juicebox is an extremely flexible and powerful Web3 protocol made to fund and manage shared treasuries. It has been responsible for some of the biggest names in crypto community fundraising, including ConstitutionDAO, AssangeDAO and MoonDAO. Funding and operating an NFT project with Juicebox is an especially effective way to leverage the protocol, providing massive benefits to both owners and their communities. In this article we’ll cover why, and in a follow-up article, we’ll cover how.

In this article:

  1. Basics of the Juicebox protocol.
  2. Why Juicebox NFT projects are better.
  3. What does it cost?

1. Basics of Juicebox

Juicebox allows people and communities to crowdfund their project and give their contributors a stake as community tokens (ERC20) in return. Once funds have been raised, the protocol can be leveraged to automate payments from the treasury in a controlled, transparent and decentralized fashion.

2. Why Juicebox NFT projects are better

Juicebox NFT projects are a win-win for both communities and owners. There are countless ways you can configure your Juicebox project for your specific goals, but here’s a general strategy we recommend for NFT projects:

Instead of sending your NFT royalty fees directly to the owner’s wallet, you can send them to a shared treasury owned by your community. Upon buying an NFT (and paying the royalty fee), the new owners of your NFT’s would automatically receive an amount of your community tokens proportional to their purchase amount. The more someone pays for an NFT, the more tokens they receive. This gives your community members a formal and quantifiable stake in the shared treasury - your project as a whole. Your community could also contribute and gain stake in your project by just buying tokens, not necessarily having to own an NFT.

For communities

Token value

You can use these tokens for anything you want, perhaps governance, raffles or exclusive access to future drops. But a unique feature of Juicebox is that it allows the option for these tokens to be redeemed by community members for a portion of your project’s treasury. As the pie grows over time, a contributor’s tokens will be worth more. Your community can gain on top of just the increase in value of their NFT’s.

Having a shared treasury is optional, however, and you could instead just have all royalty fees sent to the Juicebox project route straight to the creators. In this case, the token your community receives could not be redeemed for any ETH.

Your community can gain on top of just the increase in value of their NFT’s.

Trust and transparency

Firstly, a properly configured Juicebox project makes rug-pulls impossible. You can give your community time to react before any changes to your funding and spending parameters take effect.

Additionally, your Juicebox page shows exactly how all your funds are flowing - how much and where it’s coming from, and where those funds are subsequently being spent. The only way funds can leave the treasury is by configuring and scheduling a payment, for which your community will always have time to react to.

Spending (left) and income (right) shown on a project’s Juicebox page

You may be asking, “Ok I see the benefit for my community, but what’s in it for the owner?"

For owners

Maintain a high stake in your project using the Reserved Rate.

If you choose the option of your token holders being able to redeem from a shared treasury, we should mention that as an owner you can control exactly how much stake you maintain of this treasury over time. The reserved rate allows you to keep a portion of all newly minted tokens. A 50% reserved rate means you will maintain a 50% ownership of treasury no matter how big your project gets.

This is mostly irrelevant if you don’t want a shared treasury and to simply route all funds into the project straight to creators.

Allow for people to contribute to your project without buying an NFT and, therefore, raise more funds.

This model opens up a massive and mostly untapped market of people interested in investing in an NFT project without necessarily buying an NFT. Whether it be too high of a floor price, not wanting to go through the whole selection/auction/listing process, or anything else, Juicebox opens the door of your project to these people through community tokens.

Consider if the projects like the Bored Apes had followed this model - how much more funds could the creators have raised as a result of people buying some stake worth less than the purchase price of a Bored Ape?

How much more funds could the [Bored Apes] creators have raised as a result of people buying some stake worth less than the purchase price of a Bored Ape?

Automate payments to key members of your team.

If you’re going for the shared treasury approach, Juicebox allows you to pre-program specific distribution amounts from your treasury to any ETH address, e.g. pay vitalik.eth US$1000 every week. This saves the hassle of manually transferring funds to your team from your personal or shared multisig wallet.

Otherwise, as mentioned prior, you can simply route all funds from the project to creators and their teams.

3. What does it cost?

Up front, all Juicebox costs is gas. As of the 23th of May, it’s about US$150-200 worth of gas to launch your project, deploy your own ERC20 token and a payable ETH address for you to link your royalty fees to. Then, for any funds you end up withdrawing from your project’s treasury, you’ll pay a 2.5% fee to Juicebox. But, for this 2.5% cut of your payout distributions, you’ll receive Juicebox’s native token (JBX) in return at its current issue rate. Moreover, your fee will give you a growing stake of Juicebox’s expanding ecosystem and treasury.

Conclusion

If this has already been enough information for one reading, feel free to tap out now. But if we’ve piqued your interest at all, you may want to read on about exactly how you’d setup your Juicebox NFT project here (https://docs.google.com/document/d/1Xqj5AyG8pZcpdtbxYfOzqwIaMNyrhQZPfVhfsUpYw1M/edit). Alternatively, come hangout in our Discord and arrange an onboarding call if you’re interested in learning more. Happy Juicing!!

Disclaimer: This is not financial or legal advice. As always, speak with an expert and do your own research.