跳到主要内容

17 篇博文 含有标签「guide」

查看所有标签

· 9 分钟阅读
Brileigh
Matthew

GoFundMe vs Juicebox

Fundraising plays a crucial role for non-profit organizations and charities, serving as a lifeline for their operations and initiatives. The money gained from crowdfunds helps these organizations to fulfill their mission, support their beneficiaries, and create a positive impact in the community. In today's digital age, leveraging online platforms and digital tools has become increasingly vital, as it allows non-profits and charities to extend their reach to a broader audience and engage supporters globally in order to amplify their impact towards their cause.

GoFundMe is one of the most recognized platforms for non-profits, charities, and other causes, while Juicebox has emerged as a new crowdfunding tool dominating the crypto space. In this article we’ll cover the differences between GoFundMe and Juicebox in terms of fees, funding model, rewards, global scale, payout time and customization.

提示

Looking to compare Juicebox to other crowdfunding platforms like Kickstarter or Indiegogo? You can watch this video on the JBDAO YouTube covering both, or read the individual Kickstarter comparison article or Indiegogo comparison article on the Juicebox blog.
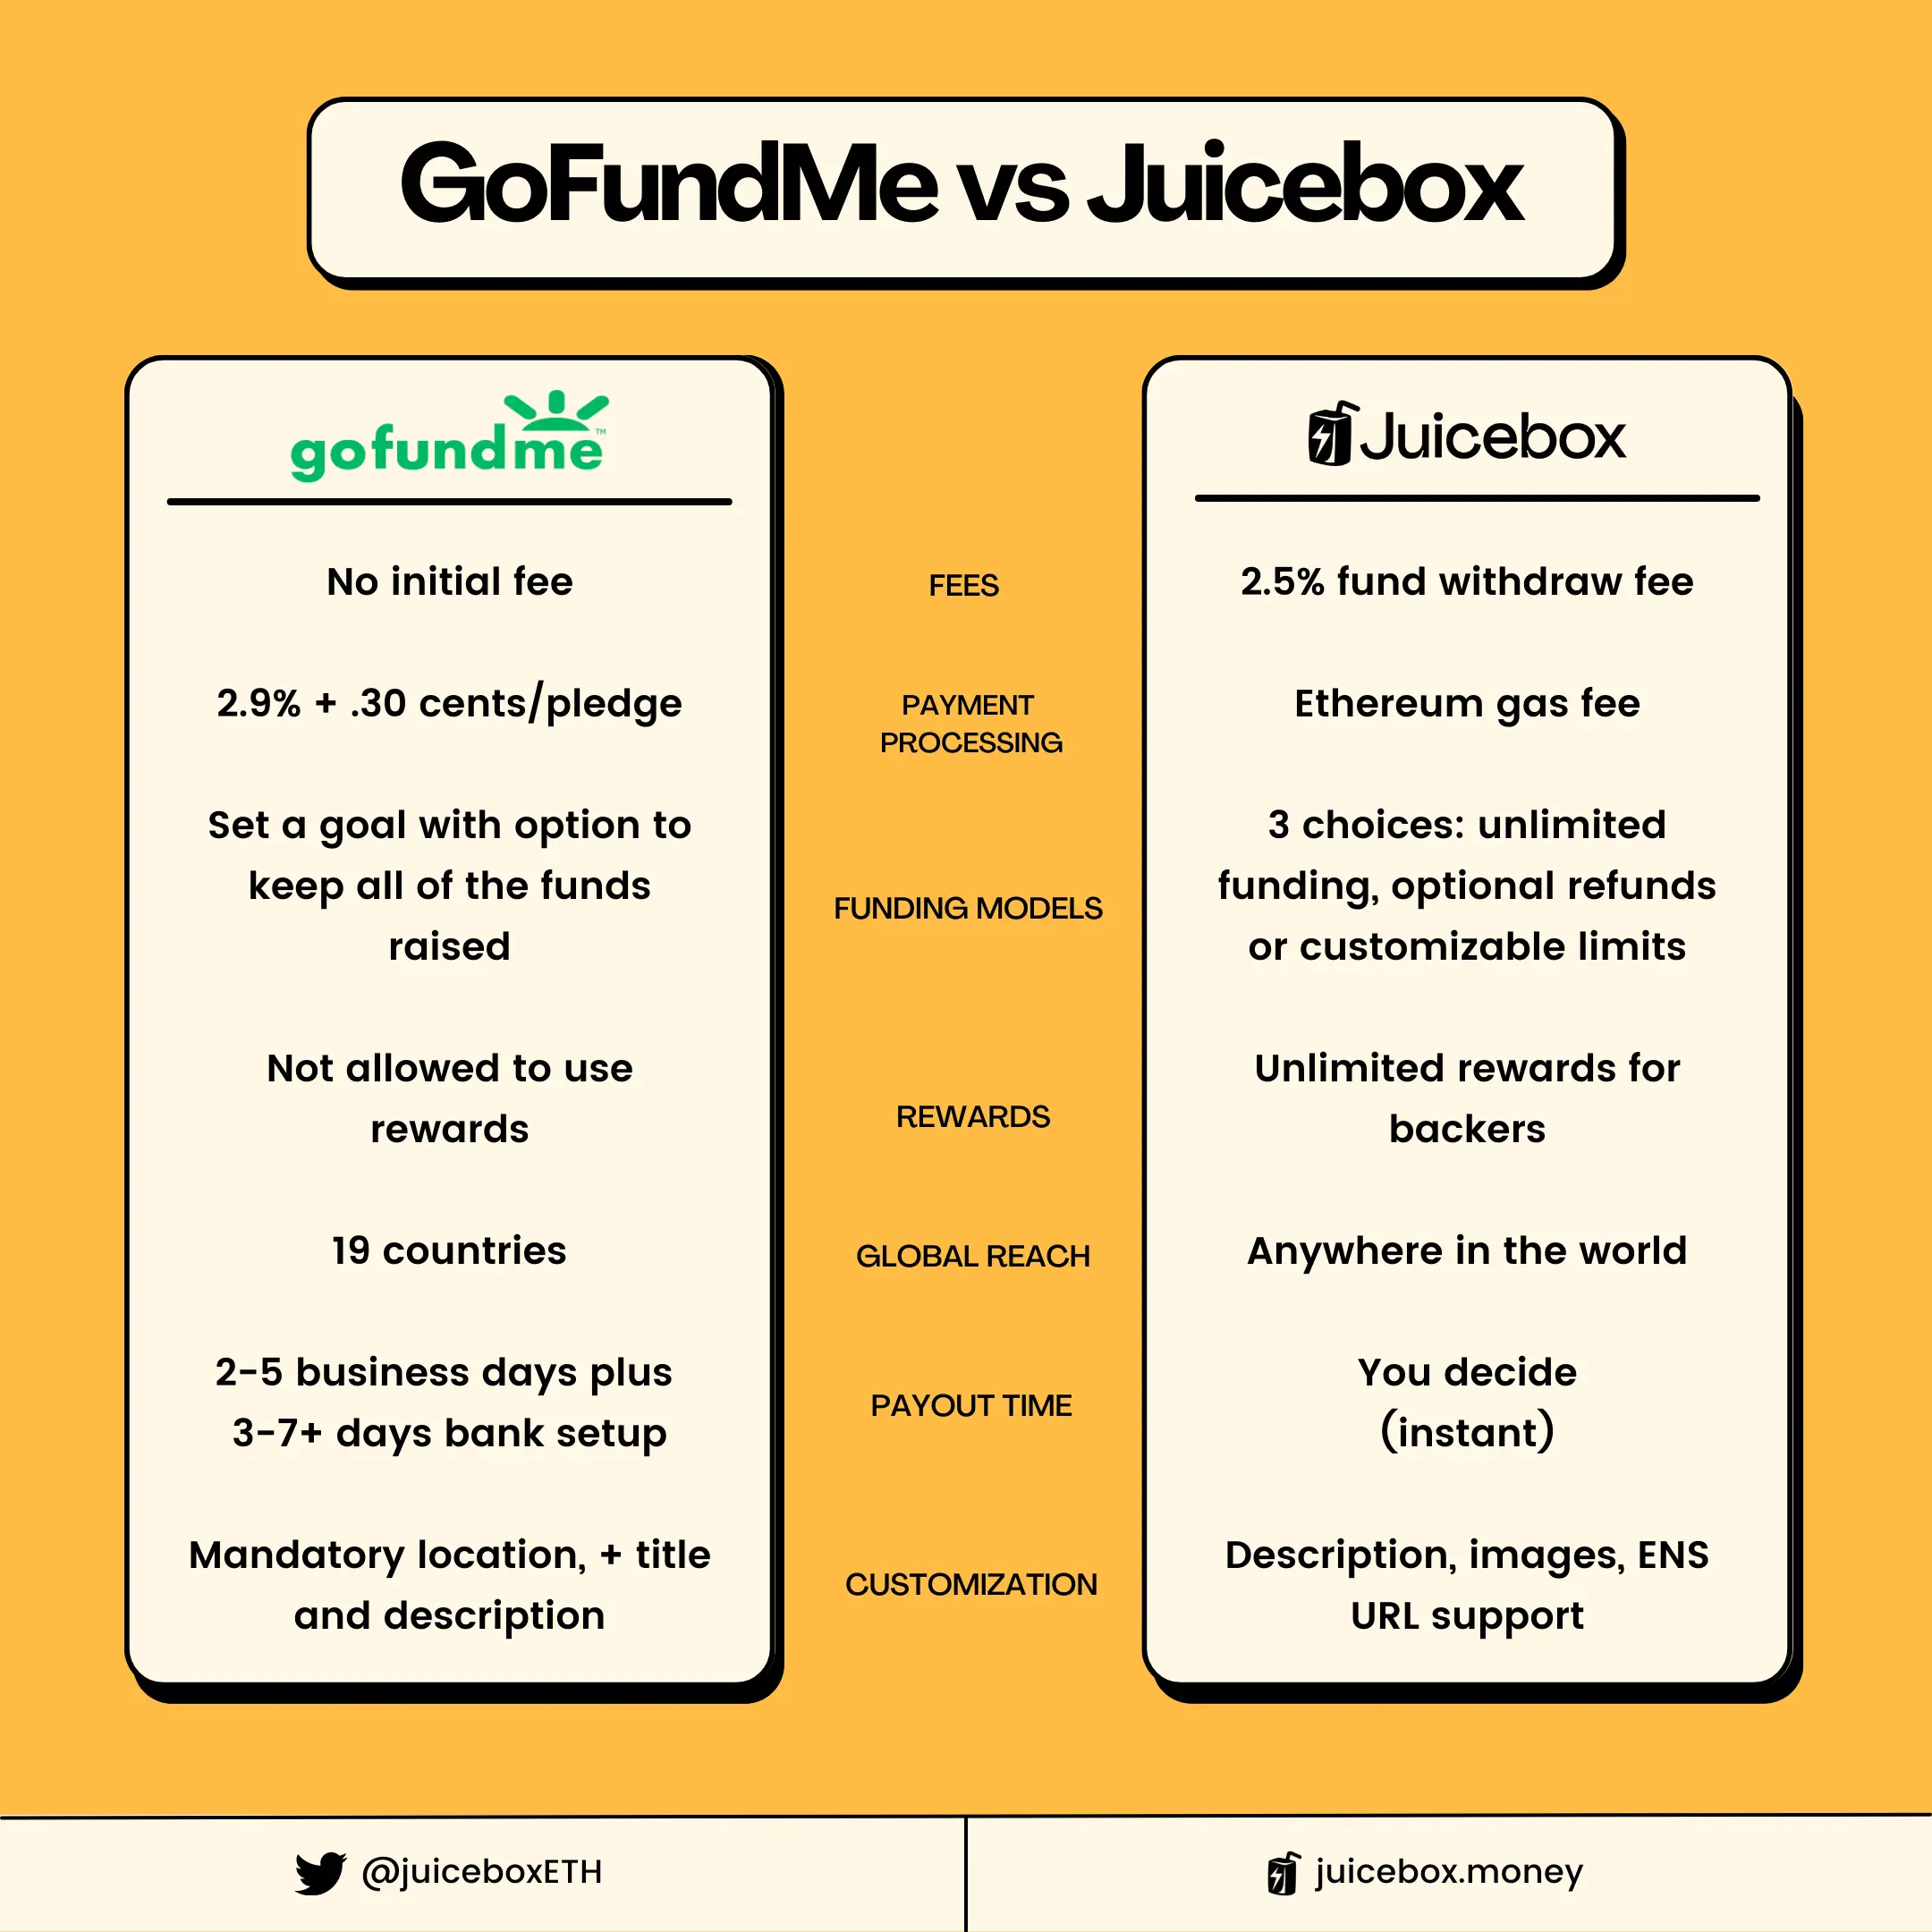
GoFundMe vs Juicebox Chart

Platform Fees

fees.webp

Fundraisers on GoFundMe have no initial charge, but ask donors for an optional tip for using the platform. Campagins on Juicebox are free to launch, but charge a withdrawal fee of 2.5% whenever funds are distributed from a project. It’s worth noting that while creating a project on juicebox.money is free, there are transaction fees from Ethereum that could cost $100 or more when launching a project. This will change down the road as Juicebox is expands to Layer-2 chains like Arbitrum and Polygon.

On the flipside, because Juicebox is community-owned, any fees paid will earn you $JBX tokens. These tokens grant you the power to actively participate in JuiceboxDAO governance, shaping the future of Juicebox. In other words, the community that uses Juicebox also owns Juicebox!
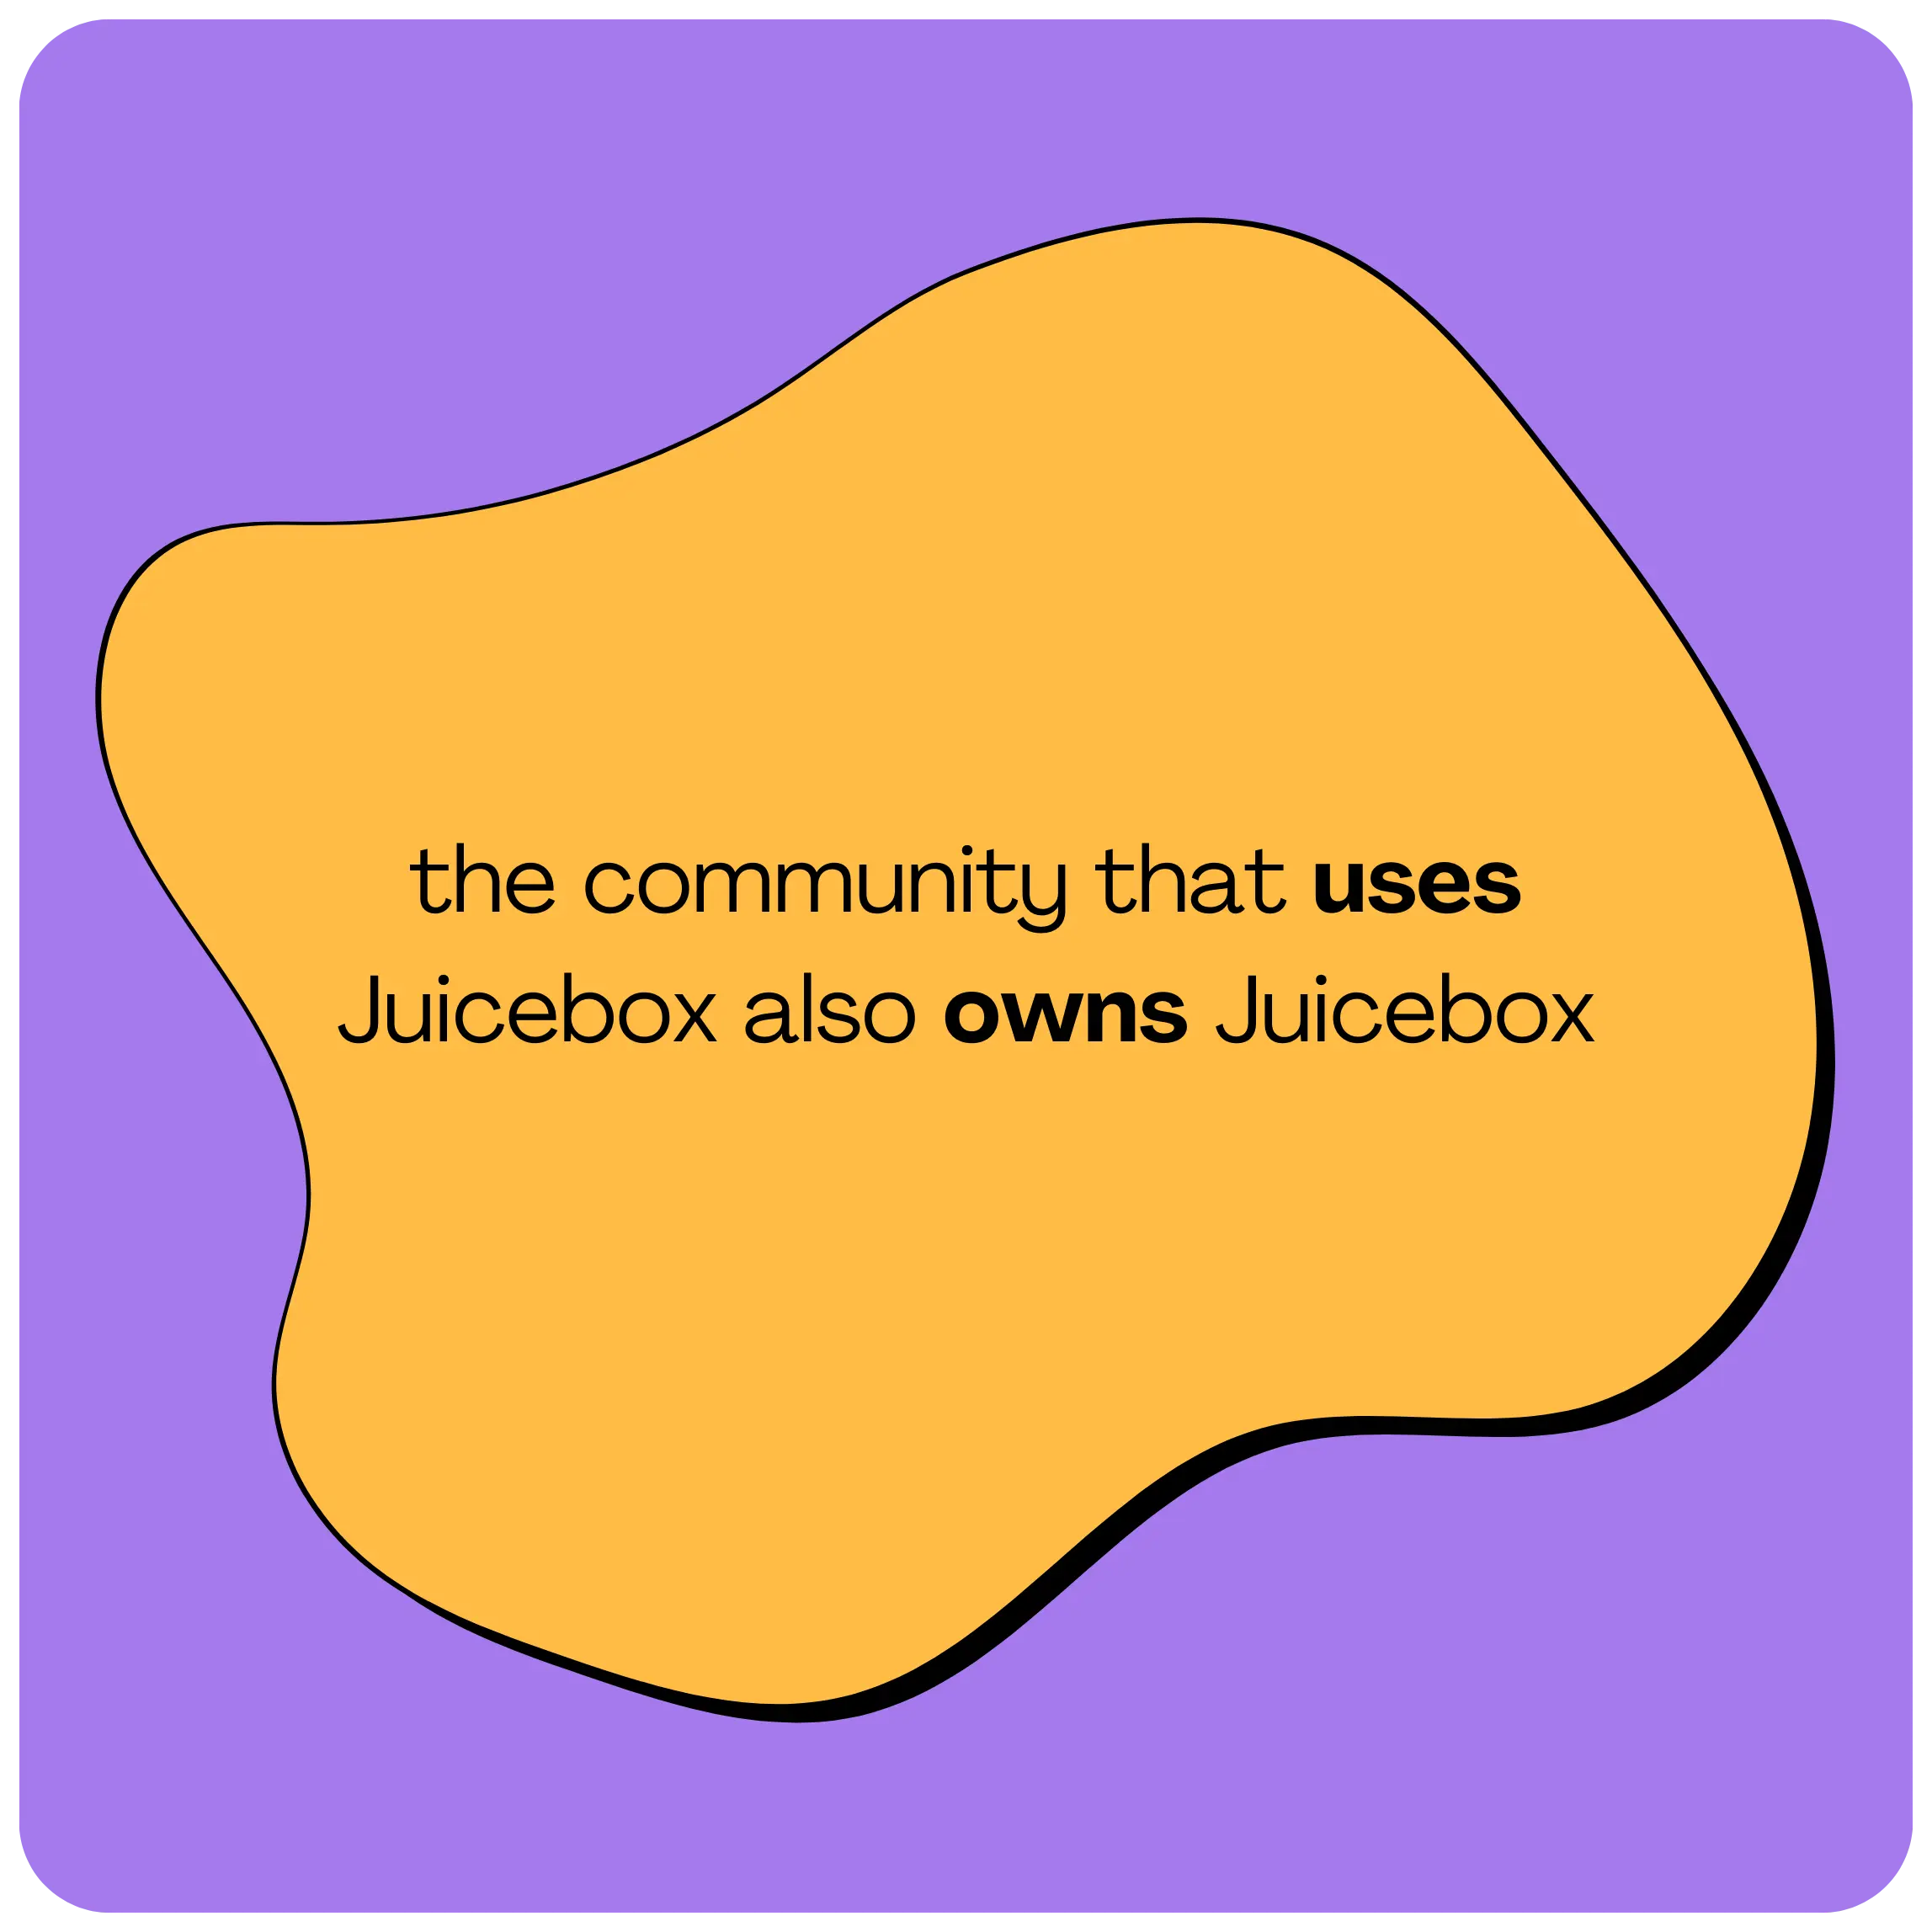
Juicebox is community owned

Payment Processing Fees

Although launching a campaign is free on GoFundMe, all payments have a transaction fee of 2.9% + $0.30 per pledge. In contrast, Juicebox does not take a cut of any payments that are made to your project, but again, because the protocol is built on Ethereum, supporters will be responsible for paying a gas fee when contributing to your project. These gas fees could amount to $20 or more, depending on network congestion. It's important to note that these Ethereum network fees do not benefit Juicebox in any way but are associated with the network itself.

Funding Models

funding models

All campaigns on GoFundMe allow project creators to set a goal and keep the funds the raise regardless if they meet their goal or not. Both GoFundMe and Juicebox offer indefinite campaign lengths, but Juicebox offers three different models for how you can manage funds, with the flexibility to pause payments, or offer refunds if needed.

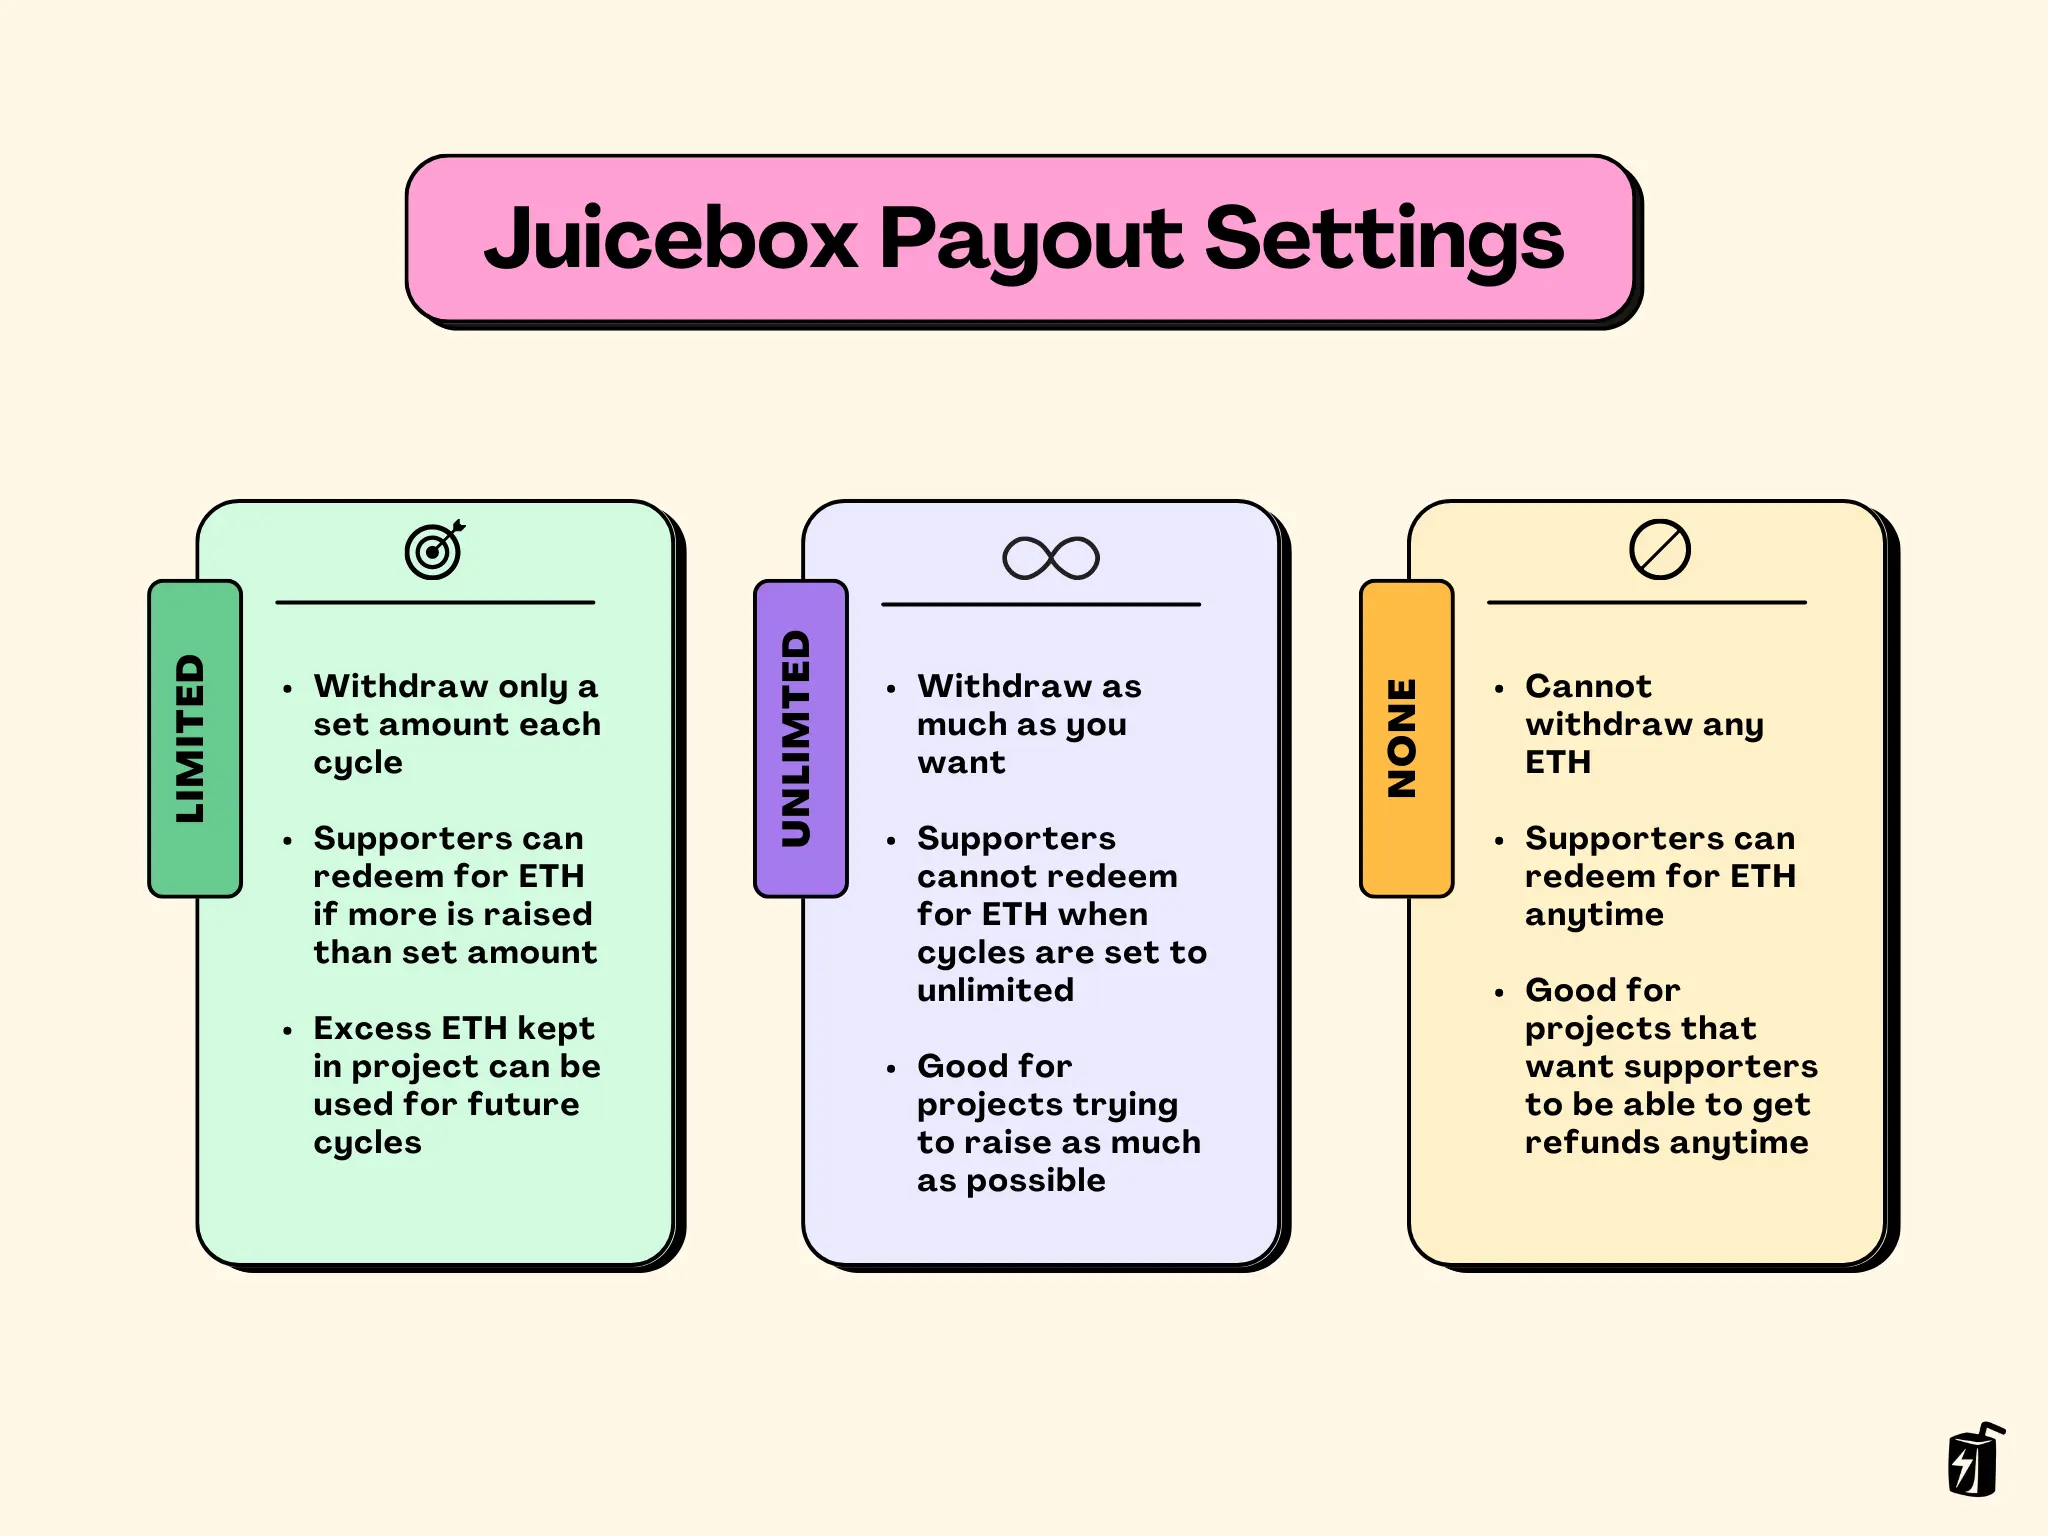
With Juicebox, you have the power to lock project settings for a timeframe of your choosing, known as a cycle. Whether it's 3 days, 2 weeks, or even a month, you have the freedom to decide how long all of your settings stay in place for while choosing between three different funding models:

1. Limited Payouts

This option allows you to withdraw only a predetermined amount each cycle. It provides backers with a 100% guarantee that you cannot withdraw more than the fixed limit. Imagine setting up a Limited Payout of 2 ETH and raising 3 ETH during a cycle. In this scenario, you can withdraw only 2 ETH, while the remaining 1 ETH can be redeemed by backers by burning their tokens for ETH. If unclaimed, the surplus ETH stays within the project, and can be used towards future cycles. Limited Payouts serve as an anti-scam mechanism, offering transparency and trust to your backers. It's an ideal choice for campaigns that thrive on growing alongside their supporters, with the flexibility to set new goals as milestones are achieved.

2. Unlimited Payouts

With this option, you can withdraw as much ETH as you raise, without any fixed limits during the cycle. Backers, however, cannot claim refunds during that particular cycle. Refunds can be enabled by switching payouts to "None" in a future Cycle giving backers the option to redeem their tokens for refunds. Unlimited Payouts are perfect for fundraisers seeking to maximize their funding potential, although it's essential to consider potential risks associated with this approach.

3. None

In this scenario, none of the project's ETH can be withdrawn by the project owner during that cycle. All ETH remains within the project, allowing backers the freedom to redeem their tokens for ETH and obtain refunds at any time. In future Cycles, you have the flexibility to change the Payouts setting as per your requirements. Setting Payouts to None is particularly useful for campaigns that prioritize giving backers the option to request refunds whenever they desire.
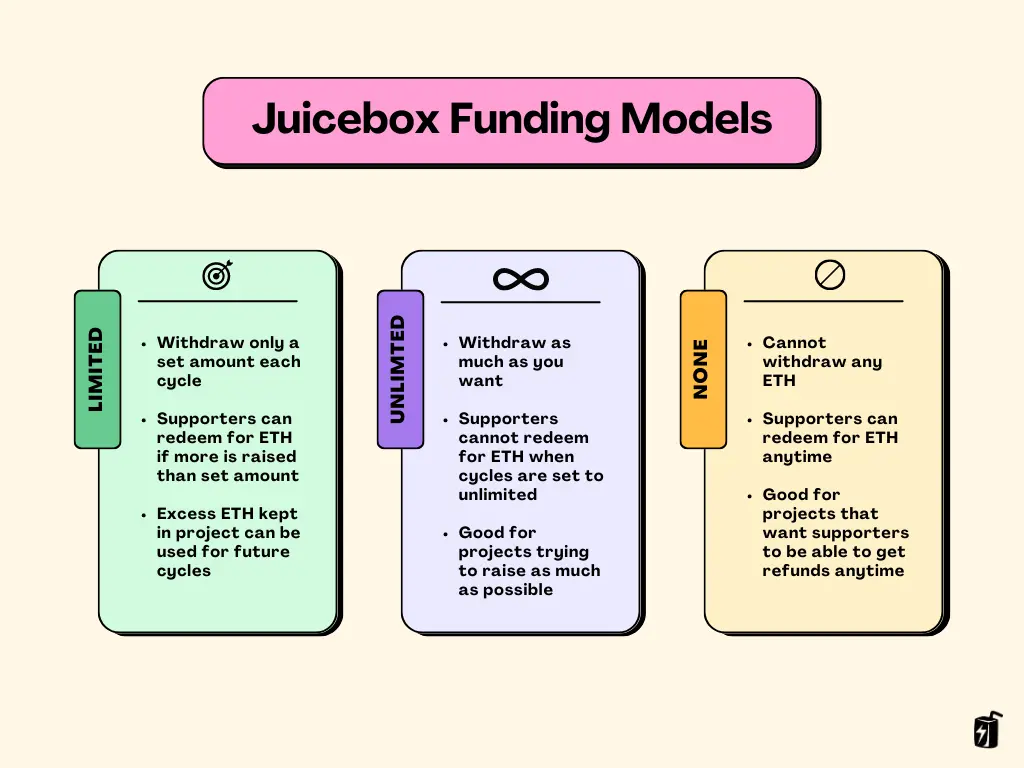
Juicebox funding models

Rewards

Rewards

Moving on, the next category we’ll look at is Rewards, so if backers meet a certain funding criteria they can receive perks. Crowdfunding campaigns that use rewards often have a higher success rate than those without because they create incentives for a variety of backers to support your project at different price points.

GoFundMe does not allow any use of rewards for donors on its platform.

On Juicebox, you can offer as many reward tiers as you’d like using NFTs. These NFT rewards can be listed at any price and can be represented by an image, GIF, or video. You can choose to set a limited or unlimited supply for each tier, so for example you can make higher tiers more exclusive with only 10 available vs. more accessible lower tiers with up to 100 available. Supporters can contribute as many times as they’d like, with no contribution limit, and can receive multiple rewards if they choose.

Juicebox banner

Juicebox also offers advanced tokenomics features, enabling the allocation of tokens to team members and offering incentives to early supporters, fostering long-term engagement. For an in-depth understanding of Juicebox project tokenomics, be sure to explore the comprehensive tutorial provided in Part 1 and Part 2.

Global Reach

global reach

The next category we’ll talk about is global reach. While GoFundMe is limited to just 19 countries, primarily in North America and Europe, Juicebox is fully permissionless, you can launch a project from anywhere worldwide, attracting backers from across the globe. Whether you're an individual, a non-profit organization, a company, or a decentralized autonomous organization (DAO), Juicebox welcomes everyone with open arms.

As long as you have an internet connection, you can use juicebox.money.

Payout time

payout time

Payout time is a critical part of campaigns for charities, especially those seeking funds for medical expenses. GoFundMe withdrawals take on average 2-5 business days for the funds to safely be deposited into the bank account on file. It’s worth noting that you must first connect the bank account of choice before being able to receive funds which could take 3-7 business days or longer to complete.

Juicebox, on the other hand, offers you complete control over payout timing. You can send payouts from your project at any point during the cycle you set, as long as they fall within the pre-defined limit. For example, if you had a project with a 14-day cycles and Limited Payouts of 10 ETH, you could make a single withdrawal or multiple smaller transactions anytime, up to the total limit of 10 ETH. If you opt for Unlimited Payouts, there are no limits to when you can withdraw funds during the Cycle.

Customization

Lastly, let's explore customization options for your campaign.

customization

Campaigns on GoFundMe mandate the location of the bank, a project title up to 35 characters, and offer a custom description and cover image to personalize your project.

Juicebox provides a range of options to personalize your project. You can set a display picture, a banner image, and craft a description that captures the essence of your initiative. Additionally, you can customize your project URL with an Ethereum Name Service (ENS) handle, adding a unique touch to your campaign.

Project pages on Juicebox are going to get even juicier because the Peel frontend team has an exciting update in store. Stay tuned for a brand new project page design, featuring new features like image integration, text with markdown formatting, and the ability to post updates as your project progresses within the next month.

Conclusion - What Makes Juicebox Different

Juicebox sets itself apart from GoFundMe for its full flexibility, giving project creators full control over how funs can be raised, when they can be dispersed as well as having an unlimited global reach and optional incentives for donors using rewards. Moreover, accepting payments in ETH on Juicebox provides exposure to a new audience and the potential for increased value if the price of ETH rises. However, it's important to note that ETH is a volatile asset, and it's crucial to conduct thorough research and understand the associated risks of cryptocurrencies.

If you’re not sure which way to go for your next campaign, you should consider launching your campaign on Juicebox in addition to GoFundMe. By launching your project on GoFundMe and supplementing it with crypto crowdfunding on Juicebox, you can leverage the benefits of both worlds. Need help setting up your campaign or have a question? Book a one-on-one onboarding call today.

Resources

If you have any questions about using Juicebox, come join the discord at discord.gg/juicebox or book an onboarding session at juicebox.money/contact.

🐦 Follow Juicebox on Twitter: @JuiceboxETH
🚀 Trending projects on Juicebox

📚 Project Creator Docs

📹 YouTube Tutorials

🎙️ The Juicecast

· 10 分钟阅读
Brileigh
Matthew

Indiegogo vs Juicebox

When it comes to crowdfunding, new tools to fundraise pop up every year. Indiegogo is one of the more recognized tools for creators and entrepreneurs, but did you know that Juicebox is one of the leading crypto crowdfunding tools, raising over 50,000 ETH in volume?

In this article, we’ll cover the main differences between crypto crowdfunding on Juicebox and Indiegogo as a traditional fundrasing platform. We’re going to look at the advantages and disadvantages in terms of fees, funding models, rewards, global reach, payout time, and customization. And even though we’re comparing Juicebox to Indiegogo, it’s not one or the other: the best option for most campaigns is to also launch on Juicebox so that you can accept payments in ETH.

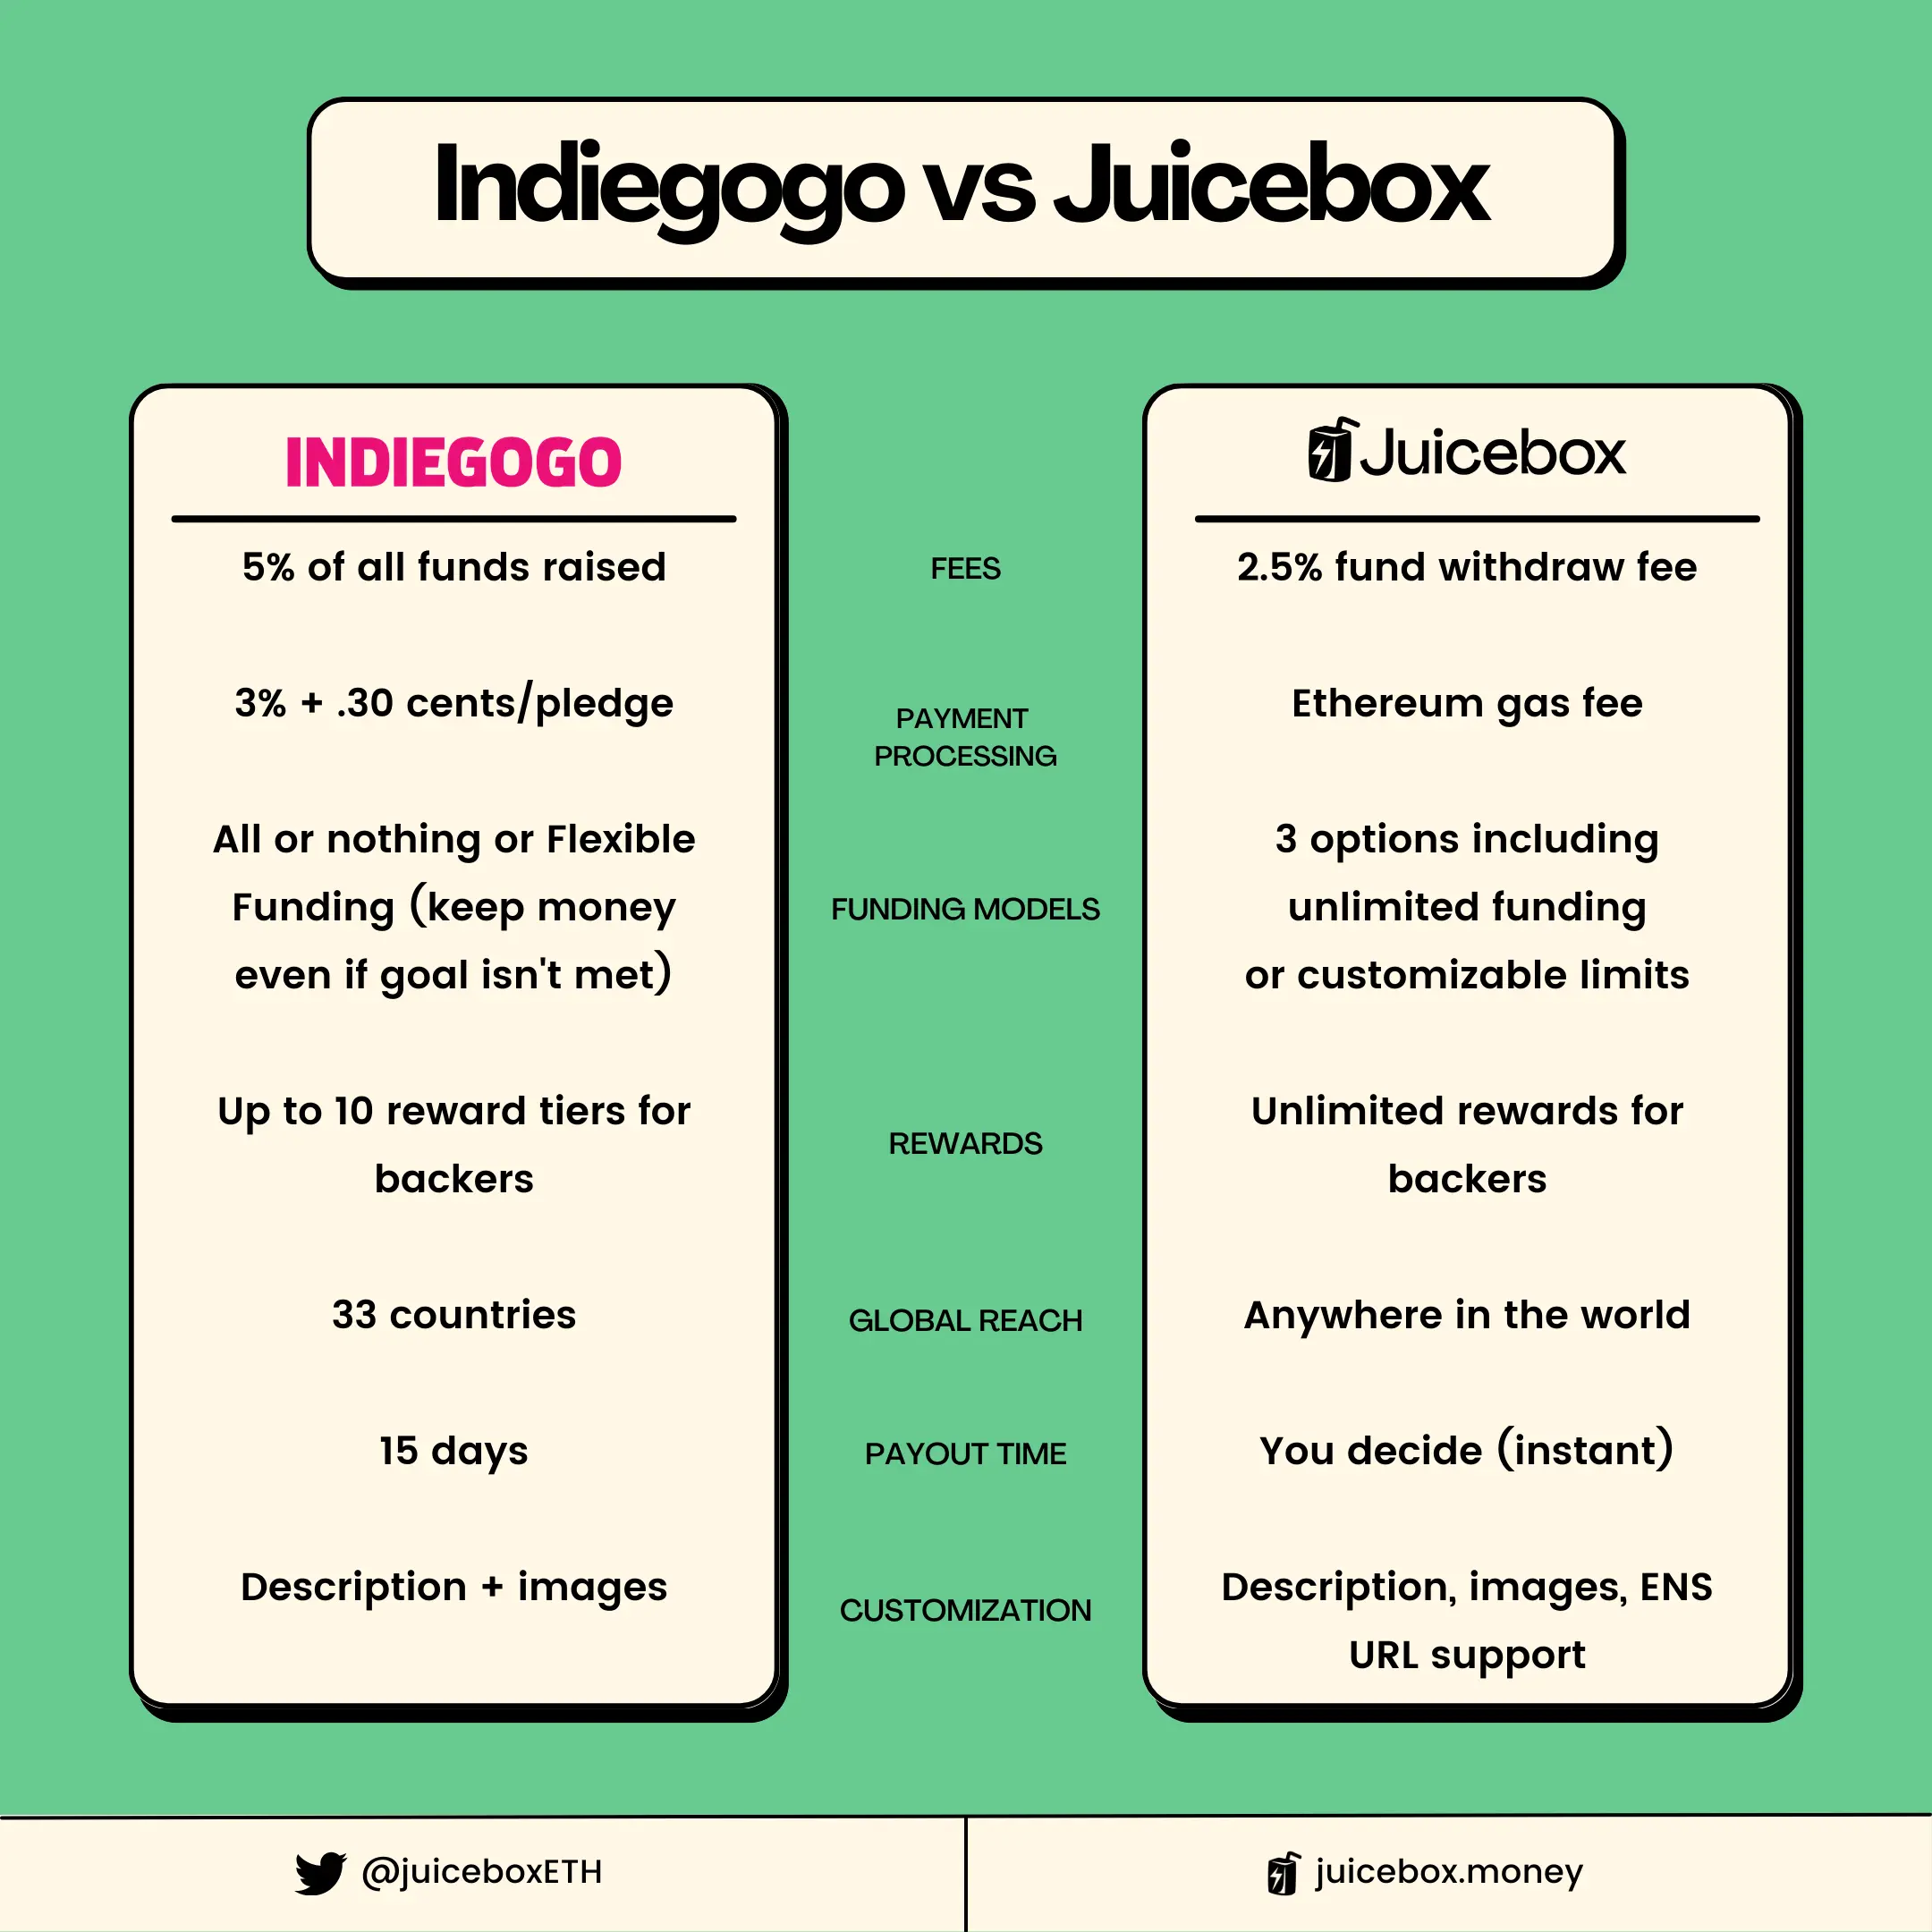
Indiegogo vs Juicebox comparison

You can follow along in this blog post, or check out this video on the JBDAO YouTube which covers the differences between Kickstarter vs Indiegogo vs Juicbeox.

提示

Looking to compare Juicebox to GoFundMe? You can read this article on the Juicebox blog to learn the differences.

Platform Fees

Fees

So, let’s start with platform fees. It’s free to start a campaign but Indiegogo charges a platform fee of 5% of all funds raised. And if you launch a campaign using Indiegogo’s InDemand program after launching your project elsewhere, like Kickstarter, they also charge an 8% fee of all funds raised.

Juicebox works differently and charges a 2.5% fee anytime funds are withdrawn from a project. And although creating a project on juicebox.money is free, you should keep in mind that Juicebox runs on Ethereum mainnet so there are transaction fees that could cost $100 or more when launching a project. This will change down the road as Juicebox is made available on Layer-2 chains like Arbitrum and Polygon.

Because Juicebox is community-owned, you’ll receive $JBX tokens in return for any fees paid which will allow you to get involved with JuiceboxDAO governance and help make decisions about Juicebox’s future. In other words, the community that uses Juicebox also owns Juicebox… which is something that traditional crowdfunding platforms lack.

Juicebox is community owned

Payment Processing Fees

Now on top of the platform fees, Indiegogo also charges processing fees for each payment that comes in. For Indiegogo, processing fees are 3% plus .30 cents per pledge. Keep in mind that these rates will vary from 3-5% depending on your country.

Again, Juicebox works a bit differently and doesn’t charge any processing fees for incoming payments. That said, since it is built on Ethereum, supporters will need to pay a transaction fee (also known as “gas”) when paying your project which could cost $20 or more depending on network congestion. To be clear, this is an Ethereum network fee and does not benefit Juicebox in any way.

Funding Models

Next, let’s talk about funding models.

Funding models

Indiegogo offers 2 options for campaigns; “all or nothing” and “flexible funding.” In all or nothing, a project sets a specific fundraising target and if it reaches that goal it gets to keep all of the money… however, if it doesn’t, then all of the money gets returned to backers. “Flexible funding” is the second option, which lets the project owner keep all the funds raised even if they don’t meet their goal.

With Juicebox, project settings are locked for a period of time that you decide: this is called a Cycle. This could be 3 days, 14 days, 1 month, whatever you set it to be. If you want your fundraiser to last 8 weeks, you could set your cycle to 8 weeks and decide on Payouts which are like your fundraising goal. Juicebox lets you set Payouts in three ways:

Option 1: Limited

The first option is Limited which lets you withdraw only a set amount each cycle. This gives a 100% guarantee to backers that you can’t withdraw more than that fixed limit. So if you set-up a Limited Payout of 2 ETH and you end up raising 3 ETH, you can only withdraw 2 ETH for that cycle. The remaining 1 ETH could be redeemed by backers by burning their tokens for ETH, but if nobody redeems then the surplus ETH will stay in the project and can be used for future cycles. You can think of Limited Payouts as an anti-scam mechanism for backers because the project owner can’t just disappear with all of the funds: you know how much they can withdraw each Cycle. Limited Payouts are a great option for campaigns that want to grow with their backers: you can set new goals as you reach new milestones, while giving your supporters full transparency along the way.

Option 2: Unlimited

The second option is Unlimited, which lets you withdraw as much ETH as you raise with no fixed limit. With Payouts set to Unlimited, backers cannot get money back during that cycle. This can be changed by setting Payouts to None in a future cycle which gives backers the option to get refunds by redeeming their tokens. Unlimited Payouts are a great option for fundraisers that don’t have a set goal and want to raise as much money as possible, but this can also present some risk to potential supporters.

Option 3: None

The last option is “None” which means that none of your project's ETH can be withdrawn in that cycle. All ETH will stay in your project which gives backers the freedom to redeem their tokens for ETH and get their money back at any time. This can be changed in a future cycle if you want to withdraw the funds. Setting Payouts to None is useful for campaigns that want to give backers the option to get a refund whenever they want.

Juicebox payout settings

Overview of Payout Settings on Juicebox

Unlike Indiegogo, projects on Juicebox can adapt over time so you can change your Payout limits and Cycles as the needs of the project evolve. For example, maybe your first cycle is 60 days long with a limit of 50 ETH for your initial fundraise to cover manufacturing costs, whereas your second cycle is 120 days long with a limit of 20 ETH to go towards marketing. Instead of being locked into a fixed campaign length of 60 days or less, you can fundraise long-term on Juicebox and edit your project settings over time. You can also put your project on Pause and stop accepting payments, if you need.

Rewards

Rewards

Moving on, the next category we’ll look at is Rewards, so if backers meet a certain funding criteria they can receive perks. Crowdfunding campaigns that use rewards often have a higher success rate than those without because they create incentives for a variety of backers to support your project at different price points.

Indiegogo’s rewards allow backers to contribute multiple times (up to $50,000 in a single transaction) to a project to receive multiple rewards. Projects on Indiegogo can only list up to 10 reward tiers.

On Juicebox, you can offer as many reward tiers as you’d like using NFTs. These NFT rewards can be listed at any price and can be represented by an image, GIF, or video. You can choose to set a limited or unlimited supply for each tier, so for example, you can make higher tiers more exclusive with only 10 available vs. more accessible lower tiers with up to 100 available. Supporters can contribute as many times as they’d like, with no contribution limit, and can receive multiple rewards if they choose.

Juicebox also offers advanced tokenomics features which allow you set aside tokens for members of your team and create incentives for backers to support your project early and stay engaged long-term. If you’d like to learn more about tokenomics for Juicebox projects, check out Part 1 and Part 2 of our tokenomics tutorial.

Global Reach

Global reach

The next category we’ll talk about is global reach. Indiegogo used to support 225 countries when they first launched but have since cut down to 33 countries.

On Juicebox, it doesn’t matter where you’re from, you can launch a project from anywhere in the world and backers from around the globe can support your project. Anyone can launch a campaign on Juicebox, whether they’re an individual, a non-profit, a company, a DAO, or any other organization.

As long as you have an internet connection, you can use juicebox.money.

Payout time

Payout time

The next category we’ll look at is payout time.

On Indiegogo, once you reach your crowdfunding target, you have to wait 15 days before you can receive the funds from Indiegogo.

On Juicebox, you can send payouts from your project anytime during the cycle, within the limits that you set when creating your project. For example, if your project has 14-day cycles and Limited Payouts of 10 ETH, then you can withdraw funds at any point in that 14-day cycle up to the limit of 10 ETH. You could do this all in one transaction or several smaller transactions along the way. And if you have Unlimited Payouts set instead, you can withdraw at any time during the cycle with no limit.

Customization

Customization

The last category that we’ll cover is customization.

Indiegogo lets you choose your project title, add a description, images, and videos from YouTube or Vimeo.

On Juicebox you can set a display picture, banner image, add a description, and customize your project URL with an ENS handle. Adding images and videos to your project description isn’t supported on juicebox.money but the frontend team at Peel is releasing a brand new project page within the next month. Stay tuned for a fresh new design and new features like the ability to add images, text with markdown formatting, and post updates as your project develops.

Conclusion - what makes Juicebox unique

What makes Juicebox stand out from traditional crowdfunding platforms is its flexibility when it comes to how you want to run your campaign. You can launch your project and get support from anywhere in the world, set new goals for your campaign as it grows, use tokens to build community & offer perks and incentives for supporters, and stand out in a marketplace that’s not oversaturated. Best of all, this all happens transparently and out in the open with clear rules in place: you can see how much money can be withdrawn, where funds go, who else has backed the project, and if project settings are changed for future cycles.

I think Indiegogo and Juicebox both have their pros and cons, so my advice is that you should combine traditional crowdfunding platforms like Indiegogo with crypto crowdfunding on Juicebox. This lets you get the best of both worlds while bringing your project to a new audience by accepting payments in ETH. And since you don’t have a 60-day deadline like on Indiegogo, funds kept in your Juicebox project may actually appreciate in value if the price of ETH increases. That said, always keep in mind that ETH is a volatile asset so please do your own research about the risks of cryptocurrencies.

Resources

If you have any questions about using Juicebox, come join the Discord or book an onboarding session at juicebox.money/contact.

🐦 Follow Juicebox on Twitter: @JuiceboxETH
🚀 Trending projects on Juicebox

📚 Project Creator Docs

📹 YouTube Tutorials

🎙️ The Juicecast

· 9 分钟阅读
Brileigh
Matthew

Kickstarter vs Juicebox

When it comes to launching a campaign, the choices for crowdfunding are abundant. Kickstarter is one of the most recognized traditional crowdfunding platforms, while Juicebox has recently emerged as a pivotal force when it comes to crypto fundraising. In this article, we’ll look at the advantages and disadvantages of both tools in terms of fees, funding models, rewards, global reach, payout time, and customization.

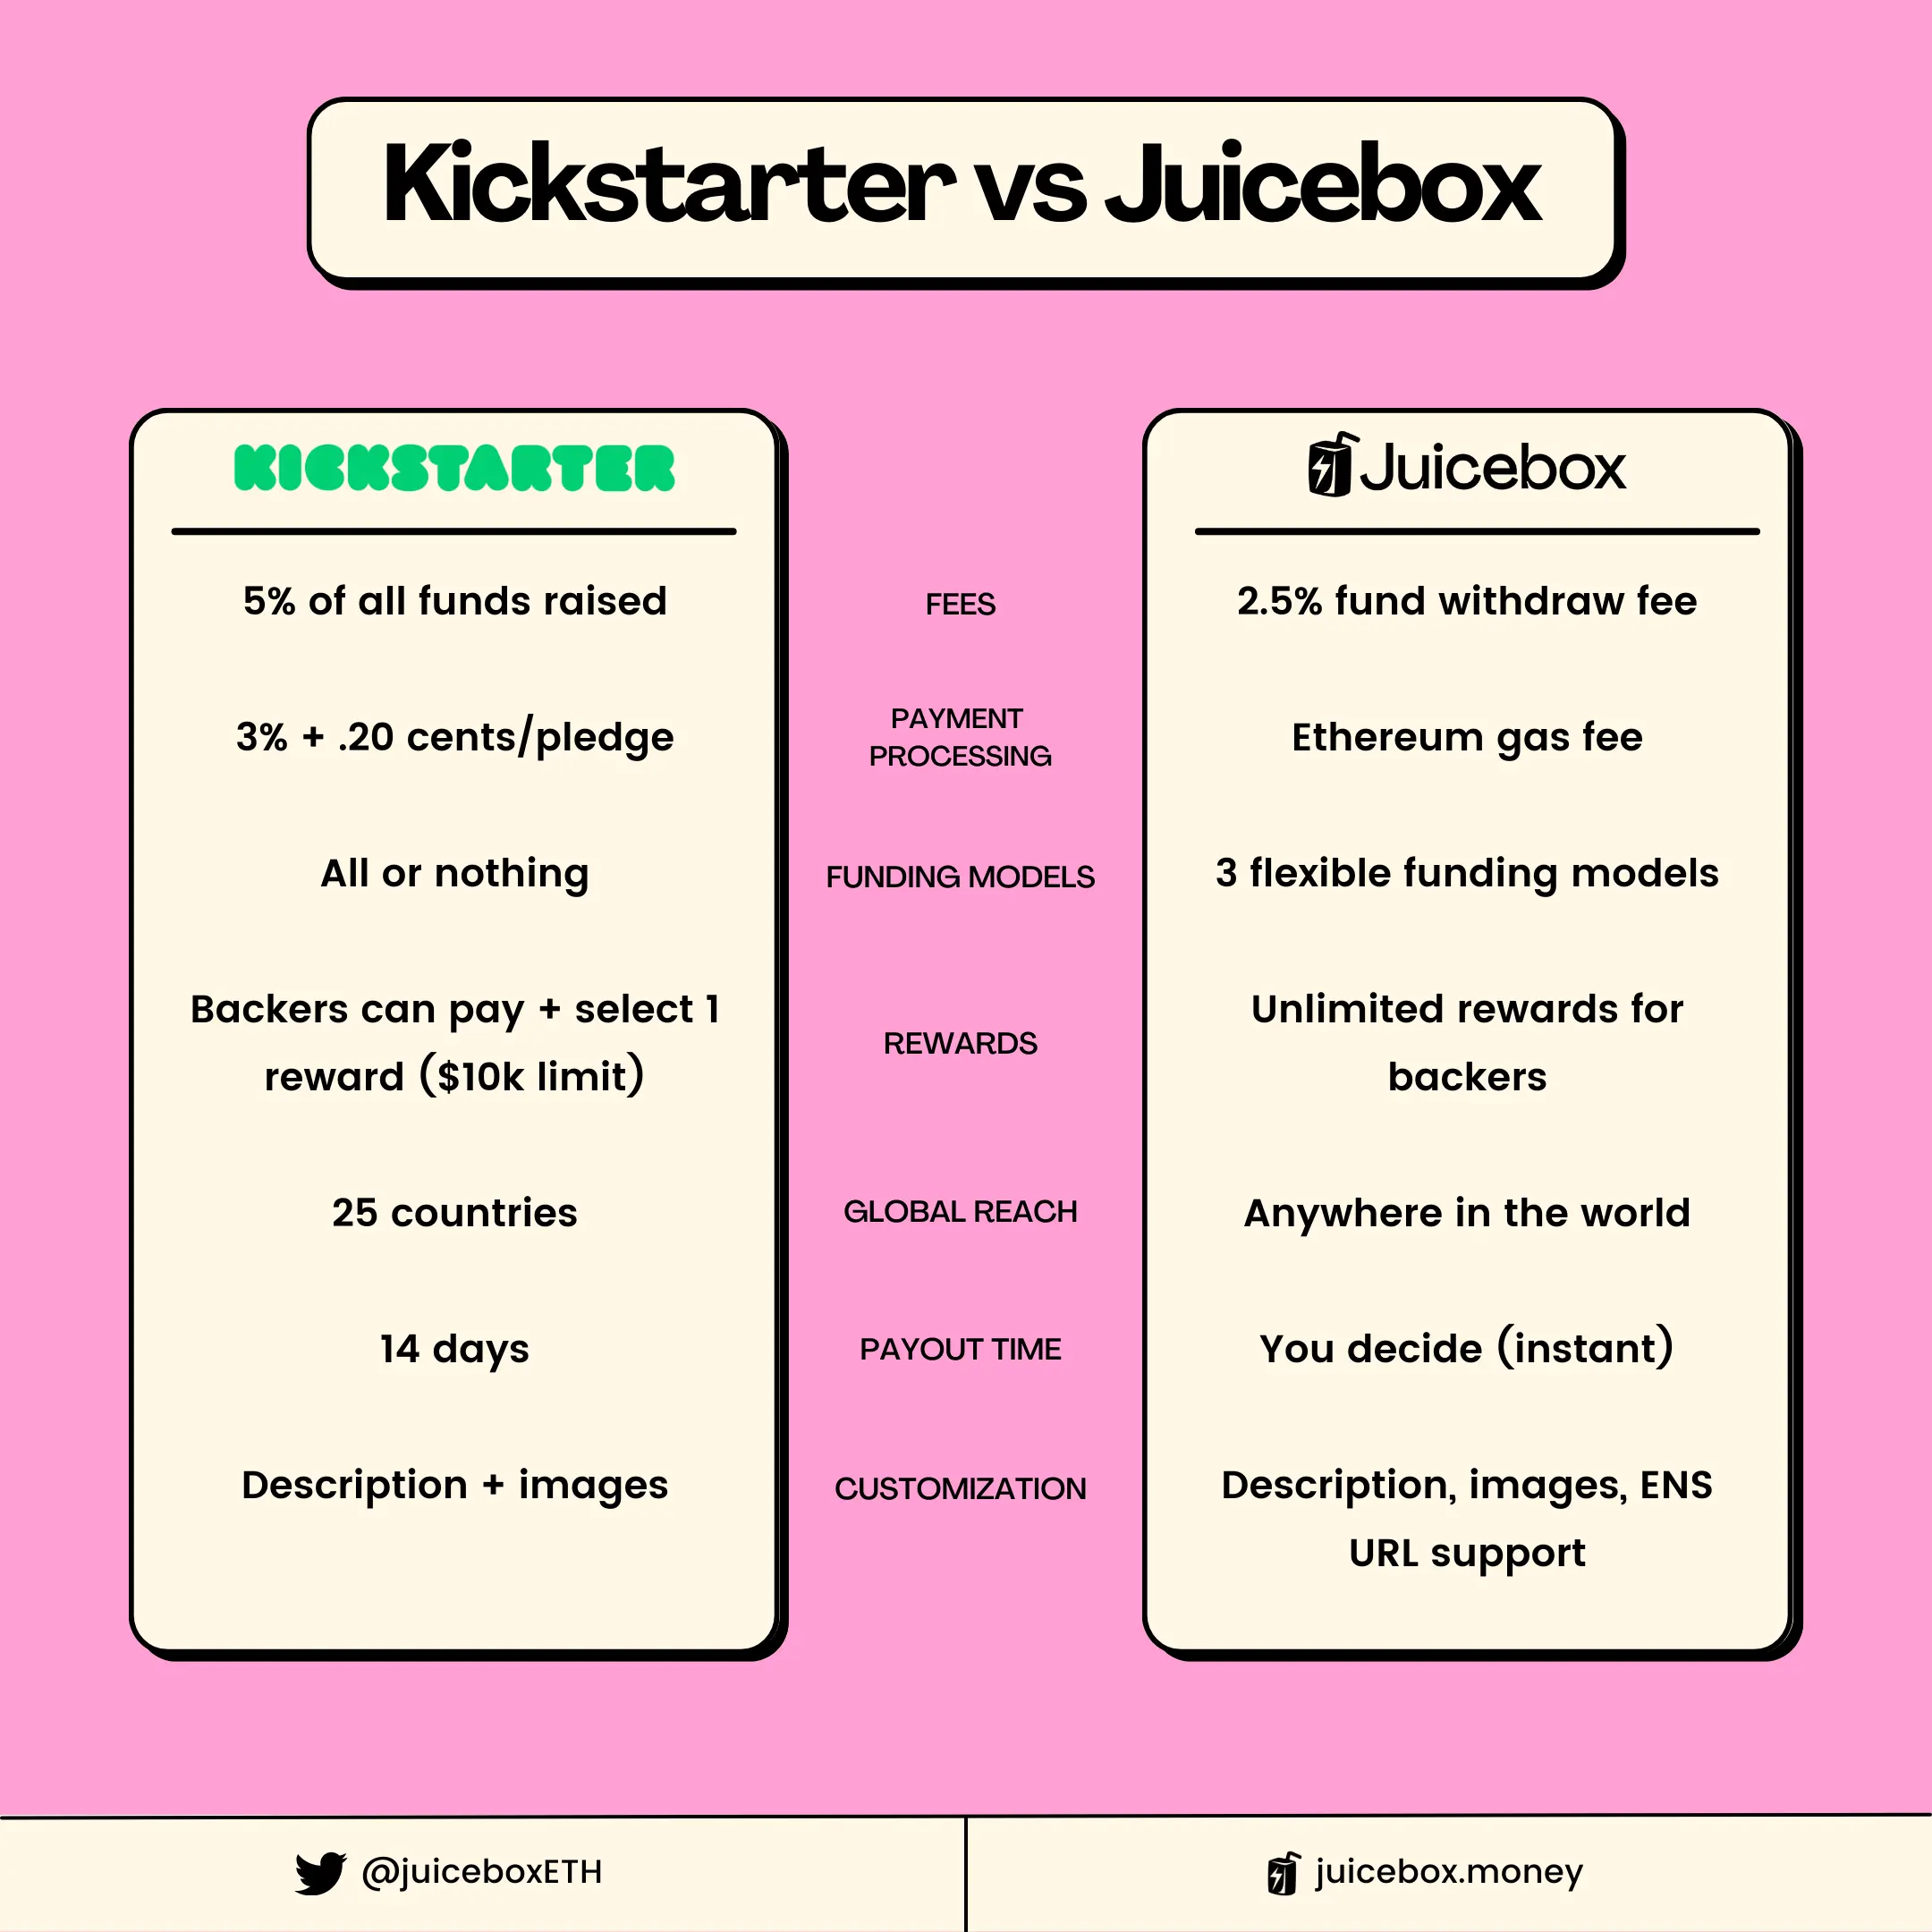
Kickstarter vs Juicebox chart

You can follow along in this blog post, or this video on the JBDAO YouTube which covers the differences between Kickstarter vs Indiegogo vs Juicbeox.

提示

Looking to compare Juicebox to GoFundMe? You can read this article on the Juicebox blog to learn the differences.

Platform Fees

Fees

When launching a campaign on Kickstarter, there’s no initial fee, but they do charge 5% of all funds raised. Juicebox on the other hand, charges a mere 2.5% fee whenever funds are withdrawn from a project. Keep in mind that while creating a project on juicebox.money is free, since Juicebox runs on Ethereum mainnet, there are transaction fees that could cost $100 or more when launching a project. This will change down the road as Juicebox is made available on Layer-2 chains like Arbitrum and Polygon.

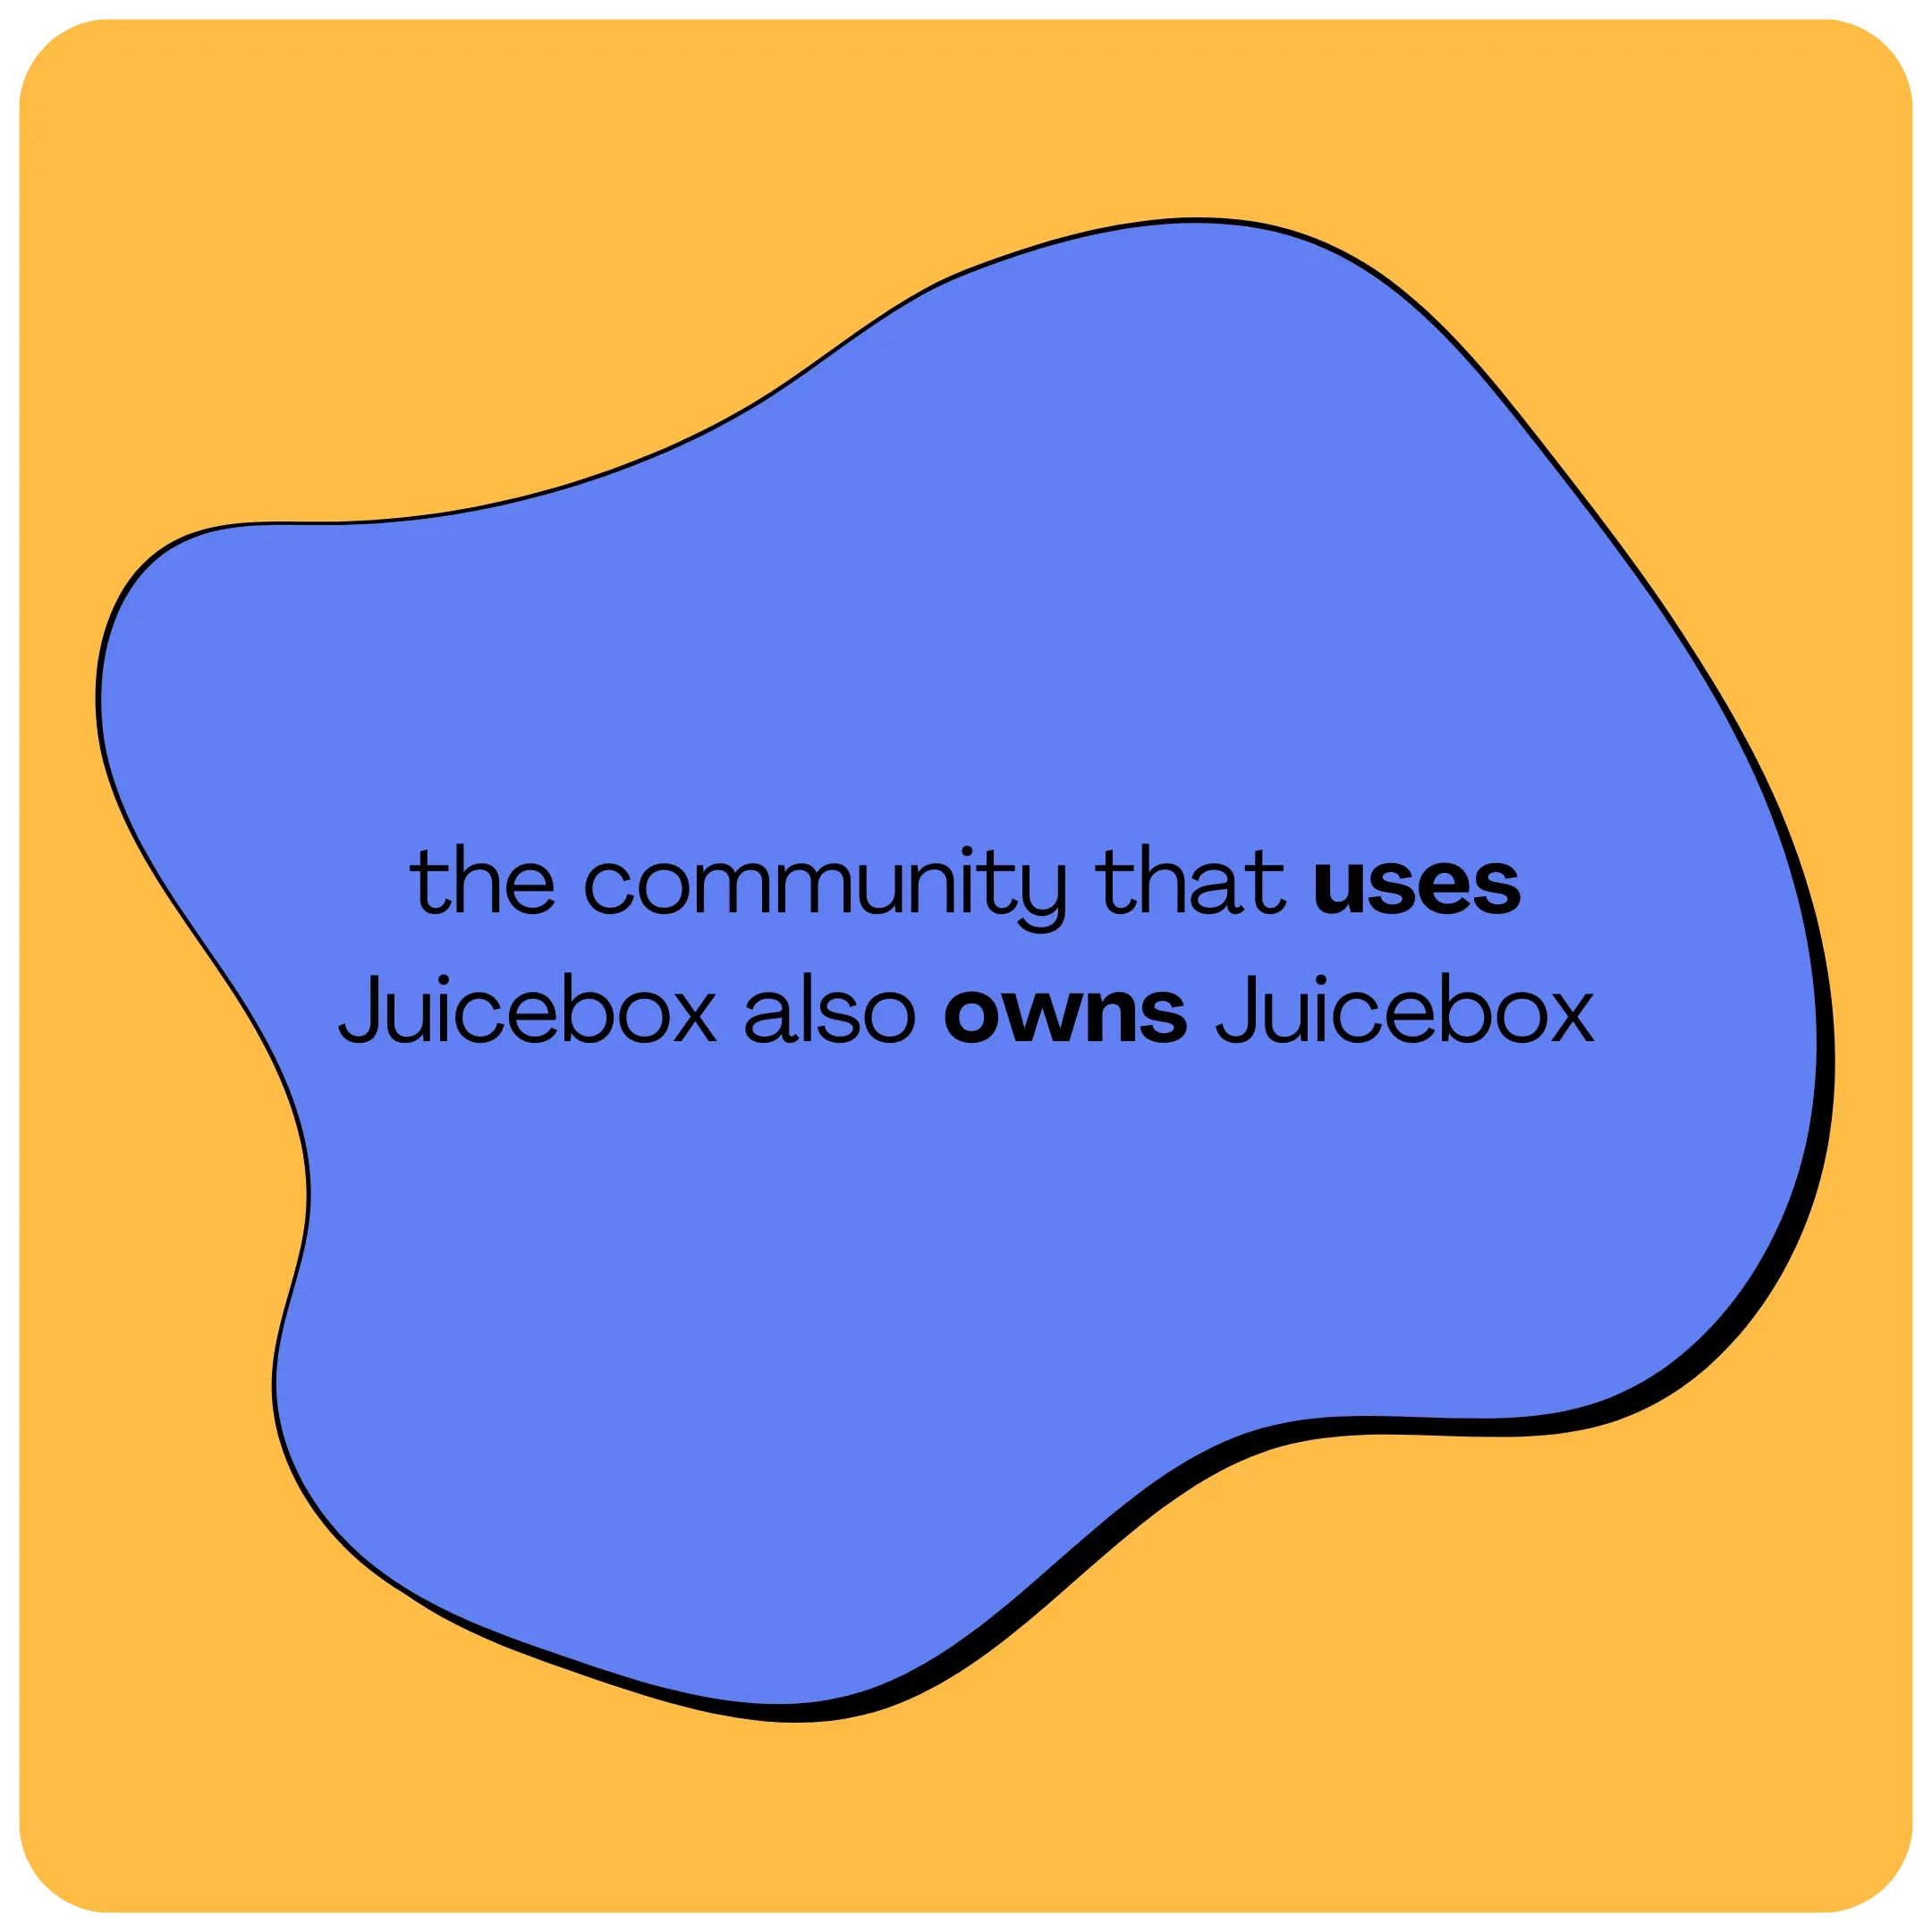
It’s worth noting that because Juicebox is community-owned, any fees paid will earn you $JBX tokens. These tokens grant you the power to actively participate in JuiceboxDAO governance, shaping the future of Juicebox. In other words, the community that uses Juicebox also owns Juicebox… which is pretty cool.

the community that uses Juicebox also owns Juicebox.webp

Payment Processing Fees

Now on top of the platform fees, Kickstarter also charges processing fees for each payment that comes in. For US-based projects, the fee stands at 3% plus $0.20 per pledge, which may vary from 3-5% depending on your country.

In contrast, Juicebox does not take a cut of any payments that are made to your project, but because the protocol is built on Ethereum, supporters will be responsible for paying a transaction fee, also known as gas, when contributing to your project. These gas fees could amount to $20 or more, depending on network congestion. It's important to note that these Ethereum network fees do not benefit Juicebox in any way but are associated with the network itself.

Funding Models

Funding models

Moving onto funding models, Kickstarter is infamous for its “all or nothing” approach where a project sets a specific fundraising target and if it reaches that goal it gets to keep all of the money… however, if it doesn’t, then all of the money gets returned to backers.

With Juicebox, you have the power to lock project settings for a timeframe of your choosing, known as a cycle. Whether it's 3 days, 14 days, or even a month, you have the freedom to decide how long all of your settings stay in place for while choosing between three different funding models:

1. Limited Payouts

This option allows you to withdraw only a predetermined amount each cycle. It provides backers with a 100% guarantee that you cannot withdraw more than the fixed limit. Imagine setting up a Limited Payout of 2 ETH and raising 3 ETH during a cycle. In this scenario, you can withdraw only 2 ETH, while the remaining 1 ETH can be redeemed by backers by burning their tokens for ETH. If unclaimed, the surplus ETH stays within the project, and can be used towards future cycles. Limited Payouts serve as an anti-scam mechanism, offering transparency and trust to your backers. It's an ideal choice for campaigns that thrive on growing alongside their supporters, with the flexibility to set new goals as milestones are achieved.

2. Unlimited Payouts

With this option, you can withdraw as much ETH as you raise, without any fixed limits during the cycle. Backers, however, cannot claim refunds during that particular cycle. Refunds can be enabled by switching payouts to "None" in a future cycle giving backers the option to redeem their tokens for refunds. Unlimited Payouts are perfect for fundraisers seeking to maximize their funding potential, although it's essential to consider potential risks associated with this approach.

3. None

In this scenario, none of the project's ETH can be withdrawn by the project owner during that cycle. All ETH remains within the project, allowing backers the freedom to redeem their tokens for ETH and obtain refunds at any time. In future cycles, you have the flexibility to change the Payouts setting as per your requirements. Setting Payouts to None is particularly useful for campaigns that prioritize giving backers the option to request refunds whenever they desire.

Juicebox Payout Settings

Overview of Payout Settings on Juicebox

Unlike Kickstarter's rigid campaign duration, Juicebox enables projects to adapt over time. You can modify Payout limits and Cycles as your project evolves. For example: your first cycle could be 60-days long with a limit of 50 ETH for your initial fundraise to cover manufacturing costs, followed by a 120-day cycle with a limit of 20 ETH dedicated to marketing efforts. On Juicebox, you're not constrained by fixed campaign lengths, allowing you to fundraise on your terms. Moreover, you have the freedom to pause your project and stop accepting payments if needed.

Rewards

Rewards

Moving on, the next category we’ll look at is Rewards, so if backers meet a certain funding criteria they can receive perks. Crowdfunding campaigns that use rewards often have a higher success rate than those without because they create incentives for a variety of backers to support your project at different price points.

On Kickstarter you can offer as many pledge reward tiers as you want, but backers can only choose one reward per project. It’s also worth noting that all US-based projects have a limit of $10,000 in place for pledges, so you can’t offer rewards at higher price points than that and you can’t raise more than $10,000 from a single supporter.

On Juicebox, you can offer as many reward tiers as you’d like using NFTs. These NFT rewards can be listed at any price and can be represented by an image, GIF, or video. You can choose to set a limited or unlimited supply for each tier, so for example you can make higher tiers more exclusive with only 10 available vs. more accessible lower tiers with up to 100 available. Supporters can contribute as many times as they’d like, with no contribution limit, and can receive multiple rewards if they choose.

Juicebox banner

Juicebox also offers advanced tokenomics features, enabling the allocation of tokens to team members and offering incentives to early supporters, fostering long-term engagement. For an in-depth understanding of Juicebox project tokenomics, be sure to explore the comprehensive tutorial provided in Part 1 and Part 2.

Global Reach

Global reach

The next category we’ll talk about is global reach. While Kickstarter is limited to 25 countries, primarily in North America and Europe, Juicebox is fully permissionless, you can launch a project from anywhere worldwide, attracting backers from across the globe. Whether you're an individual, a non-profit organization, a company, or a decentralized autonomous organization (DAO), Juicebox welcomes everyone with open arms.

As long as you have an internet connection, you can use juicebox.money.

Payout time

Payout time

Time is of the essence when it comes to accessing your funds, so that your campaign can scale successfully. Kickstarter imposes a 14-day waiting period after reaching your funding goal before releasing the funds to you. Juicebox, on the other hand, offers you complete control over payout timing. You can send payouts from your project at any point during the cycle you set, as long as they fall within the pre-defined limit. For example, if you had a project with a 14-day cycles and Limited Payouts of 10 ETH, you could make a single withdrawal or multiple smaller transactions anytime, up to the total limit of 10 ETH. If you opt for Unlimited Payouts, there are no limits to when you can withdraw funds during the cycle.

Customization

Customization

Lastly, let's explore customization options for your campaign.

Kickstarter allows you to select your project title, add descriptions, and include images or videos of your product. Similarly, Juicebox provides a range of options to personalize your project. You can set a display picture, a banner image, and craft a description that captures the essence of your initiative. Additionally, you can customize your project URL with an Ethereum Name Service (ENS) handle, adding a unique touch to your campaign. While adding images and videos to the project description is currently unavailable on juicebox.money, the Peel frontend team has an exciting update in store. Stay tuned for a brand new project page design, featuring new features like image integration, text with markdown formatting, and the ability to post updates as your project progresses within the next month.

Conclusion - What Makes Juicebox Different

To summarize, Juicebox sets itself apart from traditional crowdfunding platforms through its unparalleled flexibility in campaign execution. It enables you to launch your project and receive support from anywhere globally. As your campaign evolves, you can set new goals and adjust your Payouts while maintaining a healthy and transparent relationship with your backers. By utilizing tokens, Juicebox empowers you to build a thriving community, offer perks and incentives, and stand out in a less saturated marketplace.

Moreover, accepting payments in ETH on Juicebox provides exposure to a new audience and the potential for increased value if the price of ETH rises. However, it's important to note that ETH is a volatile asset, and it's crucial to conduct thorough research and understand the associated risks of cryptocurrencies.

If you’re not sure which way to go for your next campaign, you should consider launching your campaign on both Kickstarter and Juicebox. By launching your project on Kickstarter and supplementing it with crypto crowdfunding on Juicebox, you can leverage the benefits of both worlds. This approach allows you to tap into a wider audience while accepting payments in ETH. With Juicebox, you also enjoy the added advantage of an extended campaign duration, potentially benefiting from any appreciation in the value of ETH, however, please do your own research about risks of cryptocurrencies.

Resources

If you have any questions about using Juicebox, come join the discord at discord.gg/juicebox or book an onboarding session at juicebox.money/contact.

🐦 Follow Juicebox on Twitter: @JuiceboxETH

🚀 Trending projects on Juicebox

📚 Project Creator Docs

📹 YouTube Tutorials

🎙️ The Juicecast

· 6 分钟阅读
Brileigh
Matthew
0xSTVG

How to Migrate a Juicebox Project from V1/V2 to V3

Since launching over a year ago, Juicebox has improved its features and security for programmable treasuries to its current and third version of contracts. The jump from V1 to V2 gave more control and flexibility around tokenomics, and now the V3 contracts include new NFT rewards functionality as well as small security patches following the audit report on V2.

All project owners can migrate their projects to V3 easily and quickly by essentially reconfiguring their project on V3. In this tutorial, we’ll show you how STVG, a Juicebox contributor and project owner of Marin County Swim Association migrated his project from V2 to V3 in less than 5 minutes.

To learn more about Marin County Swim Association, check out Juicecast episode 11 with STVG on Youtube, Spotify, and Apple Podcasts.

提示

Project owners can choose to reconfigure their V2 treasury to be paused and converge onto V3 protocol, or operate both treasuries at the same time. Not sure what strategy is best for you? Hop into the Support Channel in the Juicebox Discord and a fellow Juicer will help you out.

You can follow along in the video made by STVG or step-by-step in this article. Note that you must be the owner of the Juicebox project in order to migrate to V3.

Step 1: Project Settings

Go to your project page that you are the owner of and click on Project Settings.

Project Settings

Step 2: Project Upgrade

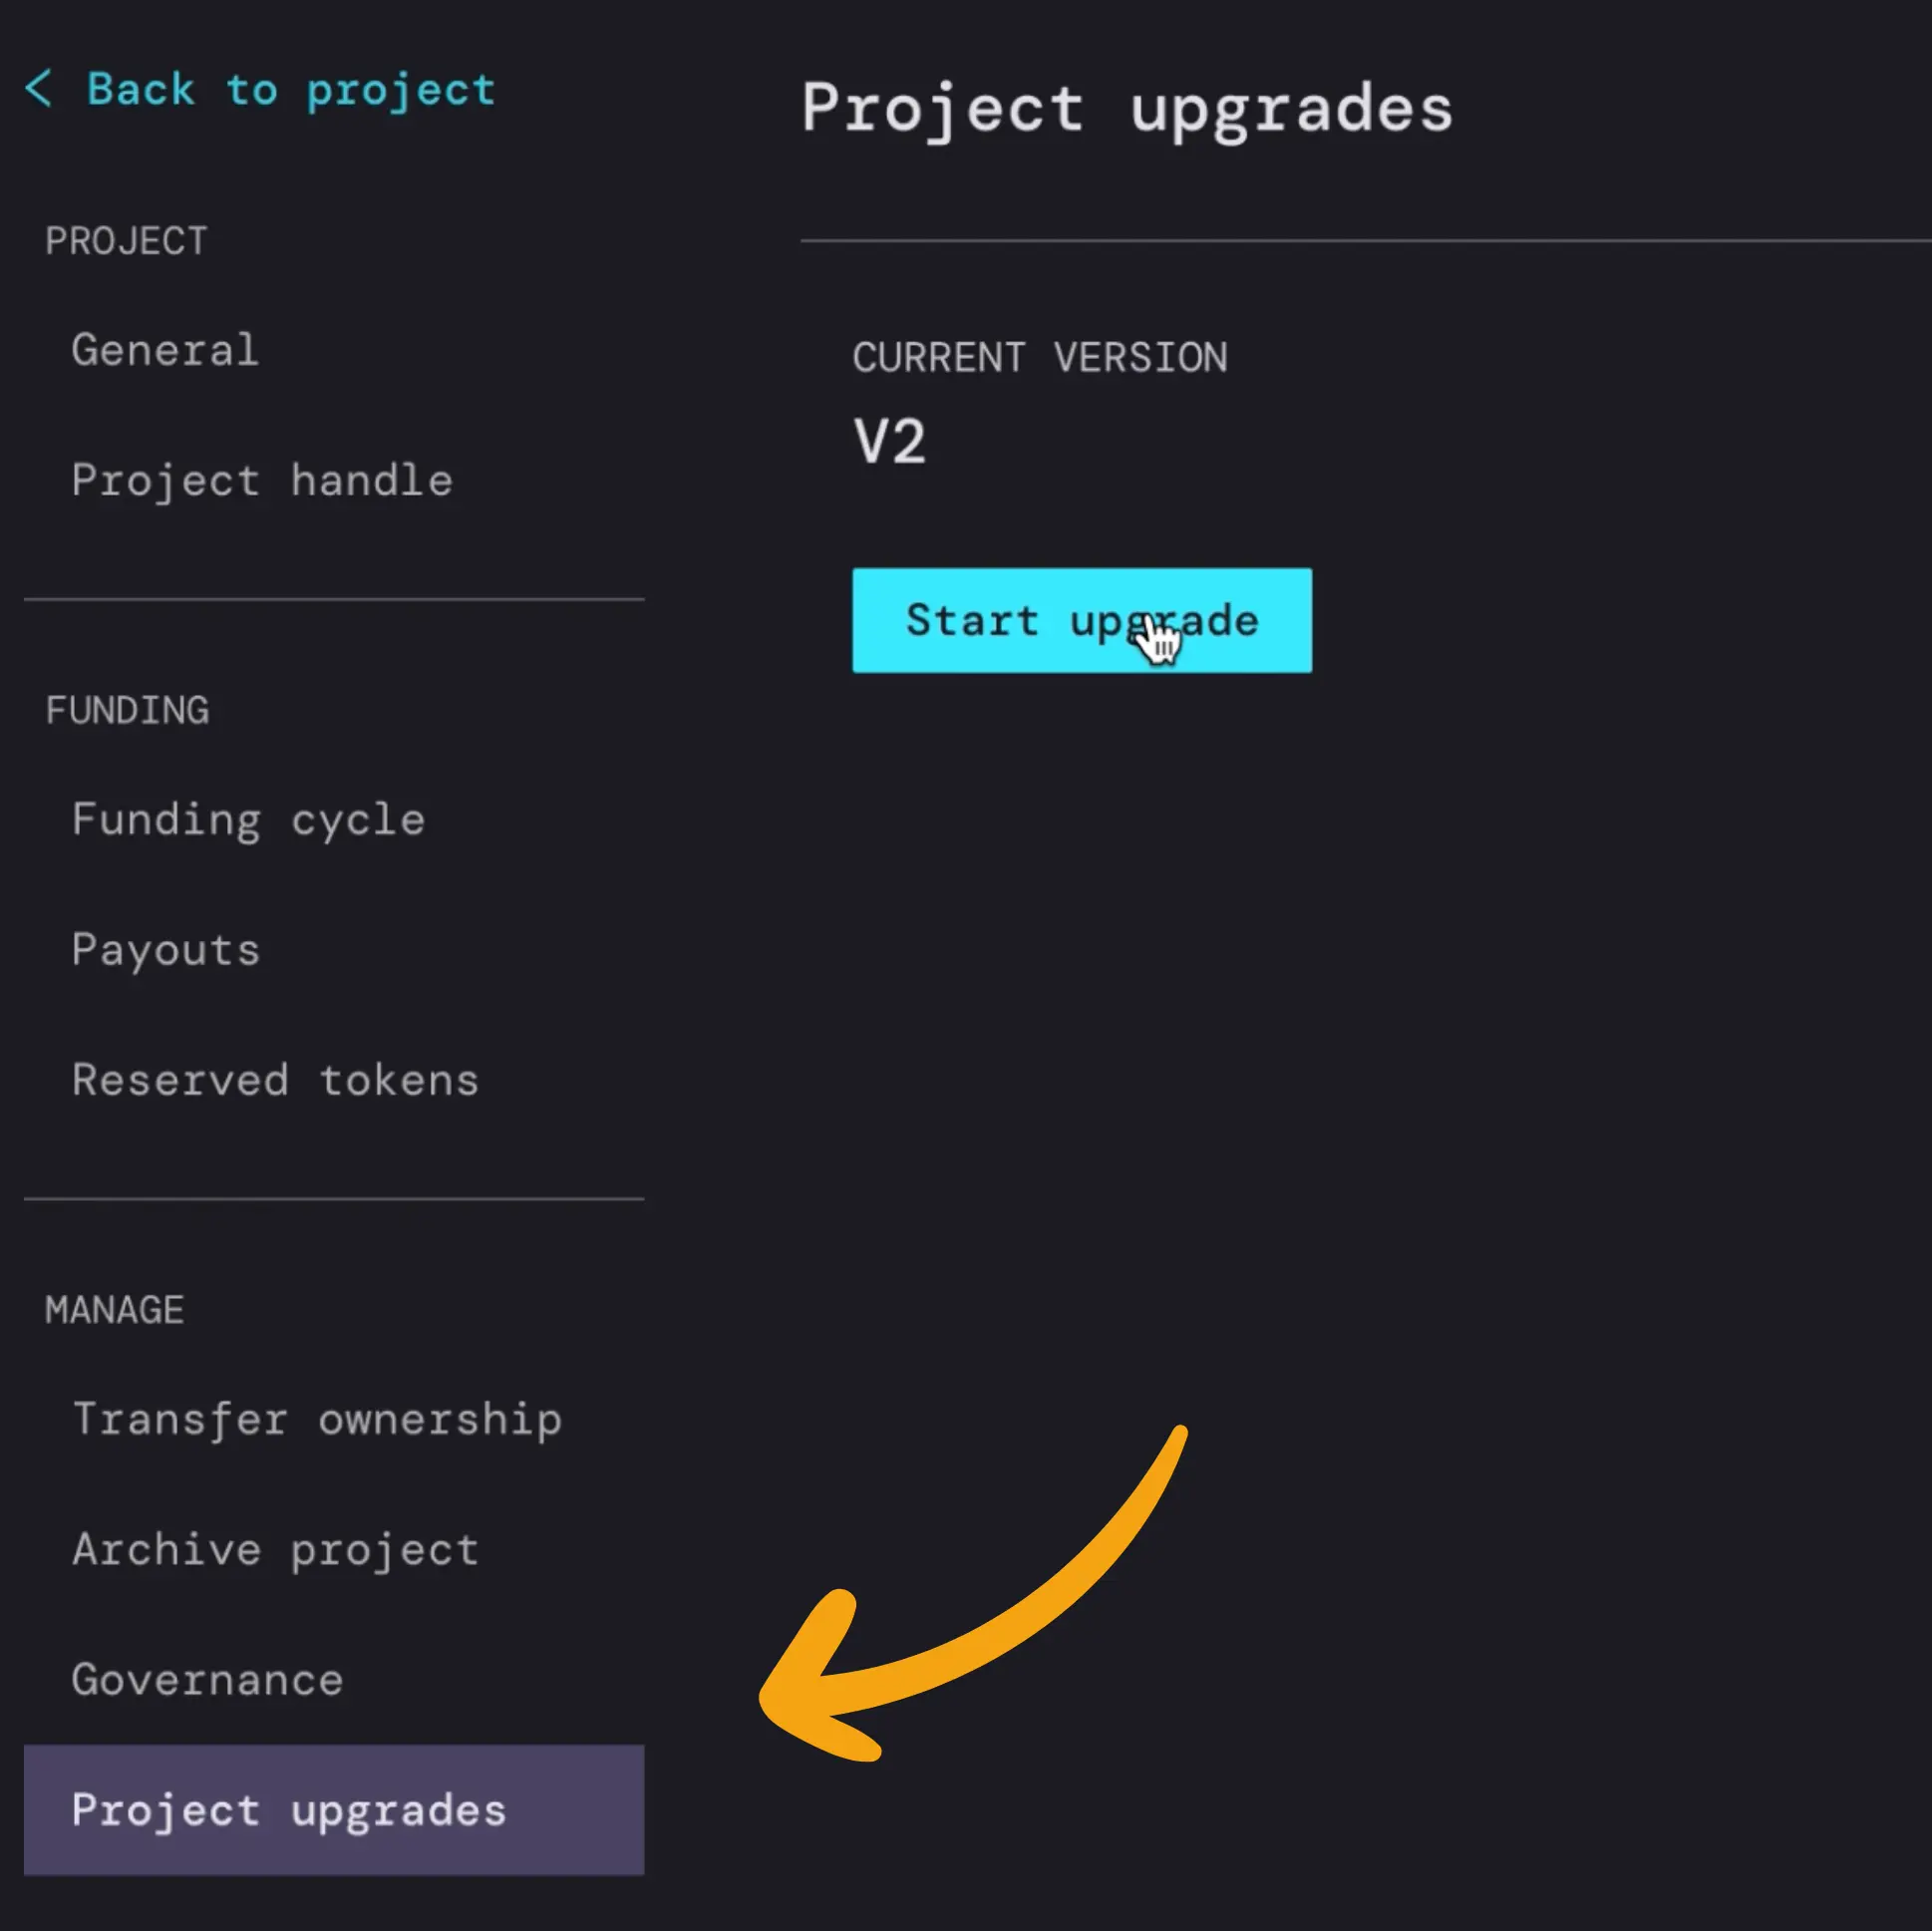
Once you’re in project settings, scroll down to Project upgrades on the left side panel at the bottom. Next you’ll see what version you’re currently on and a button that says Start upgrade.

project upgrades

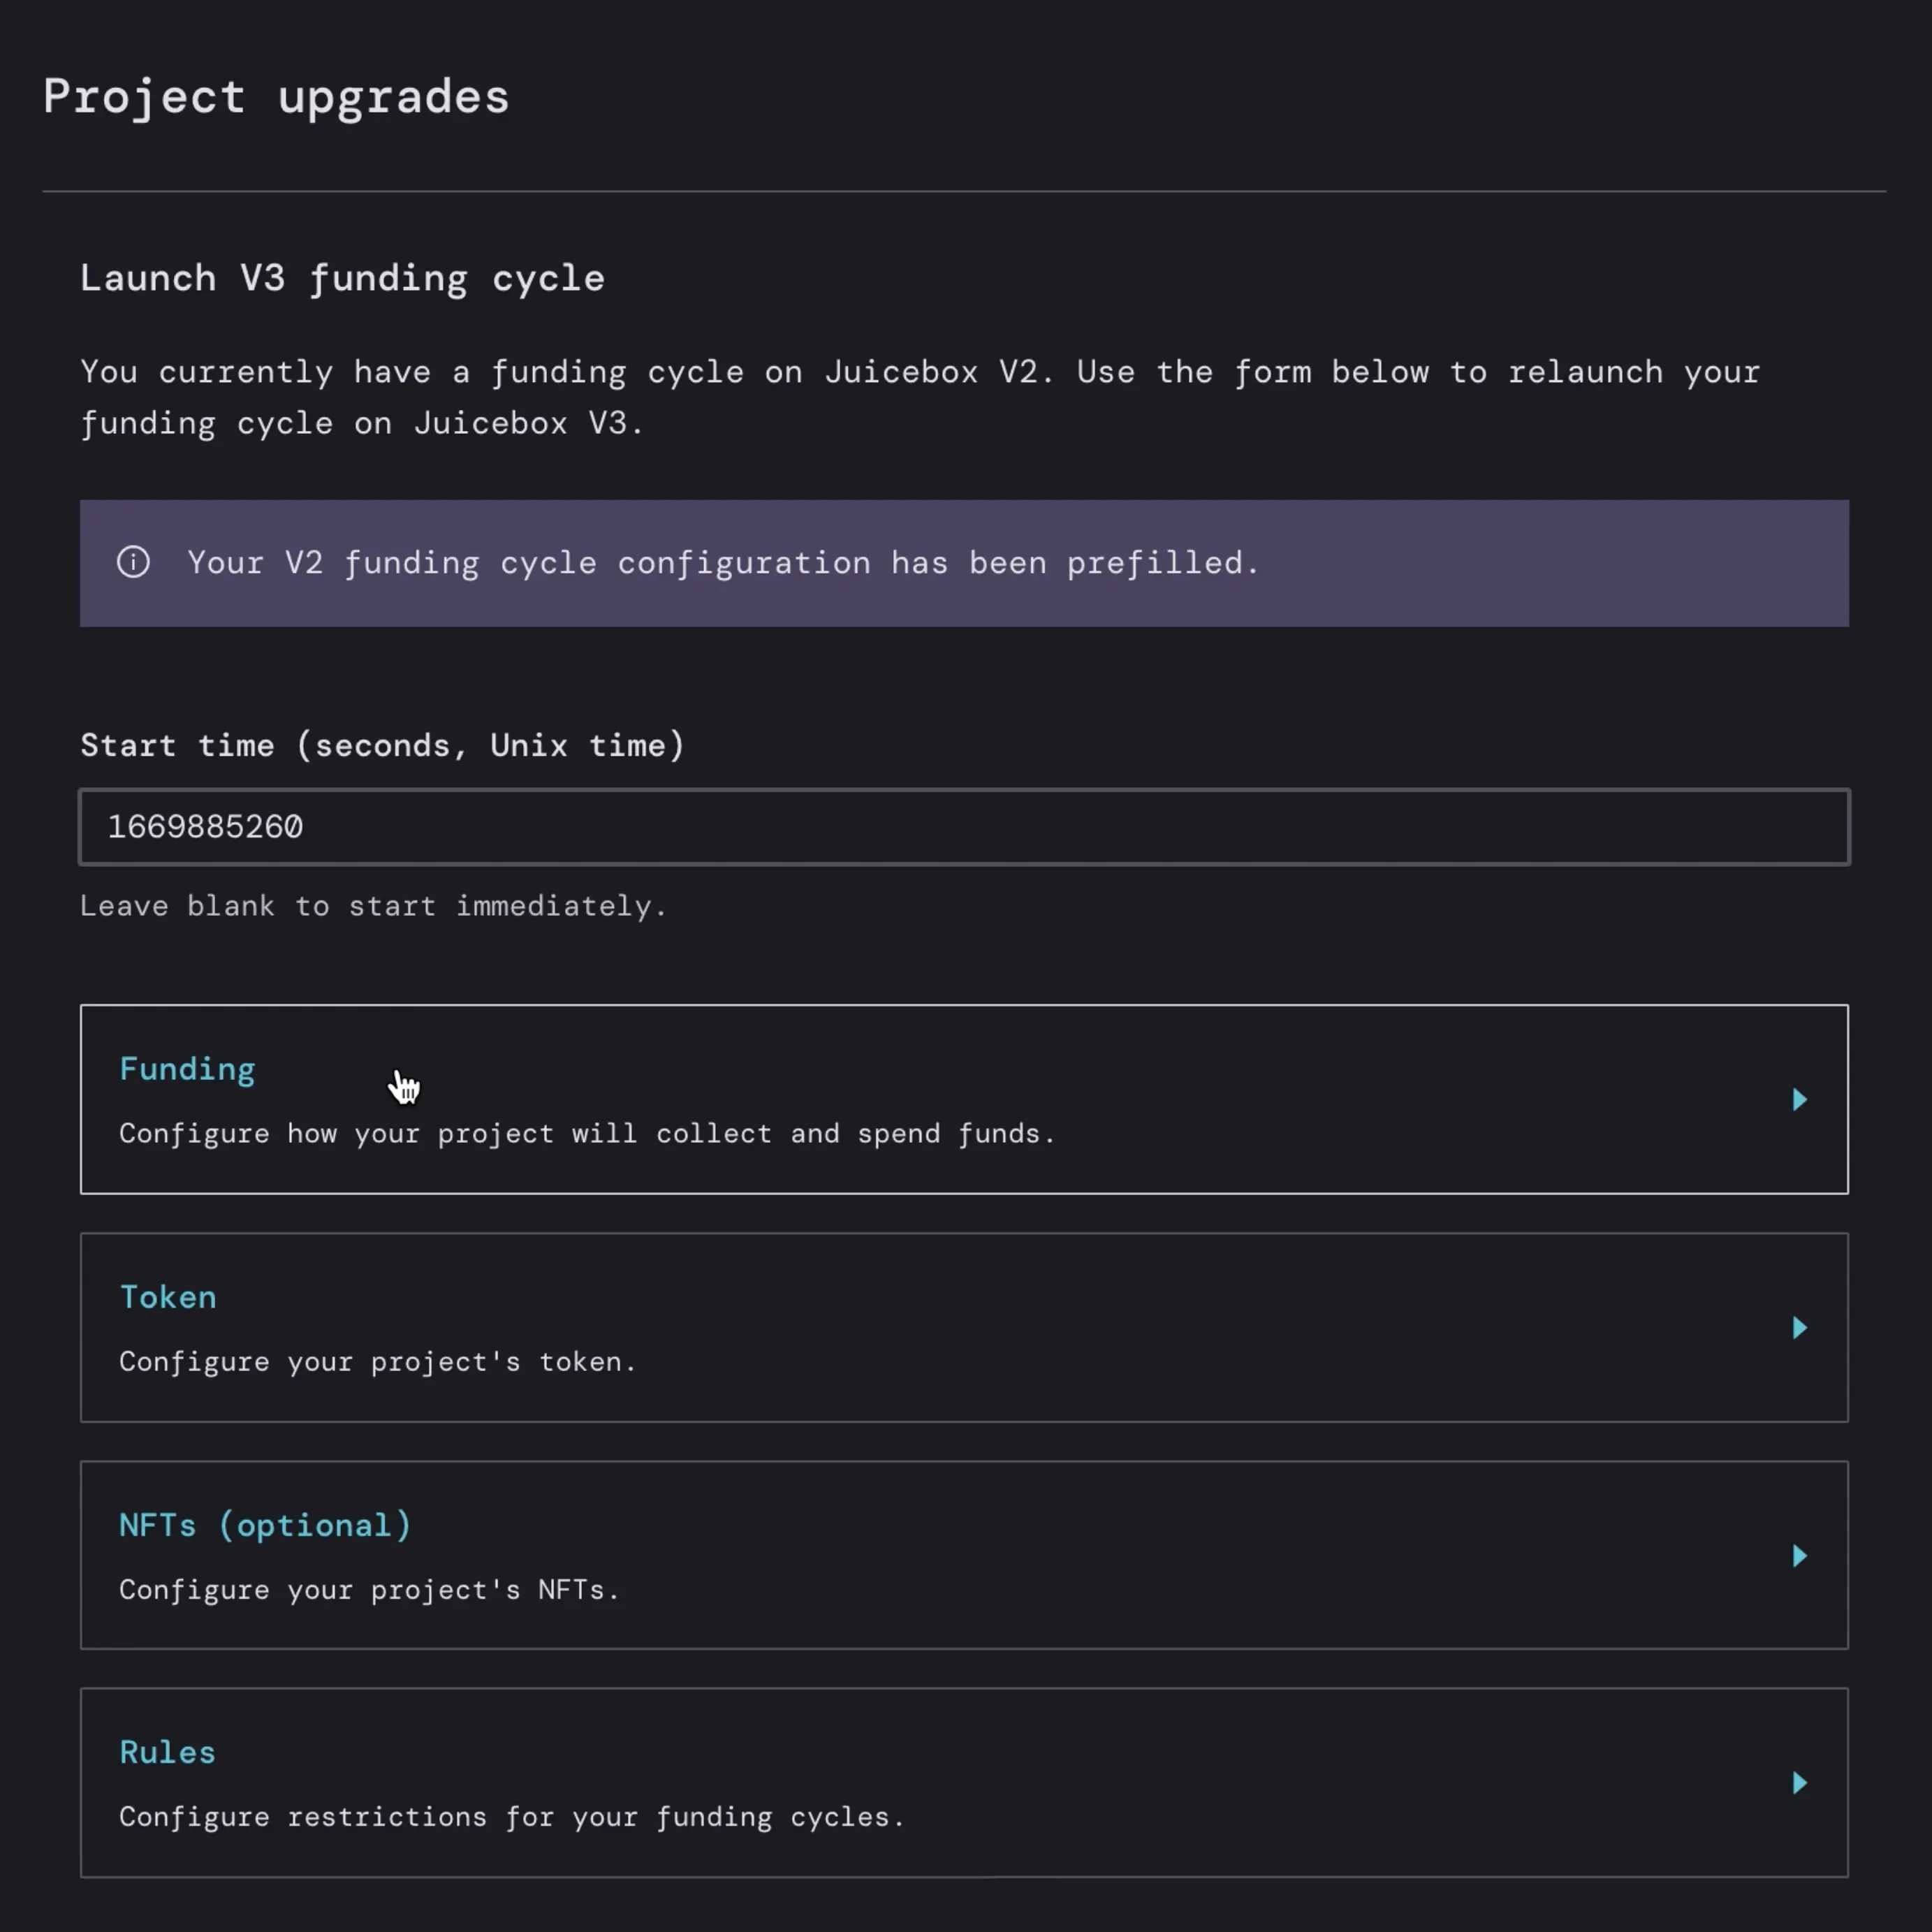
This is where you’ll begin to reconfigure your project settings to launch a V3 funding cycle.

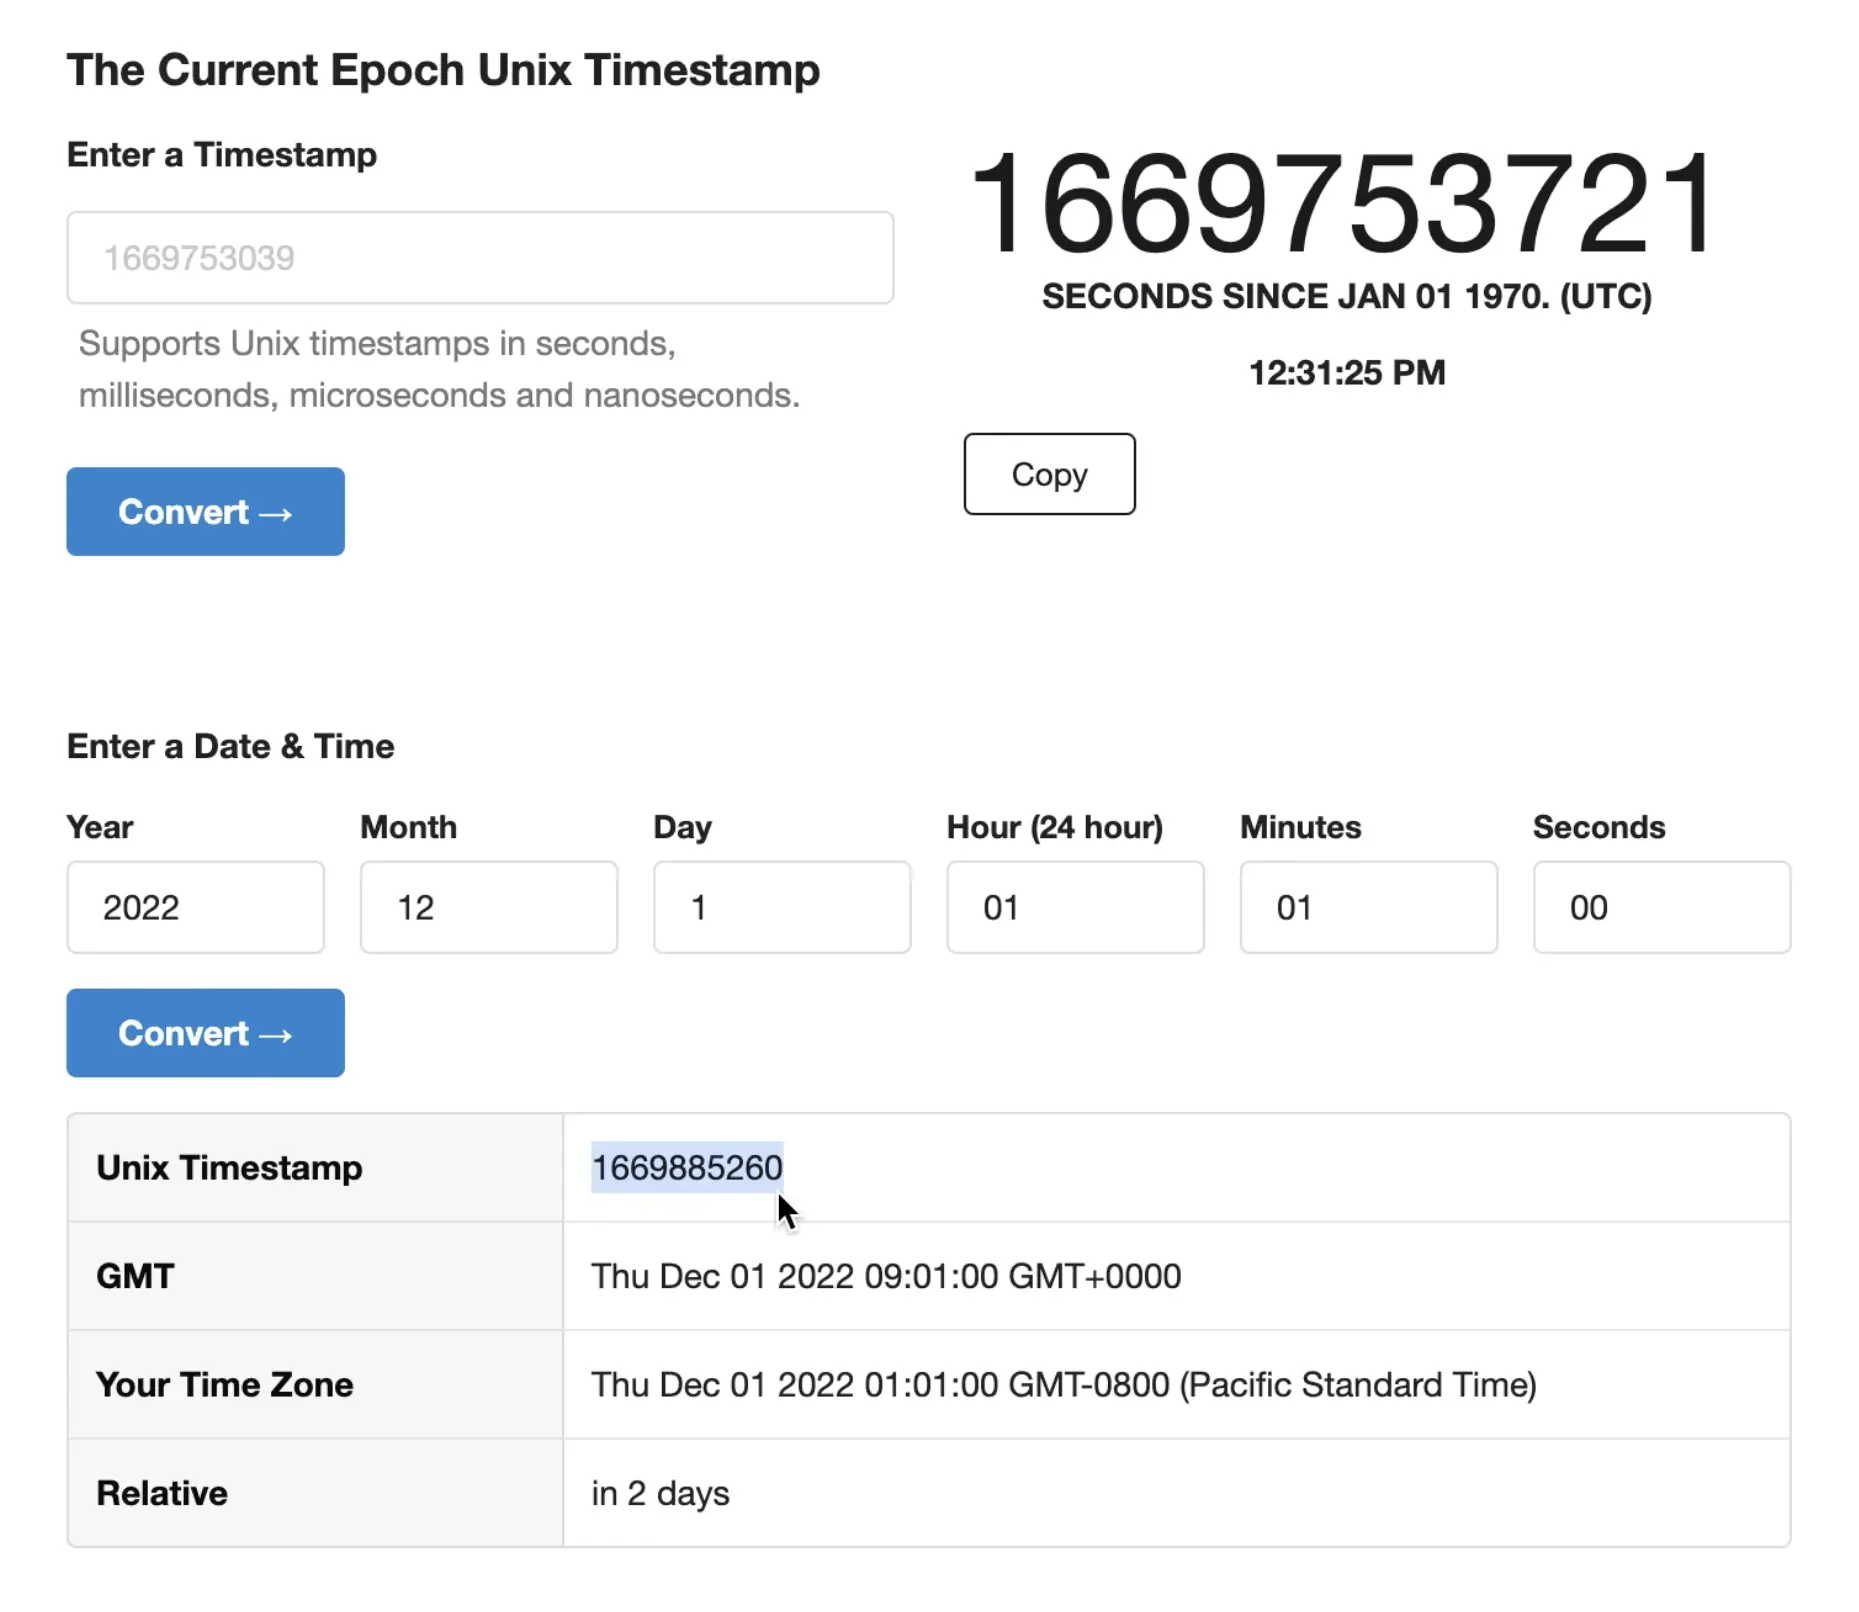
The first thing to set is theStart time. You can set this to whatever time you want to relaunch your project on V3. If you want it to start immediately you can just leave it blank. Note that if you have a specific time you want, it will have to be set in a Unix timestamp, which you can easily determine by using this online unix converter here.

In this example, STVG wanted to launch his V3 funding cycle on December 1st, 2022 at 1:00AM PST. You can enter whatever time you want your project to start here and simply copy and paste the timestamp into the Start time on the Juicebox project upgrade page.

Unix start time example

提示

Fun fact: Unix time is a date and time system widely used in computing that measures time by the number of seconds that have elapsed since 00:00:00 UTC on 1 January 1970.

When you’re done setting a start time, click Funding.

project upgrades

Step 3: Funding

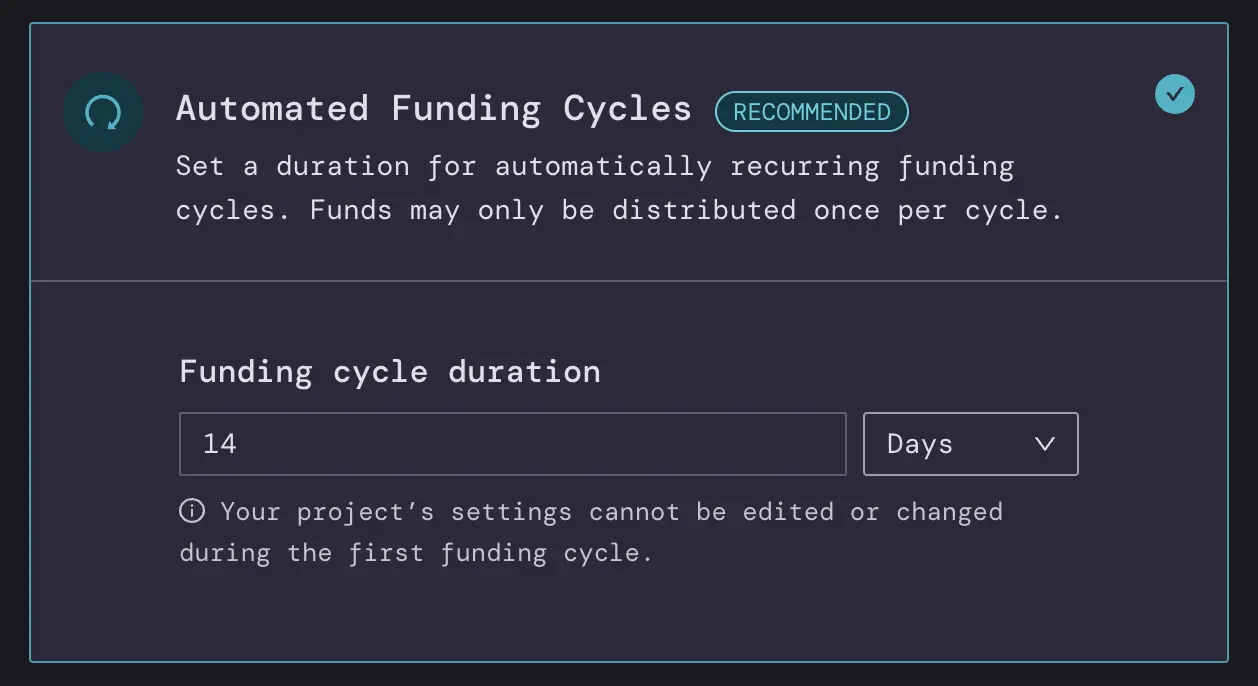
Here you can set your Funding Cycles (how long all the settings on your project are locked for) and Payouts (what address(s) the funds in the treasury can be sent to once per funding cycle).

This process is similar to the latest create project flow on Juicebox, where you can have Automated Funding Cycles or Manual Funding Cycles. You can keep the same settings from your old contract if you don’t want to change things like the payout address(s) or funding cycles, or you can use this opportunity to update changes to reflect the needs of your project.

automated funding cycles

For Payouts you can decide if one address is receiving all the funds that get distributed or you could configure it to add other people, for example if you had a second person working on the project you split the payouts 50/50. You can do this either through Percentages of Specific amounts denominated in ETH or USD. When you’re done making any changes, click Save funding configuration, then click Token.

Step 4: Token

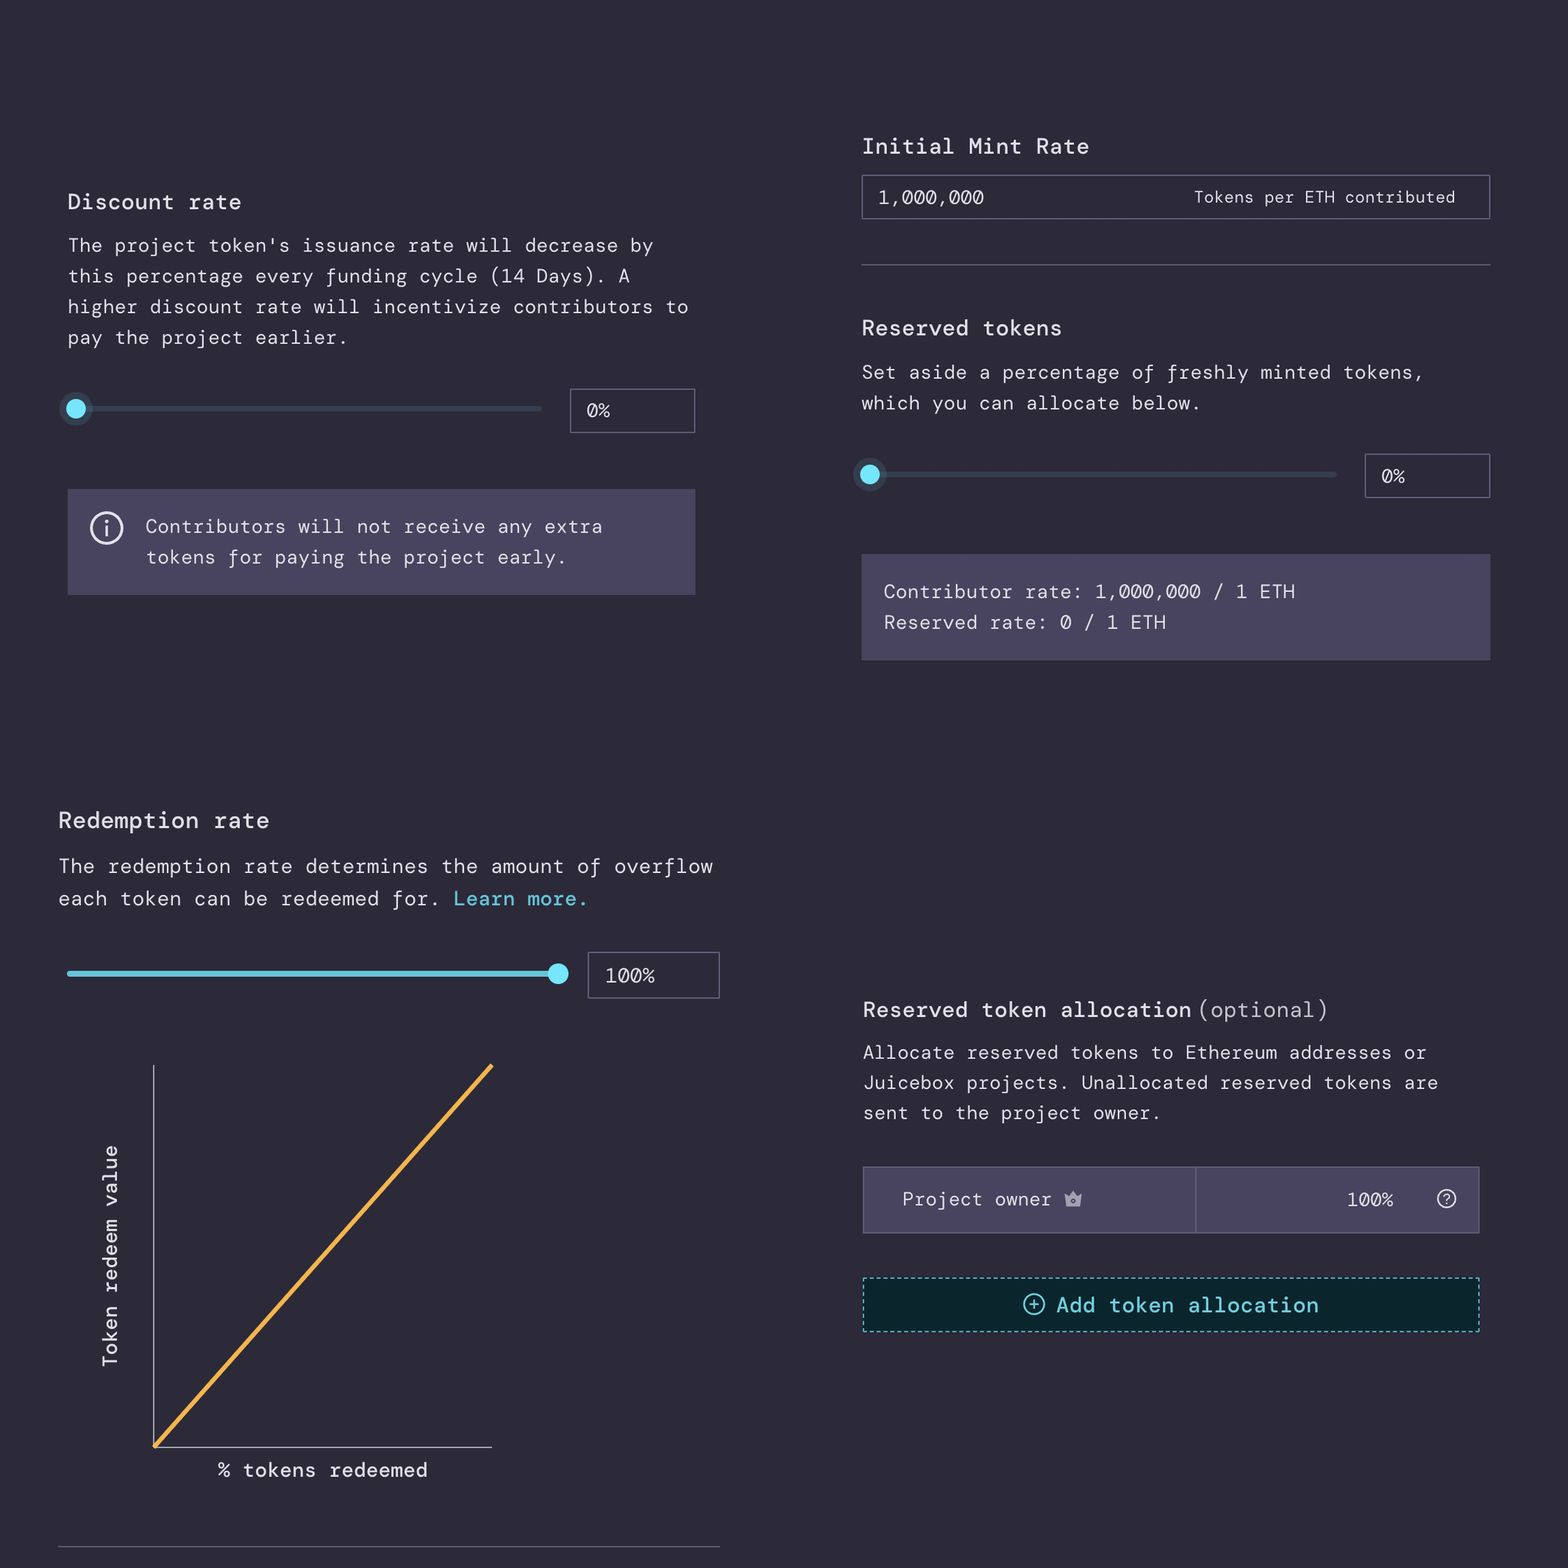
This is where you can customize different settings for the tokenomics of your project including:

  • Mint Rate (number of tokens per 1 ETH minted)
  • Reserved token allocation (option to set aside a percentage of all tokens that get minted when people contribute ETH to the project)
  • Discount Rate (option to decrease how many tokens are issued over each funding cycle to incentivize early contributors)
  • Redemption rate (determine what proportion of treasury assets can be reclaimed by a token holder by redeeming their tokens, AKA incentivize contributors to hold their tokens longer to get a better rate if they decide to burn the tokens in exchange for ETH in the future)

token settings

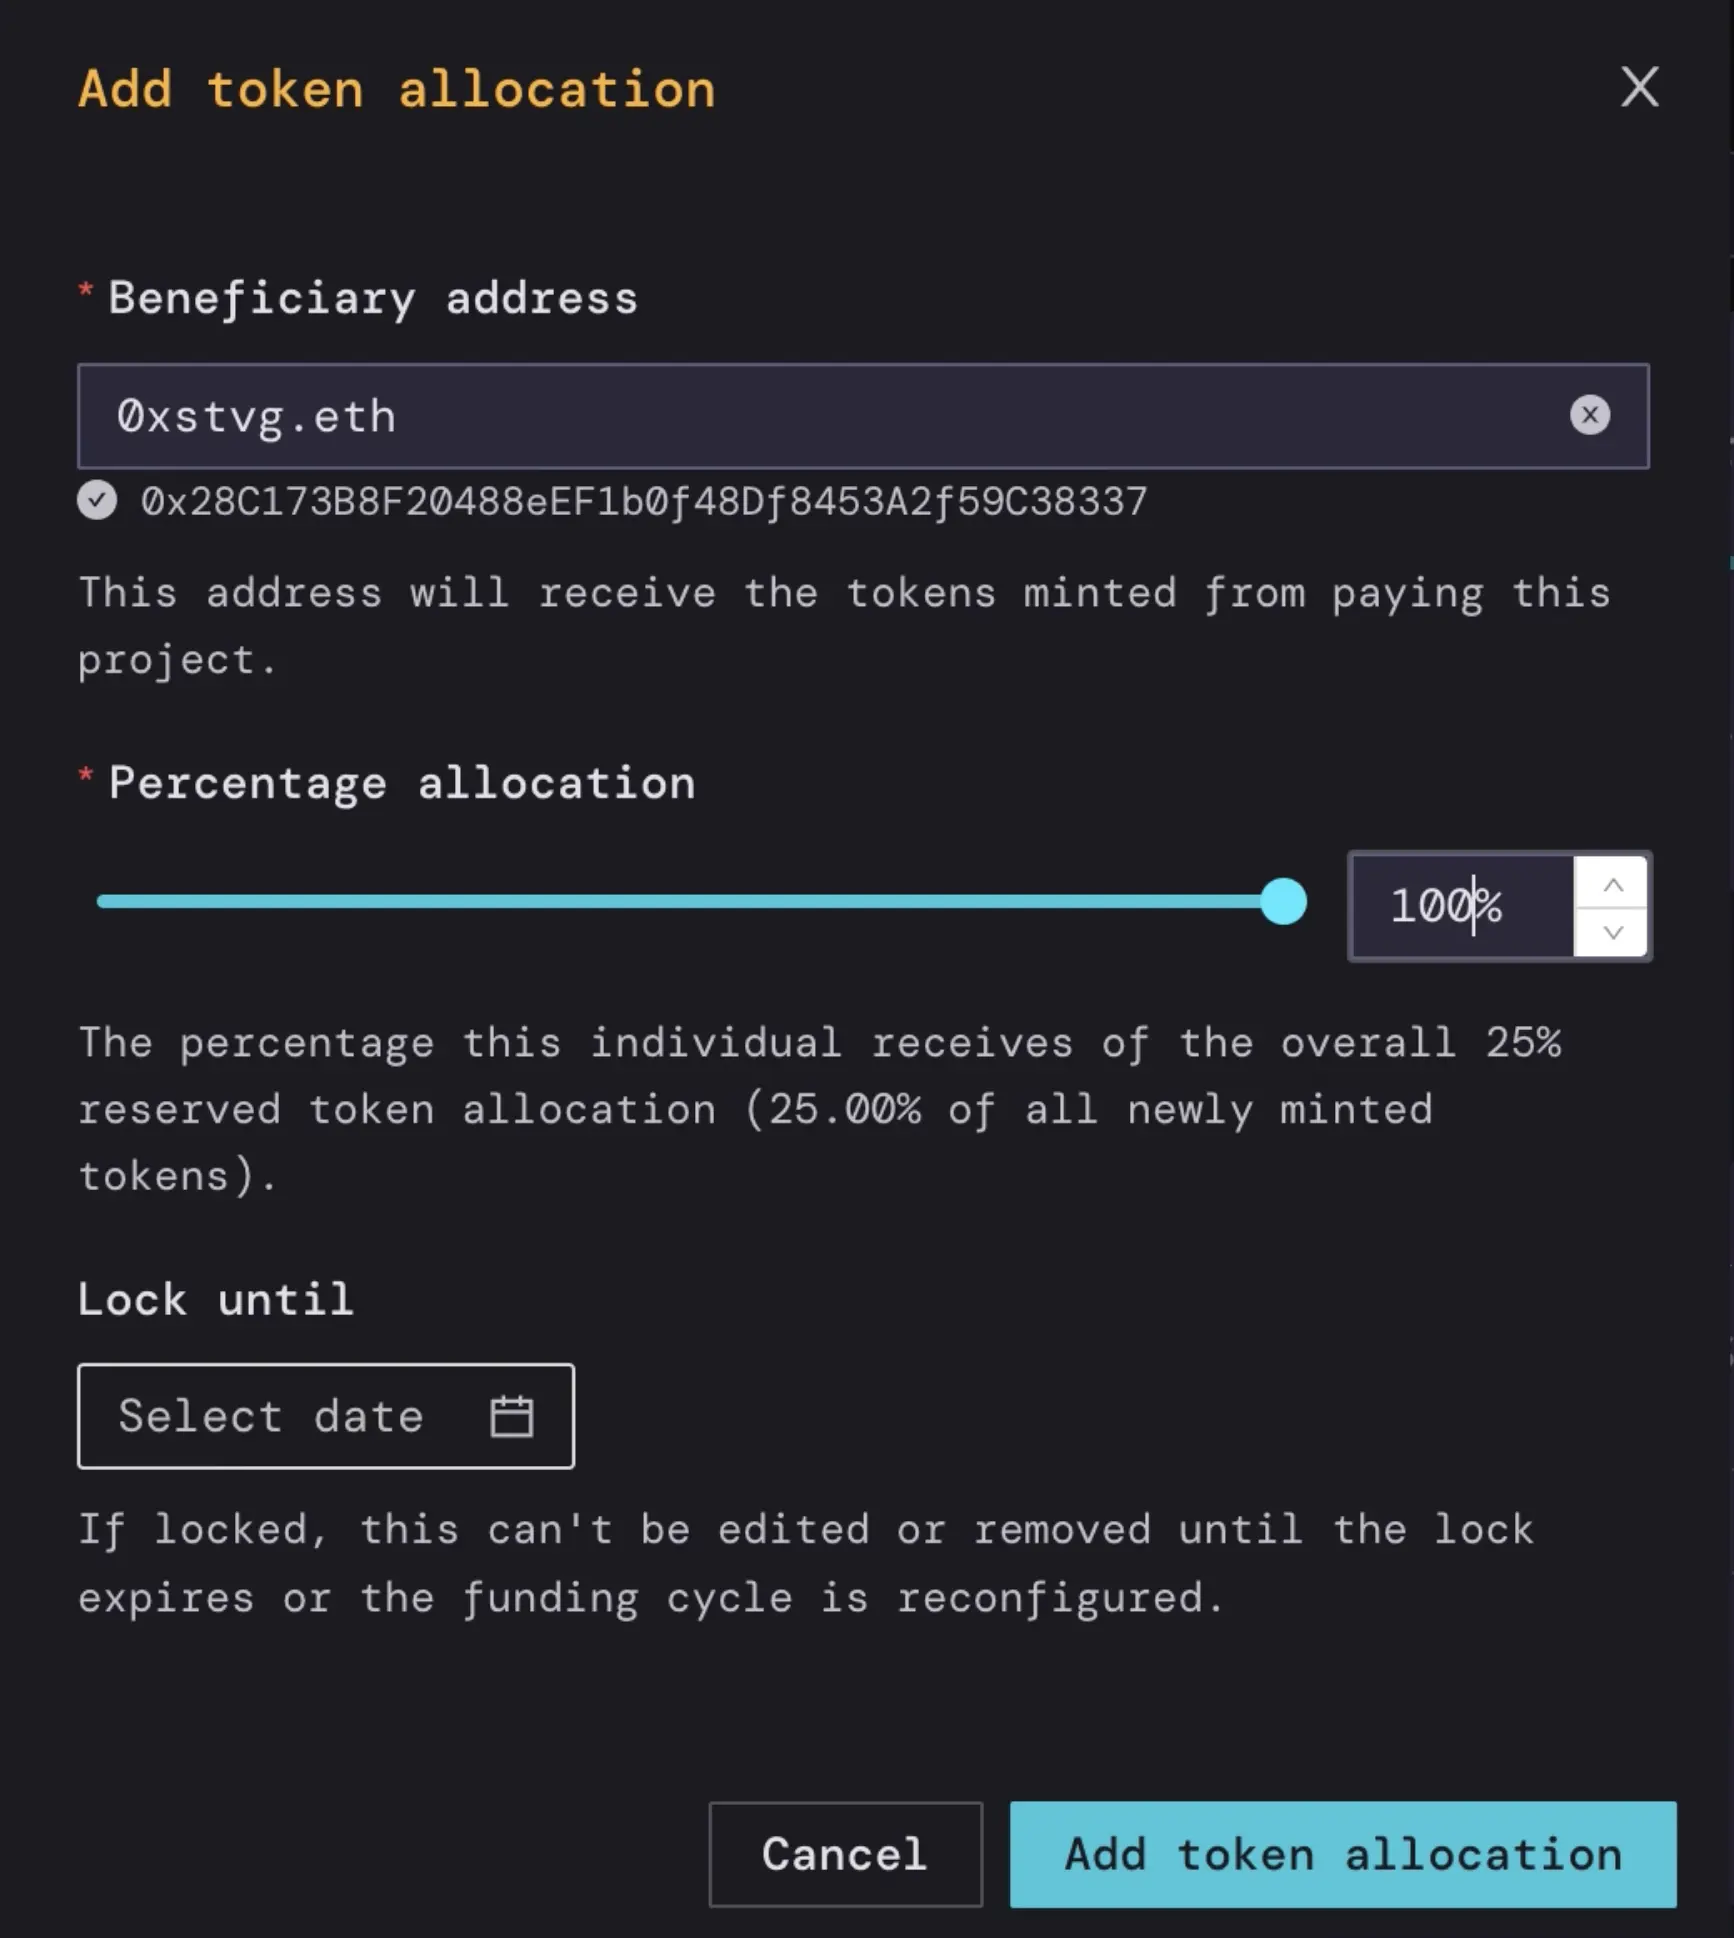
In this example, STVG left most of these settings untouched but added himself to the Reserved Token Allocationby clicking Add Token Allocation. then adding his ENS address in the field for the Beneficiary address and changing the Percentage allocation to 100% and confirming by clicking Add Token Allocation.

token allocation

These token settings are turned off by default. If you’re not sure what to do, the Default Token Settings will work for most projects. You can always reconfigure these settings in the future, depending on the strategy of your Juicebox project. You can always hop into the Juicebox Discord if you need help! When you’re done, click Save token configuration.

Step 5: NFTs (Optional)

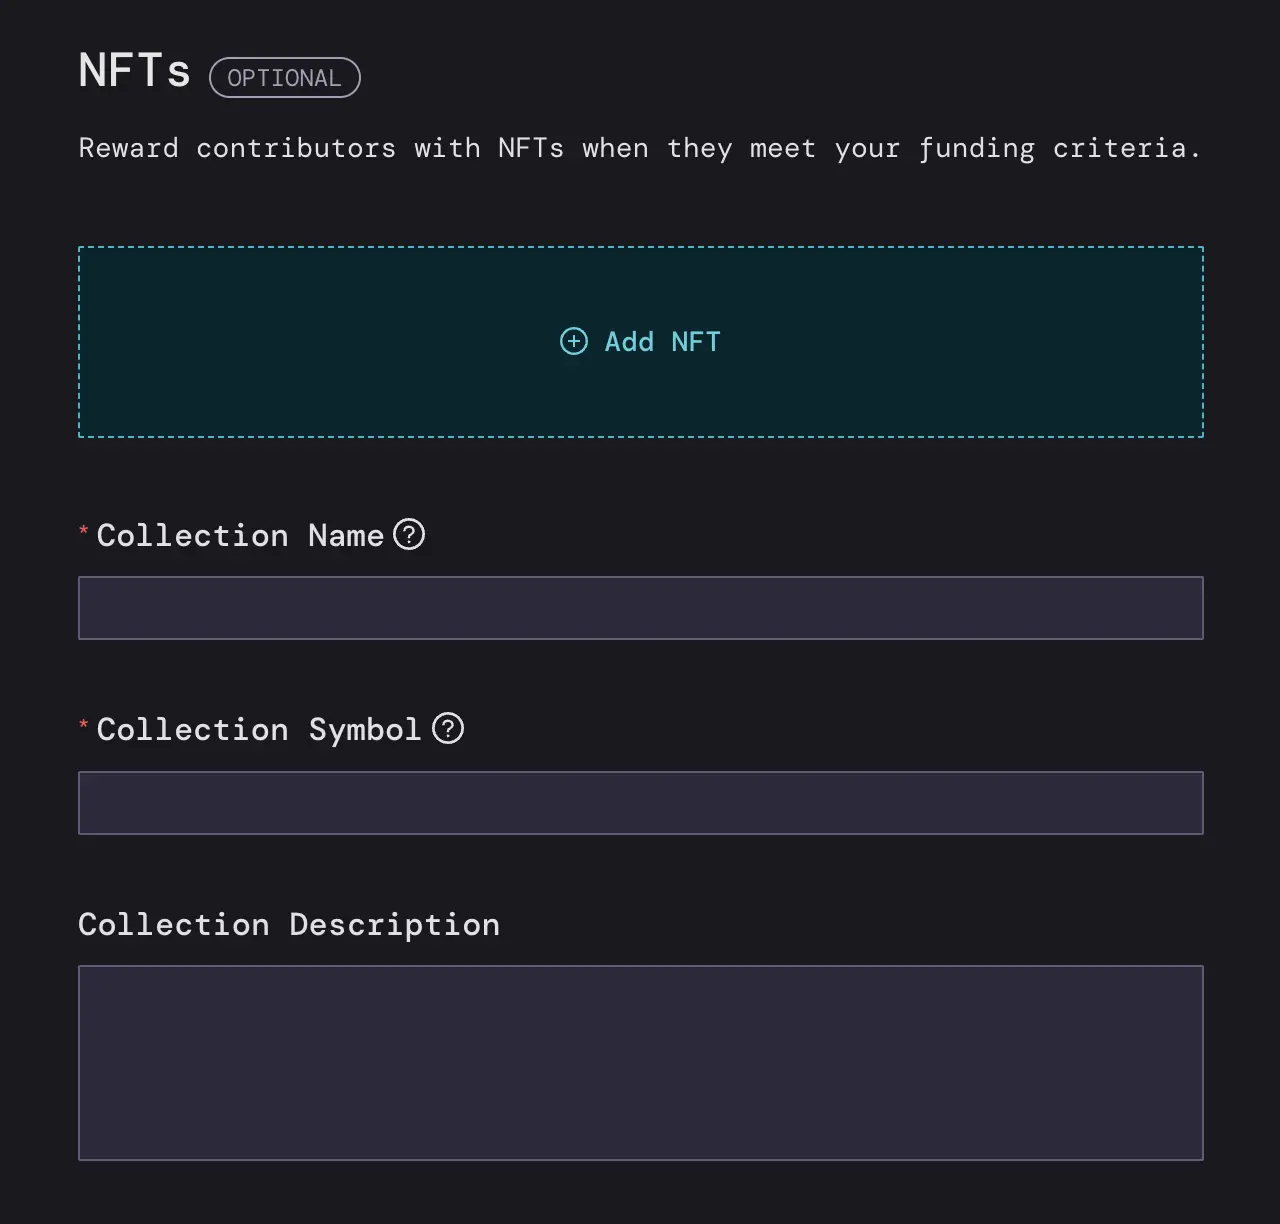
Here you have the option to add NFTs to your Juicebox project so contributors can receive an NFT if they meet your minimum funding criteria. You can add as many NFTs as you want and determine the supply and price of each NFT. Next you’ll add a Collection Name and Collection Symbol, as well as an optional description of the NFTs. If you’re not ready, you can always add NFTs later on. You can also check out this tutorial on how to use NFTs. When you’re done, click Save NFTs.

nfts

Step 6: Rules

Last but not least, you'll need to set the rules for your project before deploying.

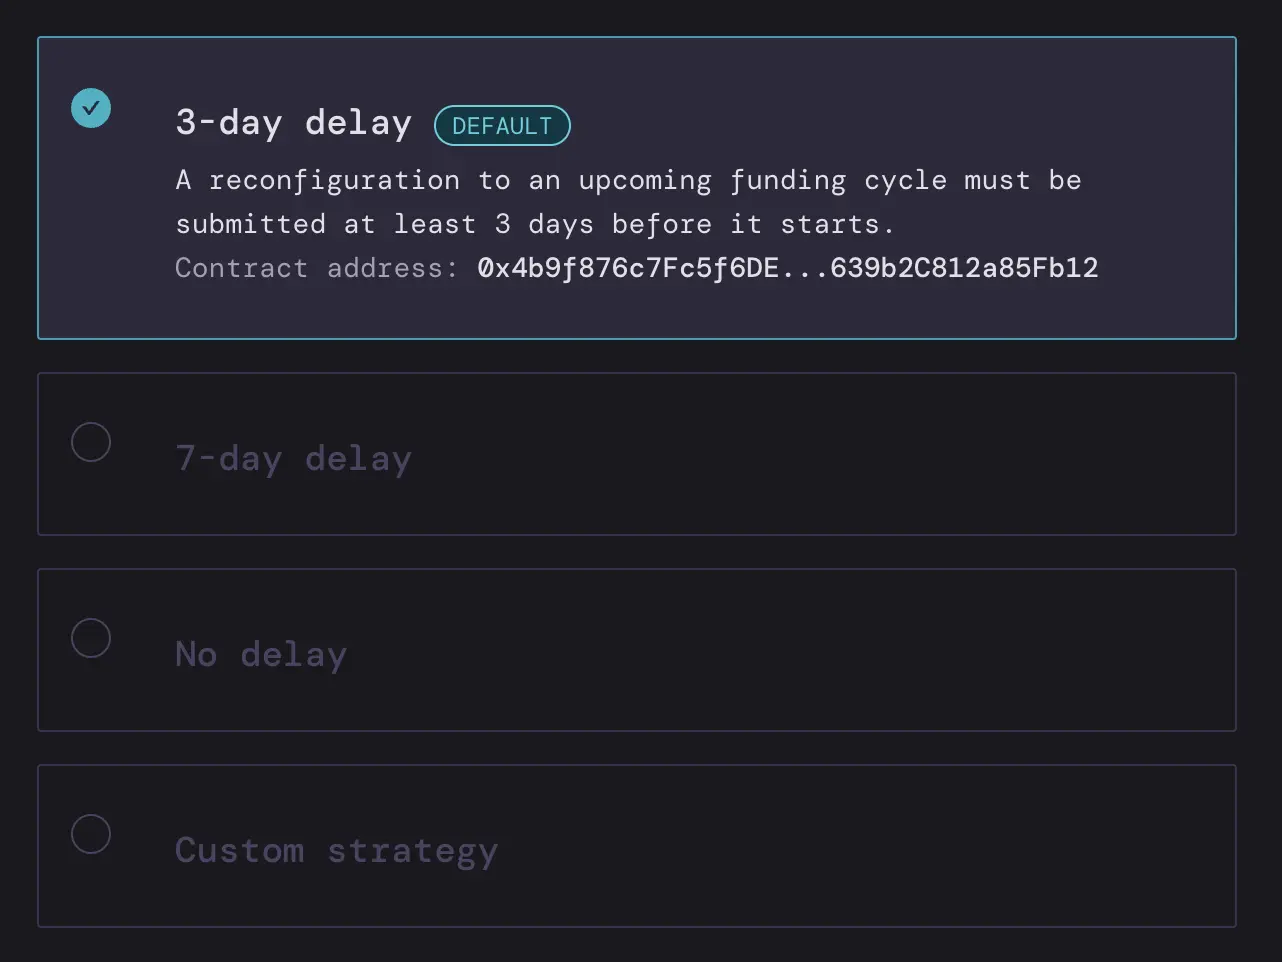
Make sure to set your Reconfiguration Rules, which essentially creates a safety measure of how soon you can reconfigure your Juicebox project settings before they take effect. You can choose the 3-day delay (default) 7-day delay, No delay, or a Custom Strategy.

You can also decide to Pause Payments, Allow Token Minting, and Allow Terminal Reconfiguration. When you’re all done, click Save Rules.

reconfiguration-rules.webp

Step 7: Review and Deploy

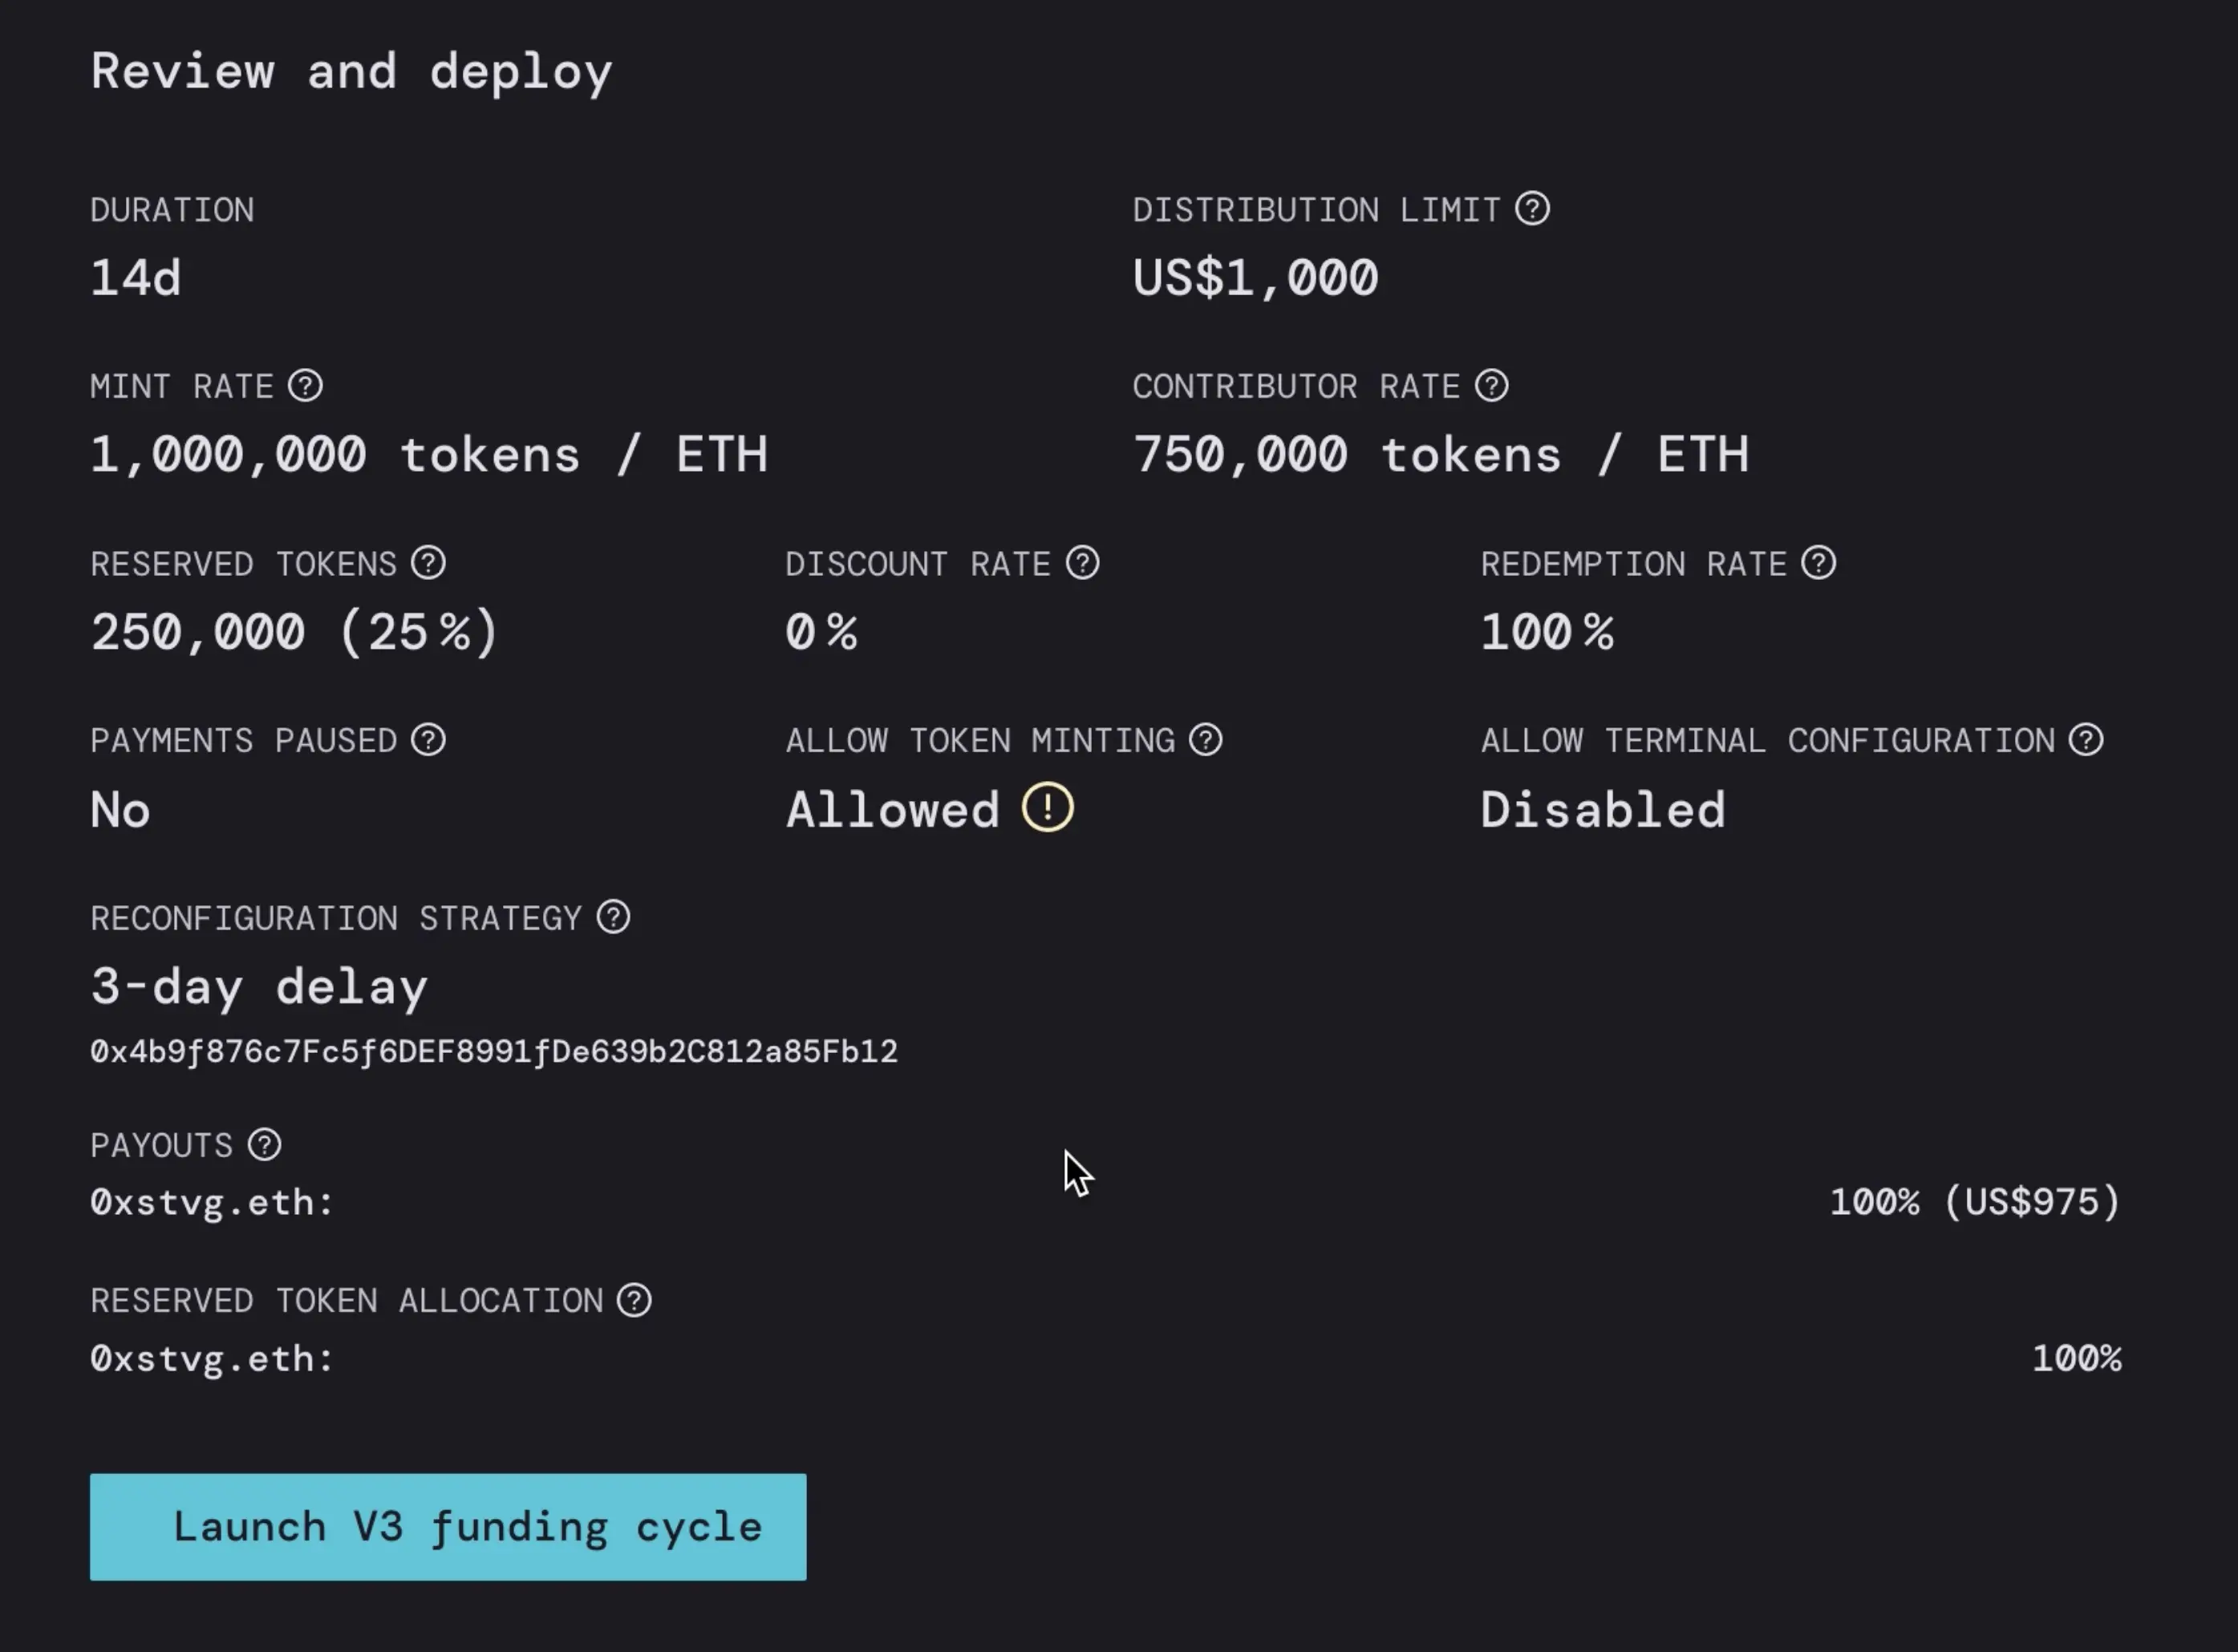
Last but not least, you can review a summary of all your new V3 settings before you deploy.

review and deploy

When you’re good to go, click Launch V3 funding cycle. This will prompt a transaction in your wallet which you’ll have to confirm and you’re done!

Launch a V3-Funding cycle

And that’s it! You’ve successfully migrated to V3.

If you need help along the way, jump into the Support channel in the Juicebox Discord.

🐦 Follow Juicebox on Twitter: @JuiceboxETH
🚀 Trending projects on Juicebox

📚 Project Creator Docs

📹 YouTube Tutorials

· 6 分钟阅读
Brileigh
Matthew

How to sell NFTs on Juicebox

Juicebox enables creators and communities to create and launch NFT projects with powerful yet simple tools tailored to your needs in an ongoing basis. In this tutorial we’ll guide you through how to configure a Juicebox project to sell NFTs in less than 10 minutes. Whether you’re a creator selling content, managing a DAO, NFT project or cryptocurrency crowdfund, you can sell NFTs easily on Juicebox with complete control and transparency.

You can follow along in this article or the Youtube video.


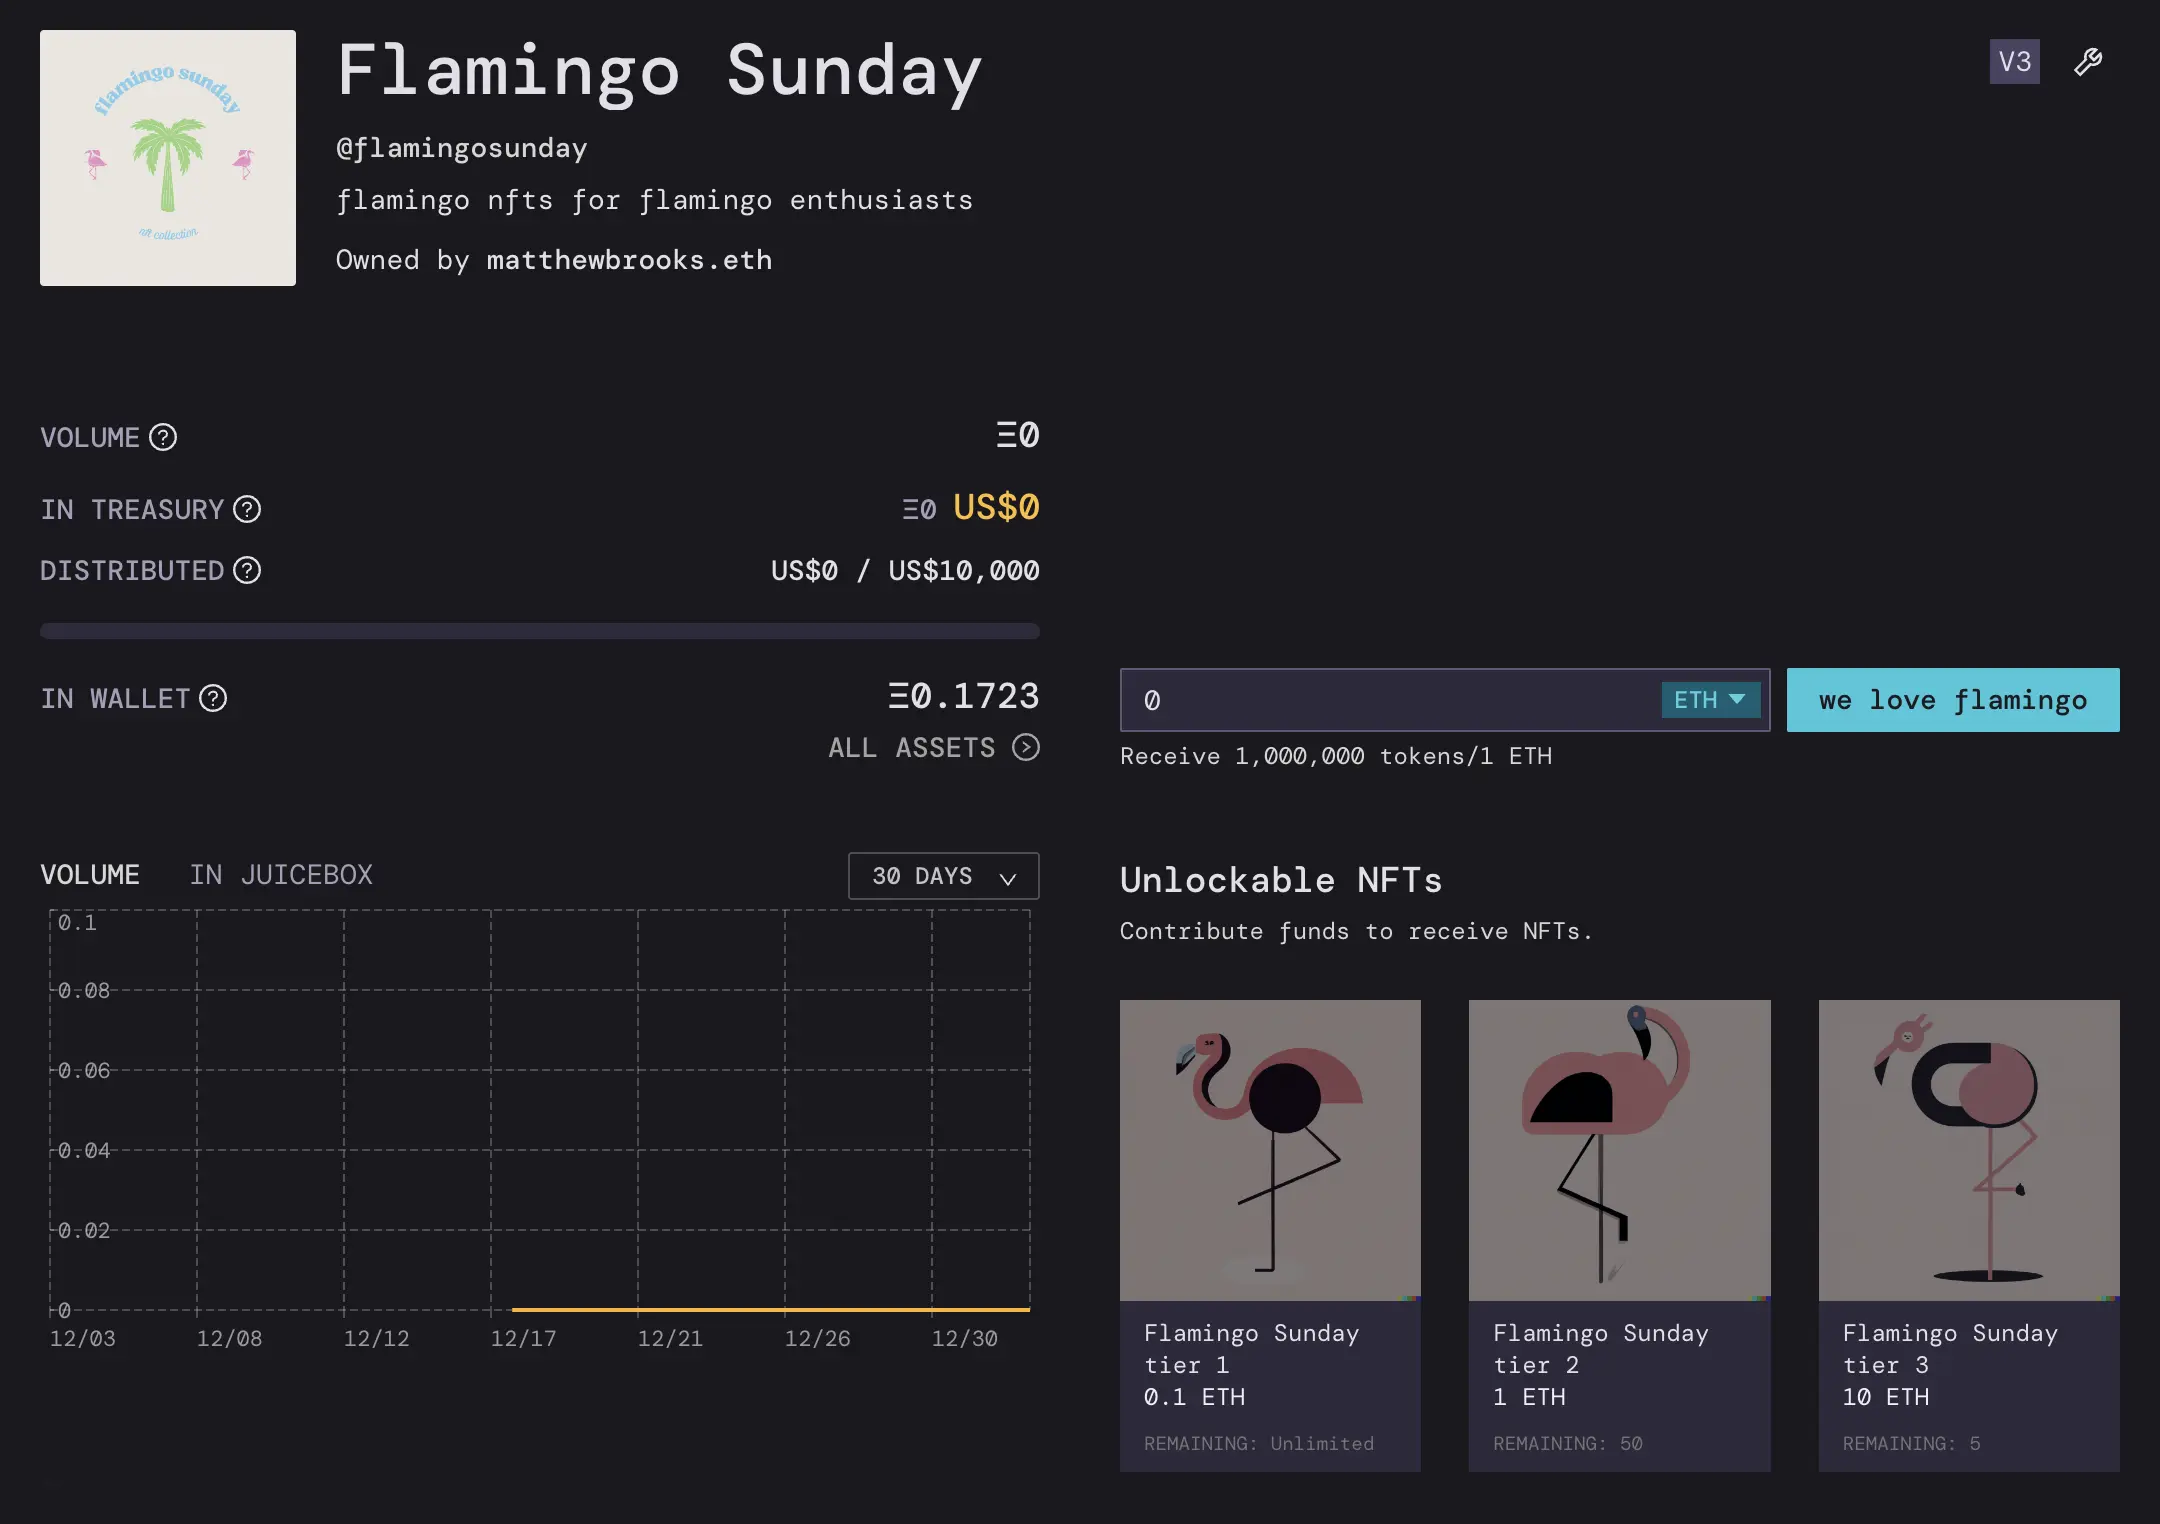
The example for this tutorial is an NFT project called Flamingo Sunday. We’re using Juicebox to sell flamingo NFTs at 0.1, 1, and 10 ETH tiers and anyone who contributes at those amounts will receive the corresponding NFT.

So head to juicebox.money, connect your wallet, and click Create a project.

Create a project

Step 1: Project Details

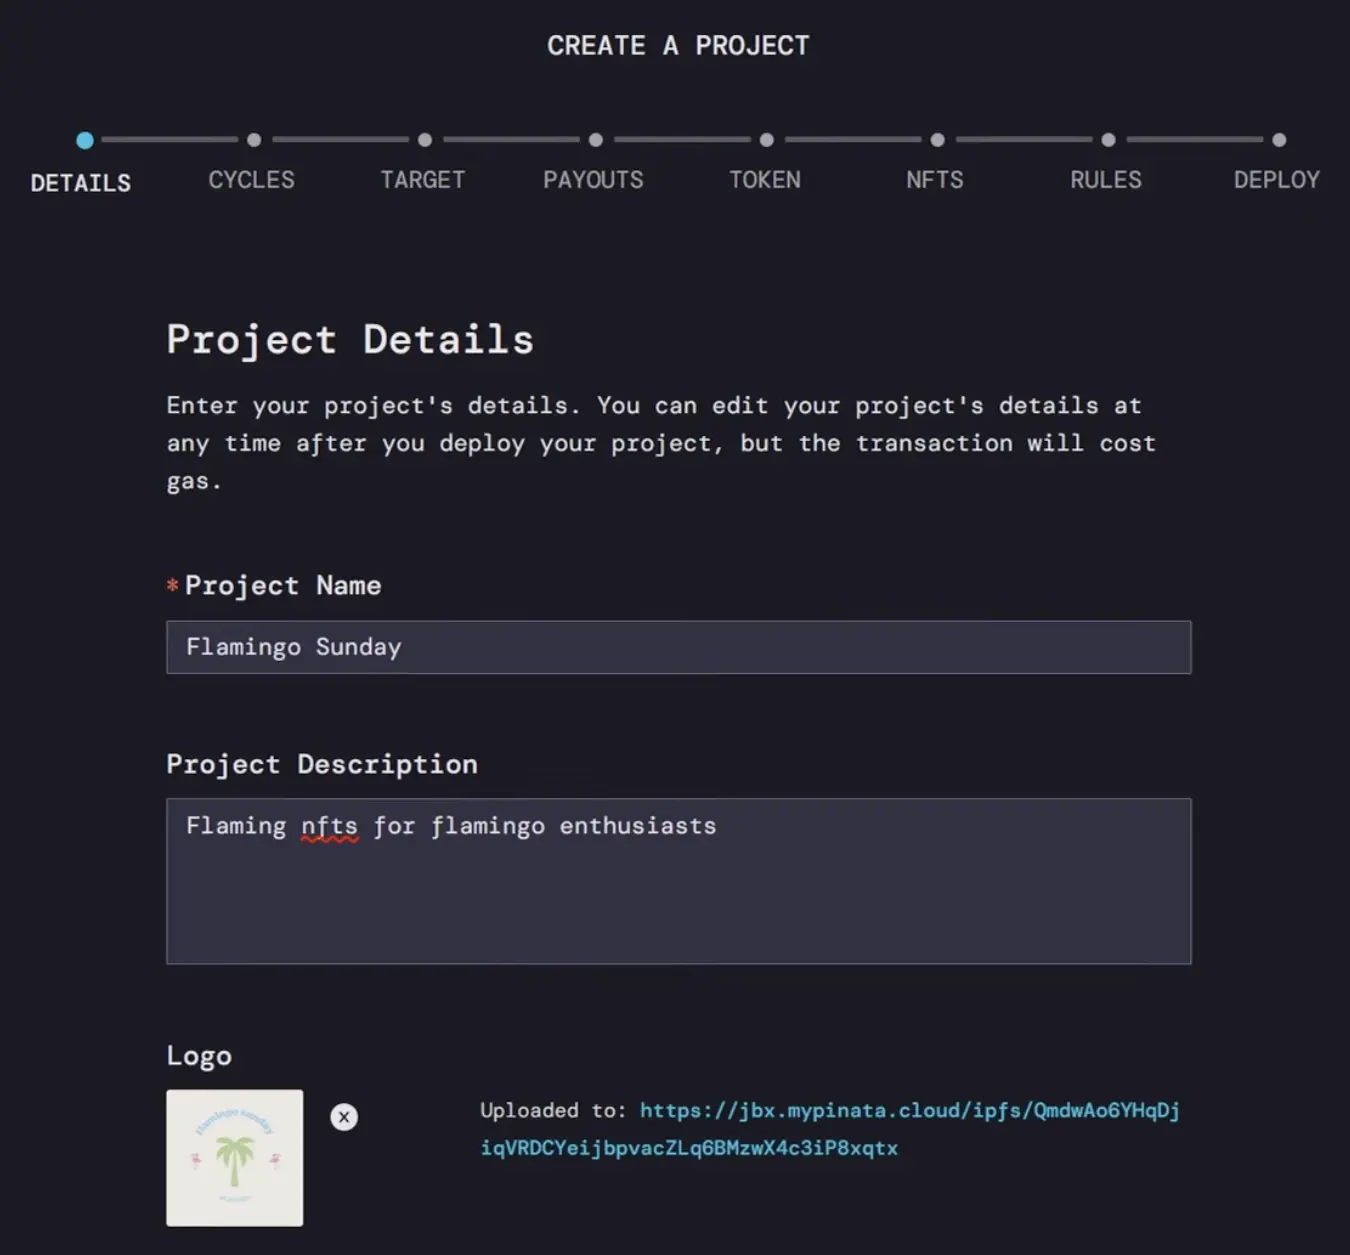
Here you’ll provide general information about your Juicebox project including the name, description, a logo, and add social links. You can even customize the Pay button, for this example we could make it say “we love flamingos.” Once you’re done, click Next.

Project details

Step 2: Funding Cycles

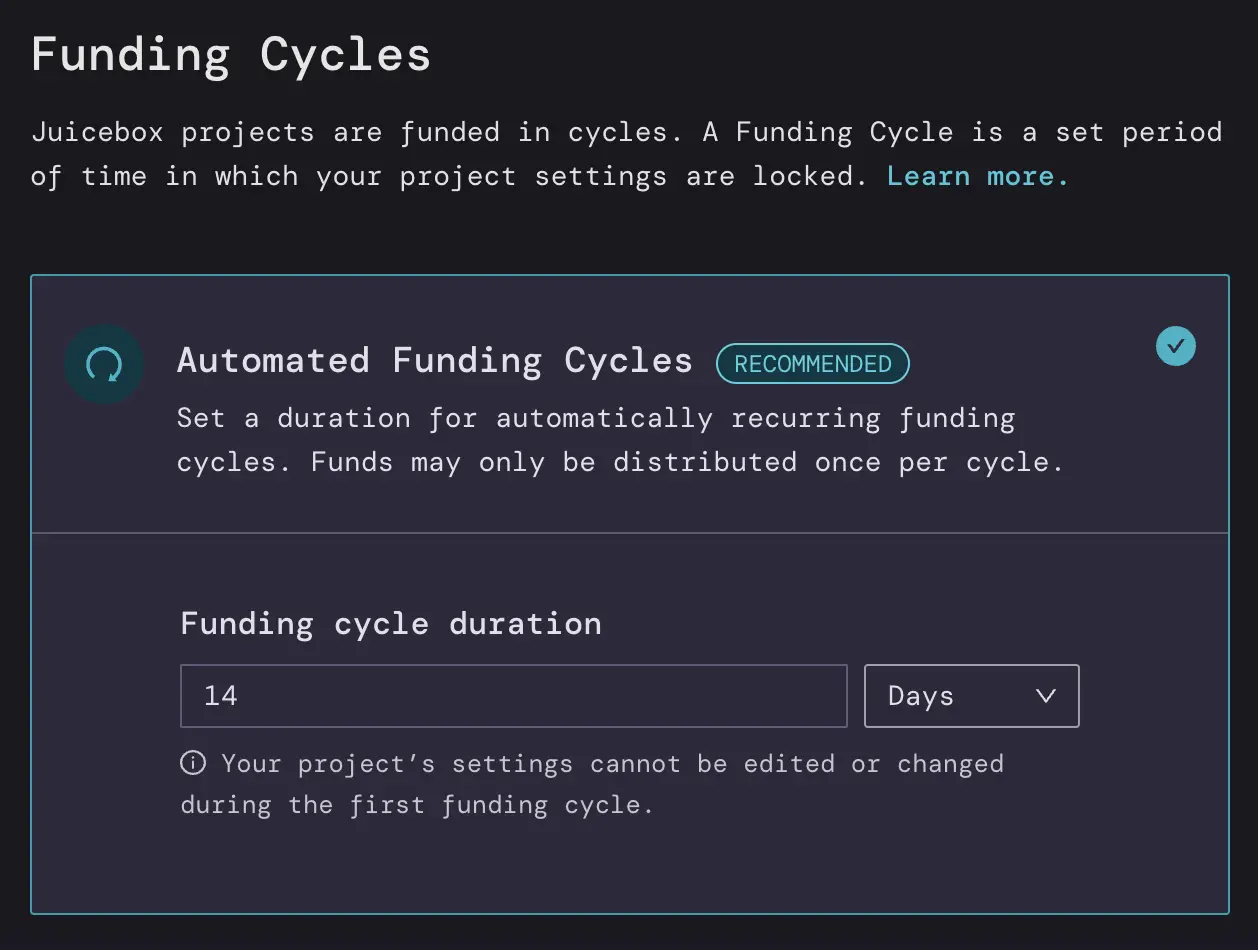
If we set this to 14 days then all of our project settings will be locked for 14 days and we can only distribute funds from the treasury once during that 14-day cycle. This helps build trust so contributors feel safe that they won’t get rugged.

You can decide what’s best for your project and if you need the flexibility to change at any time, you can choose Manual Funding Cycles. If you’re not sure, you can start with Automated Funding Cycles.

Funding Cycles

提示

Remember, you can always reconfigure your project later to reflect your needs for the project

Step 3: Funding Target

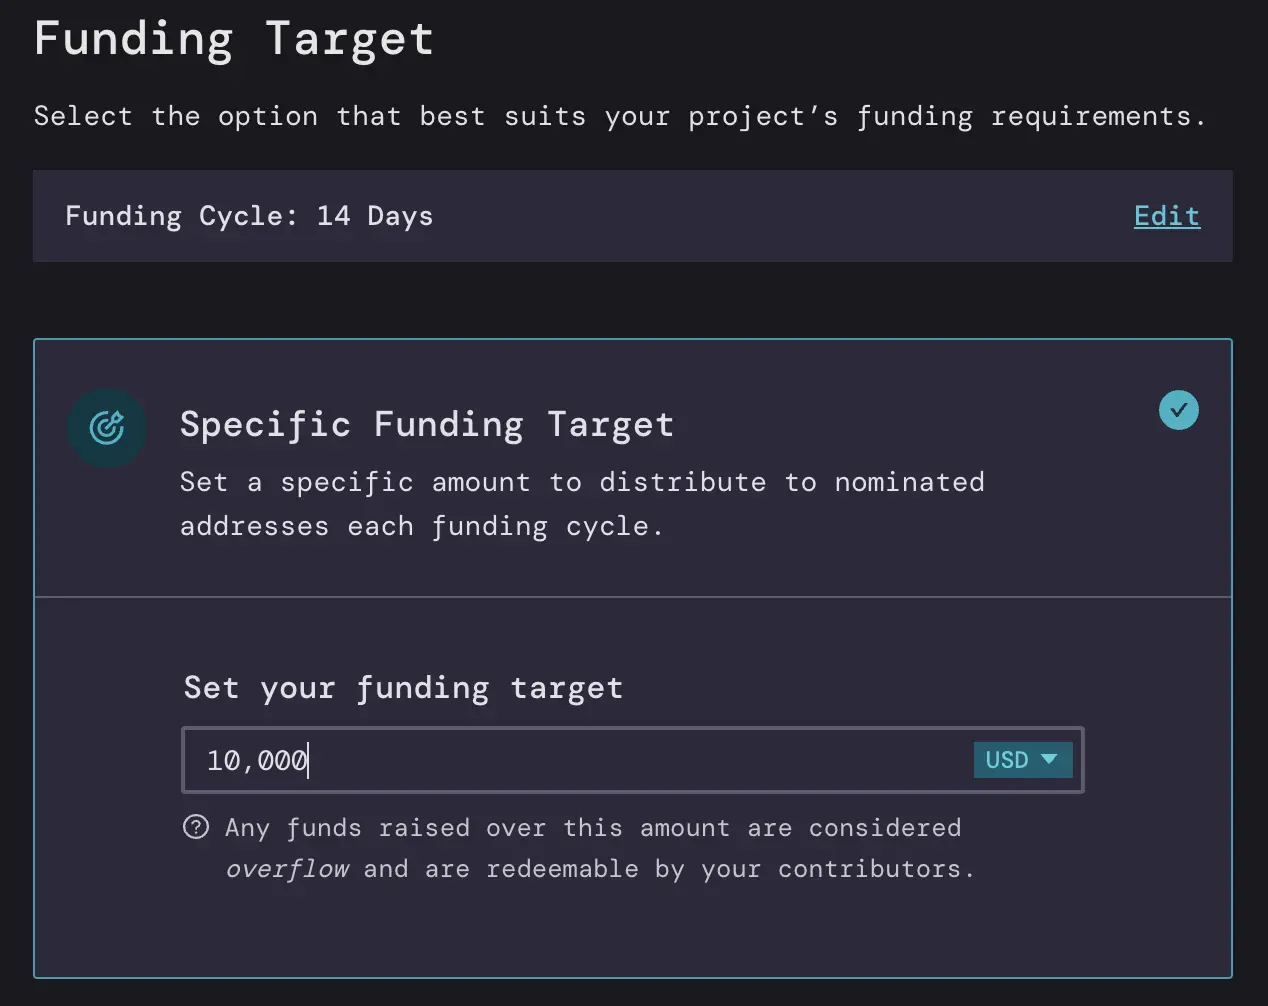
This is where you decide how much money from the project can be distributed per 14 days (the length of your funding cycle)

If we set a Specific Funding Target of 10,000 USD, we can distribute up to 10,000 USD worth of ETH per 14-day funding cycle. This is like a hard cap on the amount that can be distributed from the treasury so the project owner can’t take all the funds and disappear. Anything over 10,000 USD worth of ETH will be considered Overflow and can be redeemed by anyone who contributed to the project, almost like a refund.

Funding Target

提示

You can also set this in ETH instead of ETH denominated in USD.

Another way to do this is an Infinite Funding Target which means you can distribute as much as you want from the treasury, but this can be perceived as risky to contributors to your project because you could take all the money and run. So for this example, we’ll go with a Specific Funding Target of 10,000 USD worth of ETH.

Step 4: Payouts

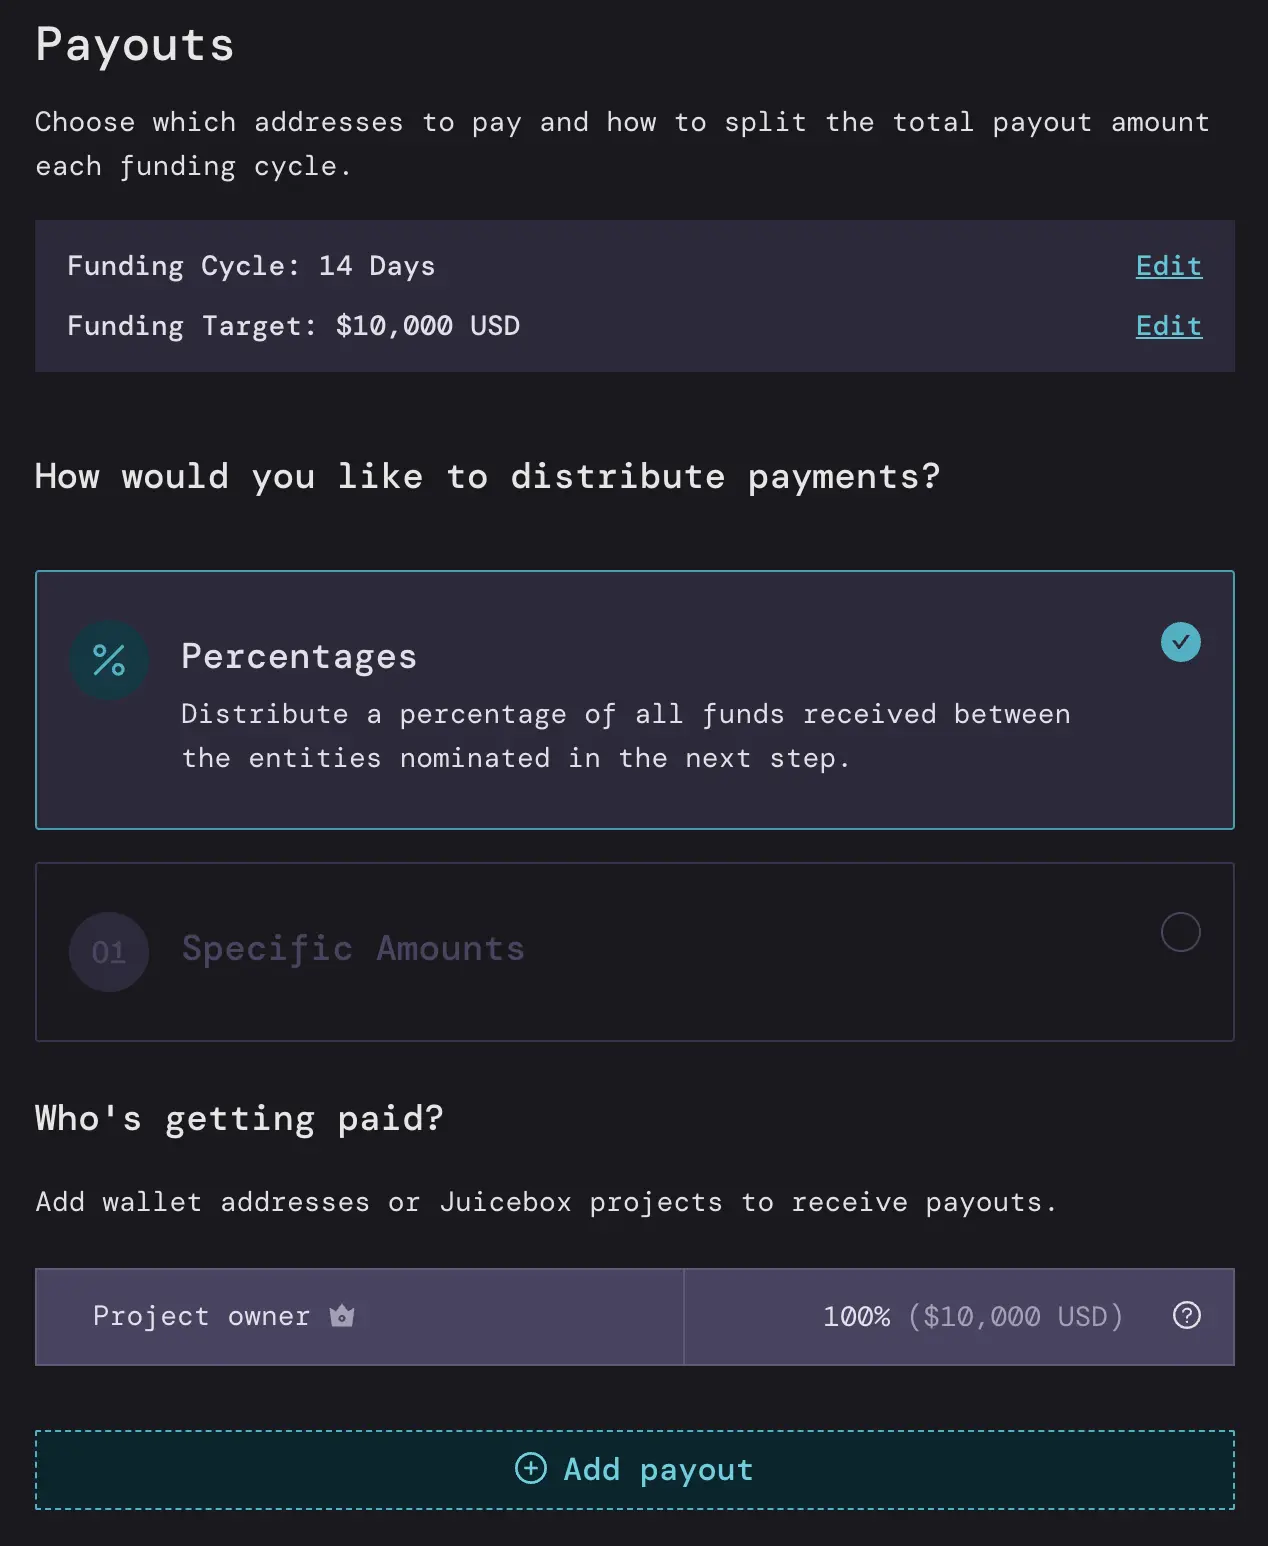
Here you can decide where to distribute the ETH that we receive every 14 days. We can do this with percentages or specific amounts.

For example, with percentages, let’s say I am the artist that made Flamingo Sunday and I want to receive 100% of the funds that come in every 14 days.

If we were doing specific amounts, I could say that I want to receive 10,000 USD worth of ETH which is the total amount that can be distributed every 14 days to myself.

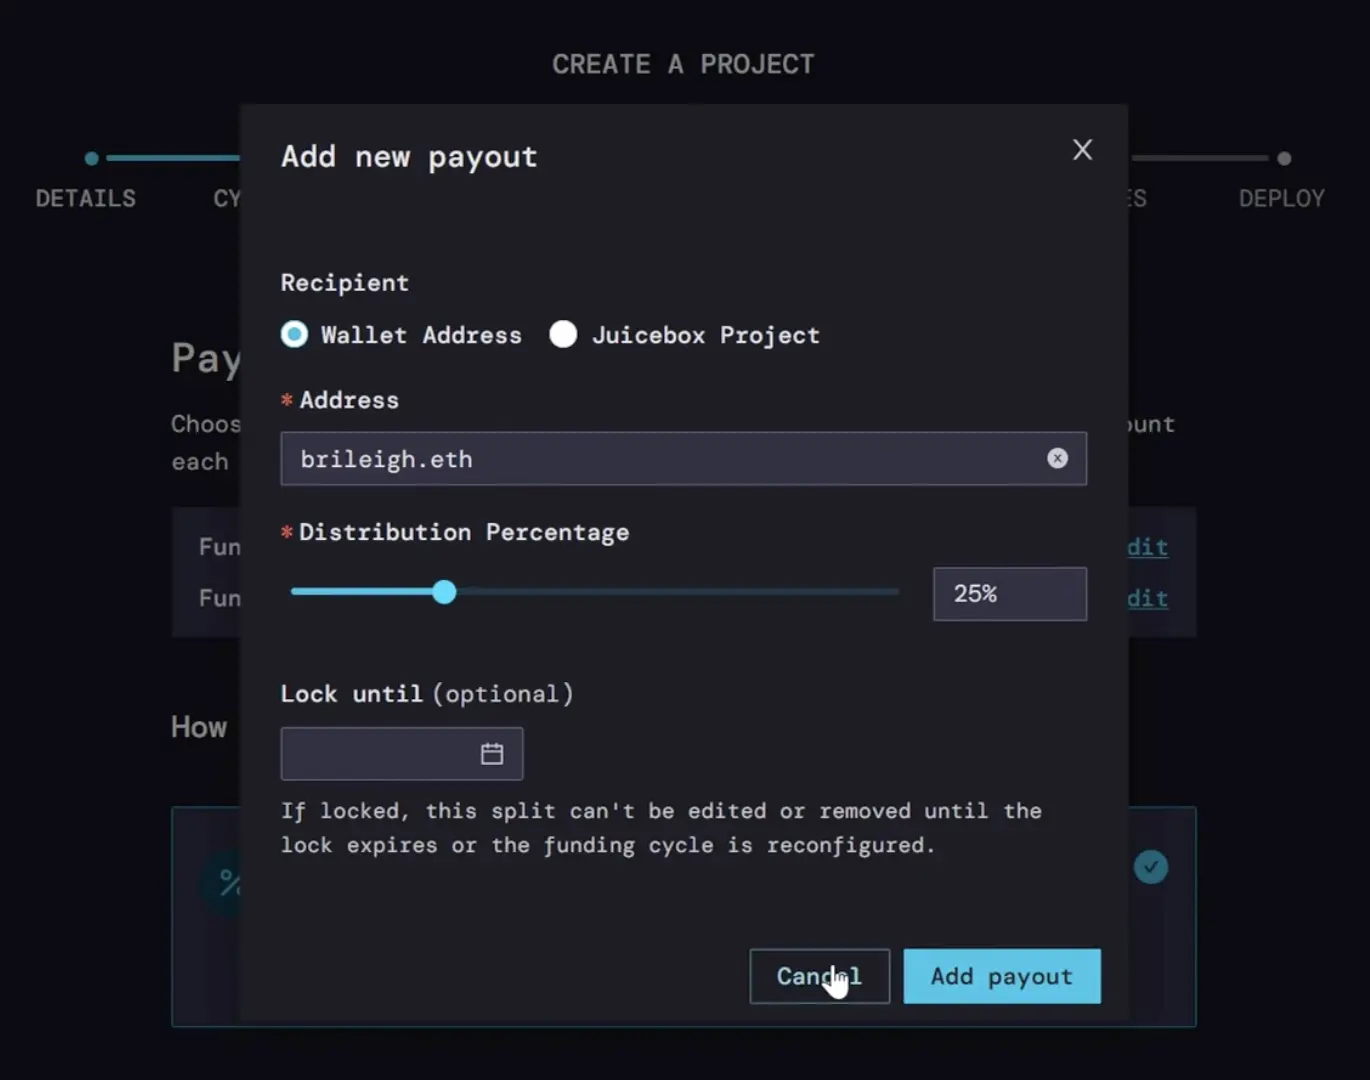
Both of these can be configured to add other people, for example if you had a team of four people (including yourself) working on the project, you could split the payouts 25% to each address by clicking Add Payout and adding their address and 25%.

how to add a payout

But for this tutorial we’ll keep it simple and stick with 100% going to the project creator.

Payouts

Step 5: Project Token

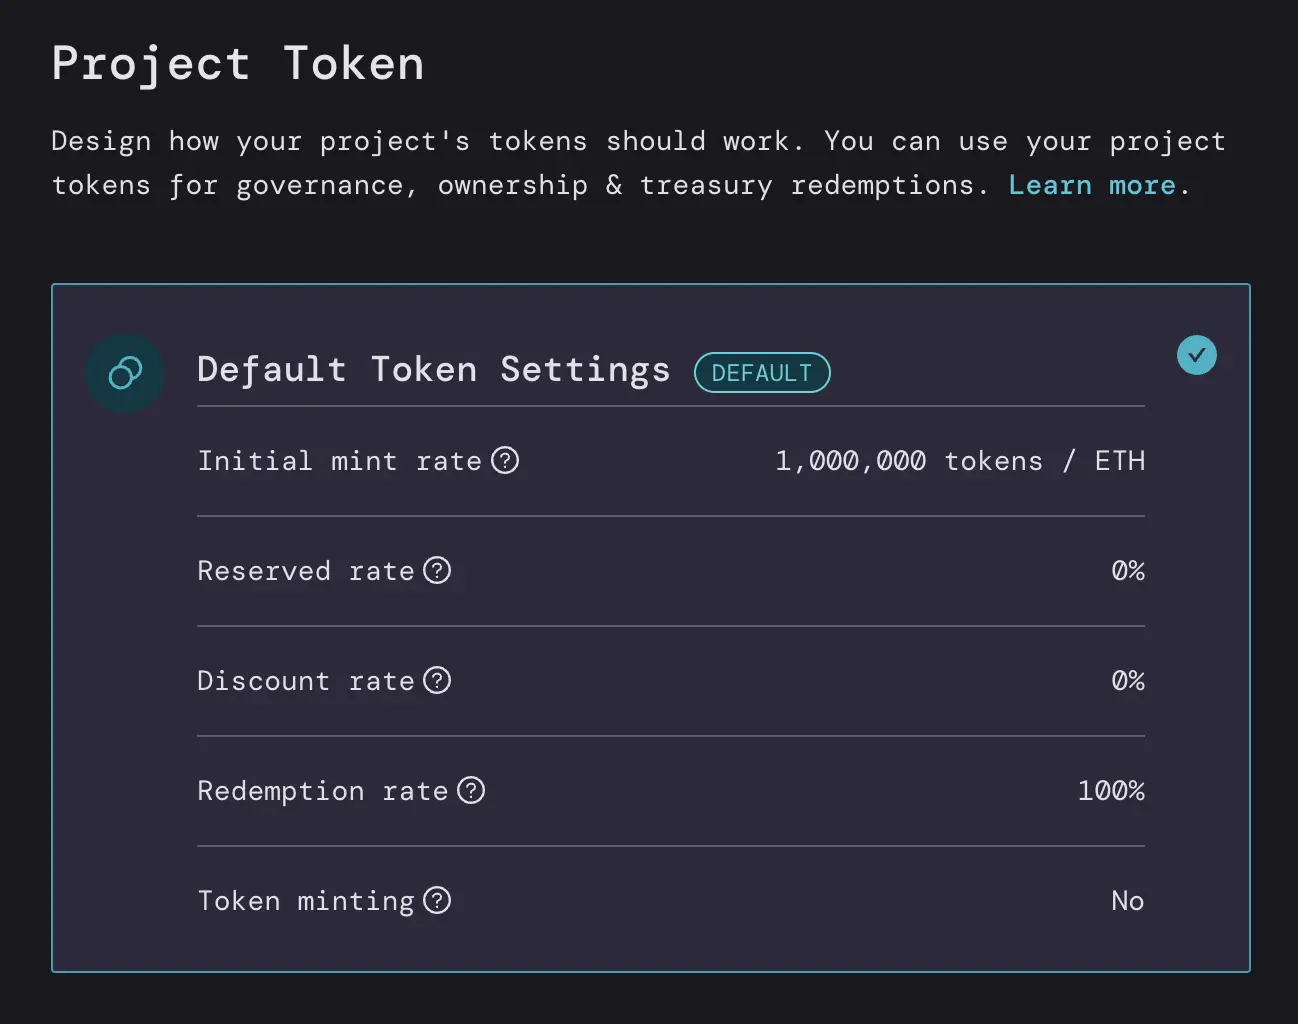
Here you can decide how your project’s tokens will work. There’s a lot of things you can customize here but the Default Token Settings will work for most projects. You can always reconfigure this setting in the future, depending on the roadmap for your NFT project.

project token

Step 6: NFTs

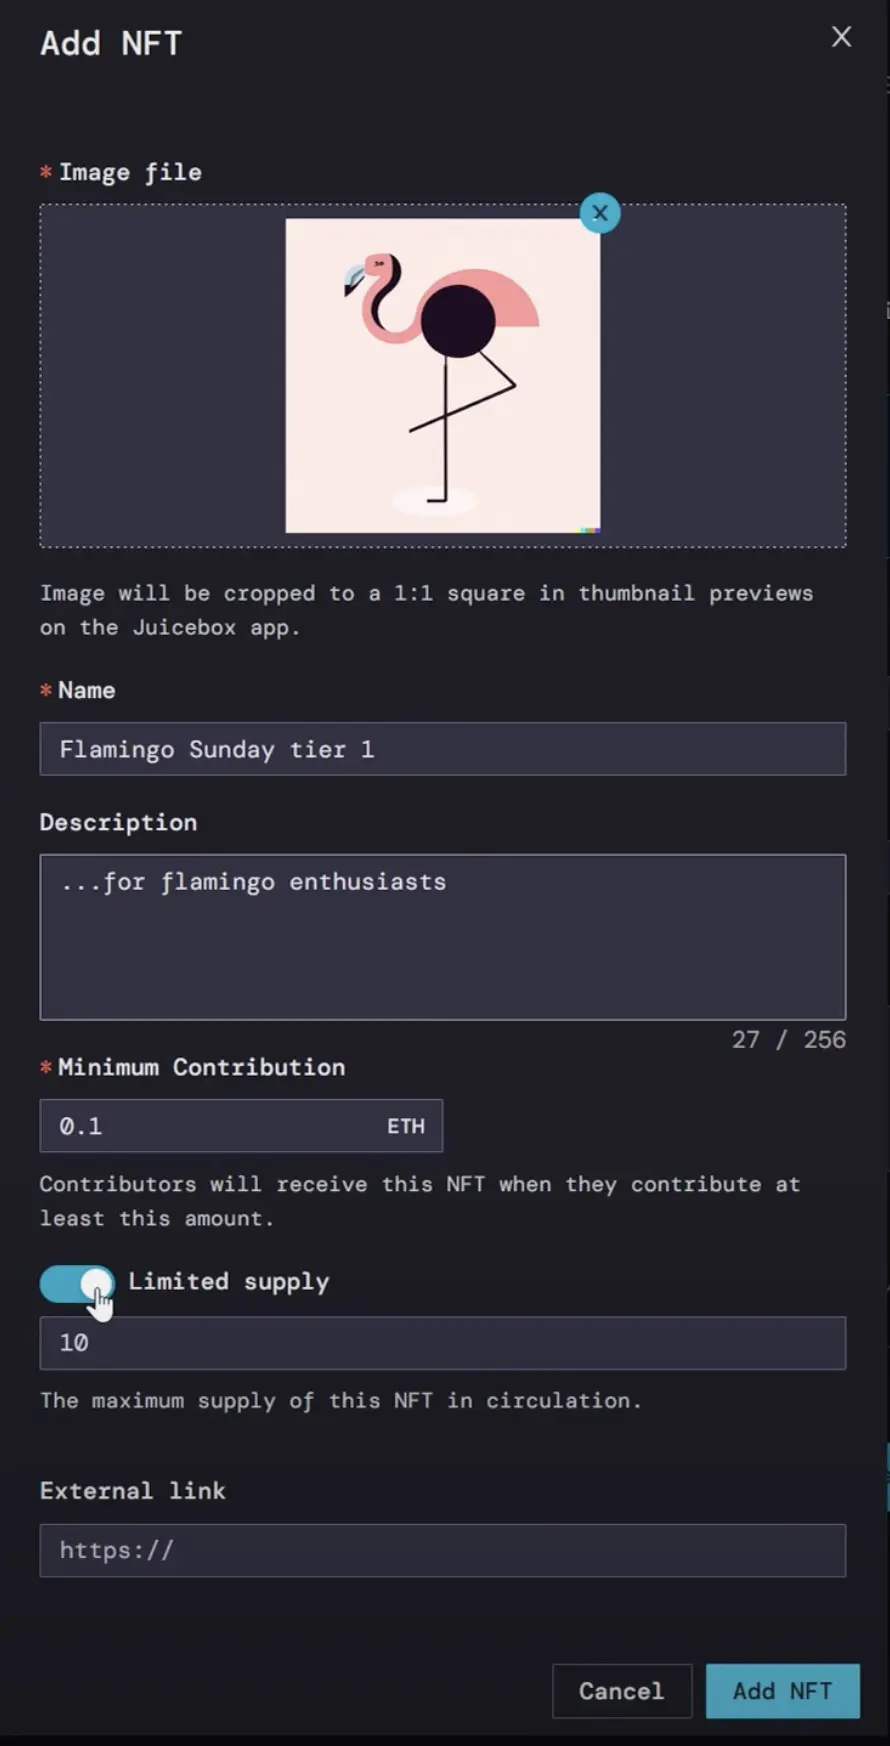
Click Add NFT choose an image, and give it a name, a description, and the minimum ETH contribution in order for someone to buy the NFT. This is also where you can decide the supply. You can either have a limited supply—for example, only 10 can be minted—or an unlimited supply. You can also add an external link to point to a website of your choice.

add nft

You can repeat this process as many times as you like for each NFT you have. They can be priced and supplied all the same, or you can create tiers. Using tiered NFTs is a great way to create different incentives for people to support your Juicebox project at different price points.

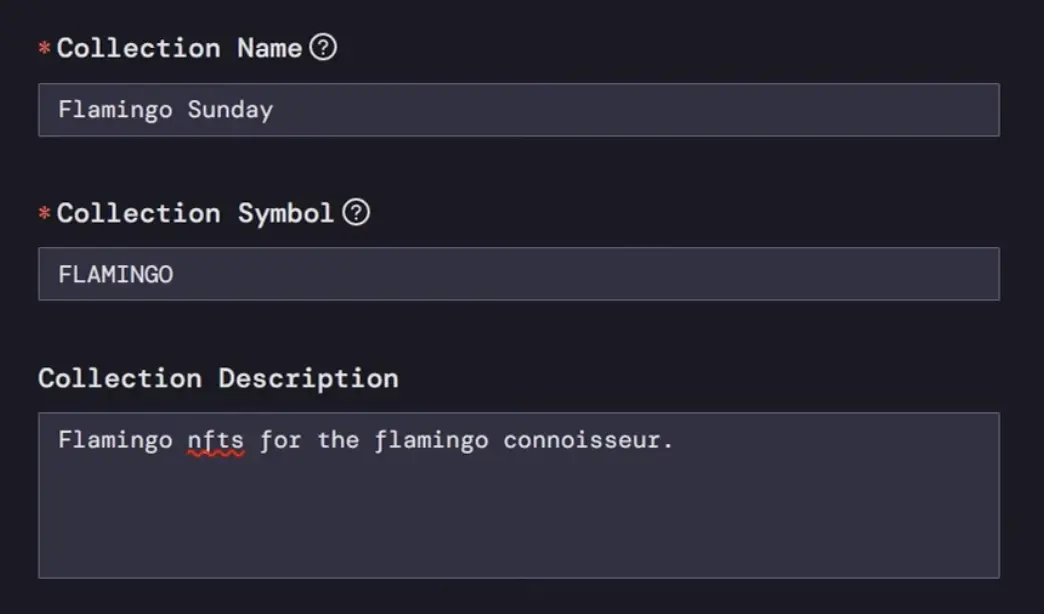
Once you have all your NFTs added, you can create a collection name, description, and custom token symbol. For this project, we’ll call it “Flamingo”

collection settings

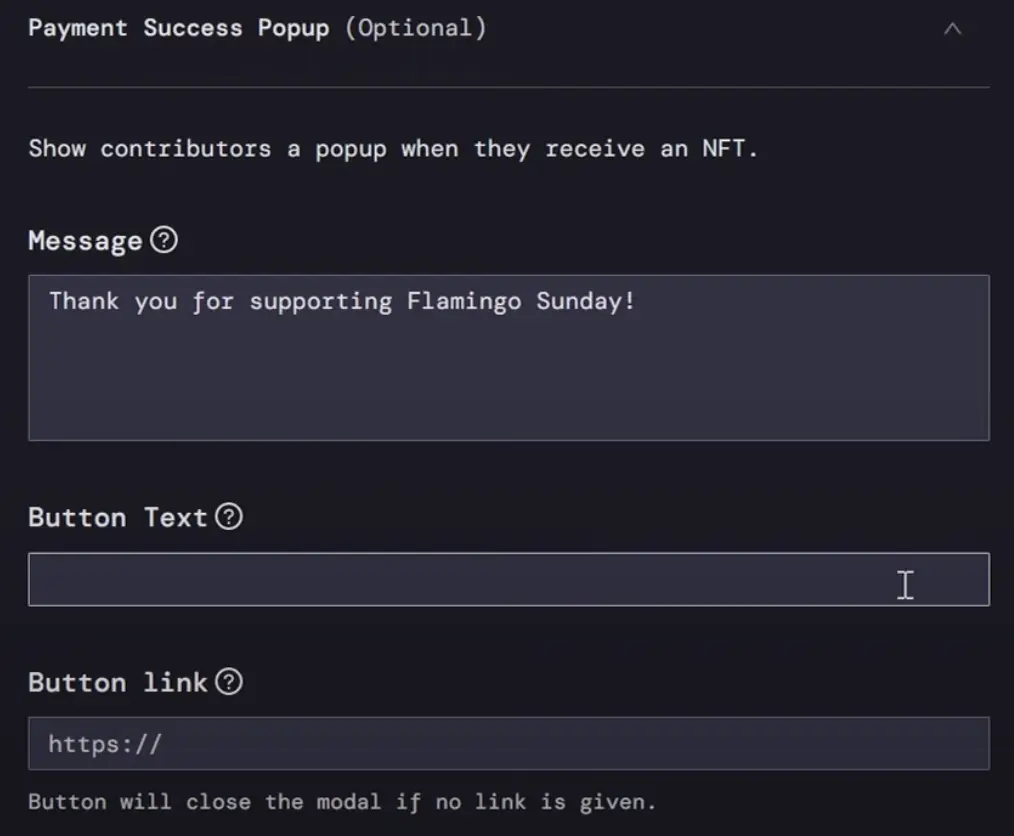
There’s also an option to add a message that appears when contributors receive an NFT as well as a button with a link, this could be a project website, Twitter, Discord, etc.

pay button

Step 7: Confirm all settings (rules)

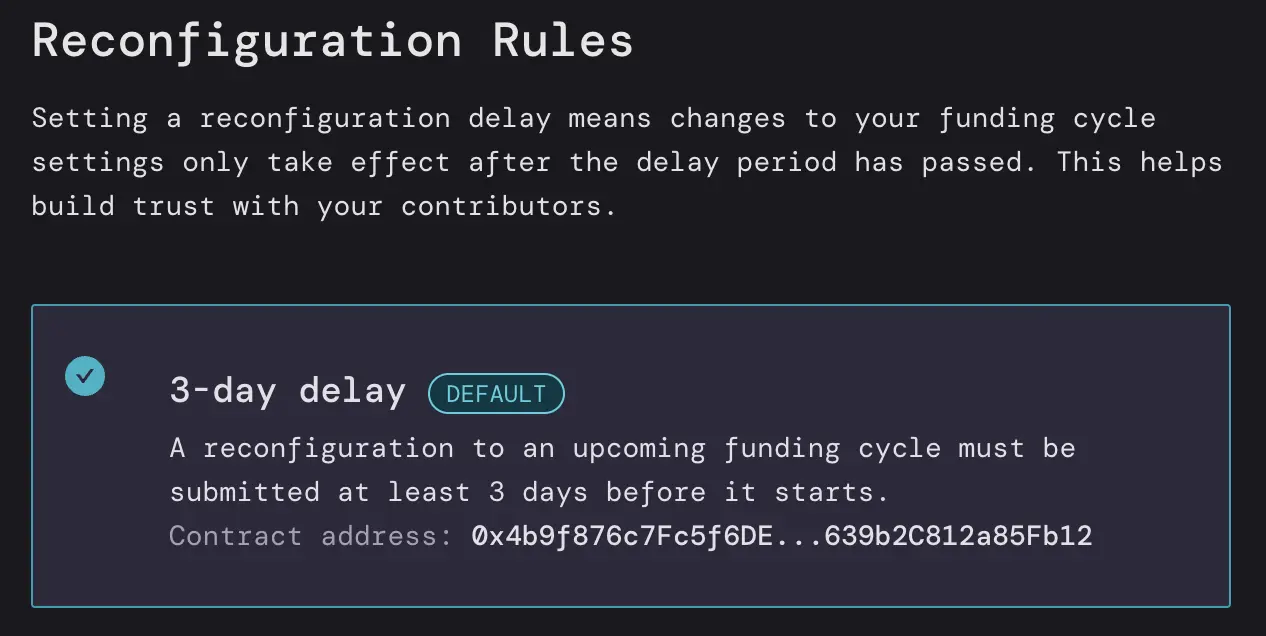
The default is a 3-day delay, which means that any changes to the project settings need to be submitted at least 3 days before the next funding cycle starts. You can think of this as a safety measure. In other words, the project can’t suddenly change all of their settings.

You can change this to be longer, shorter, or no delay, but we’ll stick with the 3-day default.

3 day delay

Before deploying, review your settings and make any changes needed. You can always go back and tweak things before you deploy. Check the Terms of Service box and you’re ready to go! Click Deploy, confirm the transaction in your wallet, and your project is live!

project deployed

提示

You can go through this entire process on Goerli testnet before launching your project on mainnet. If you have any questions, please come by the Support channel in the Juicebox Discord.

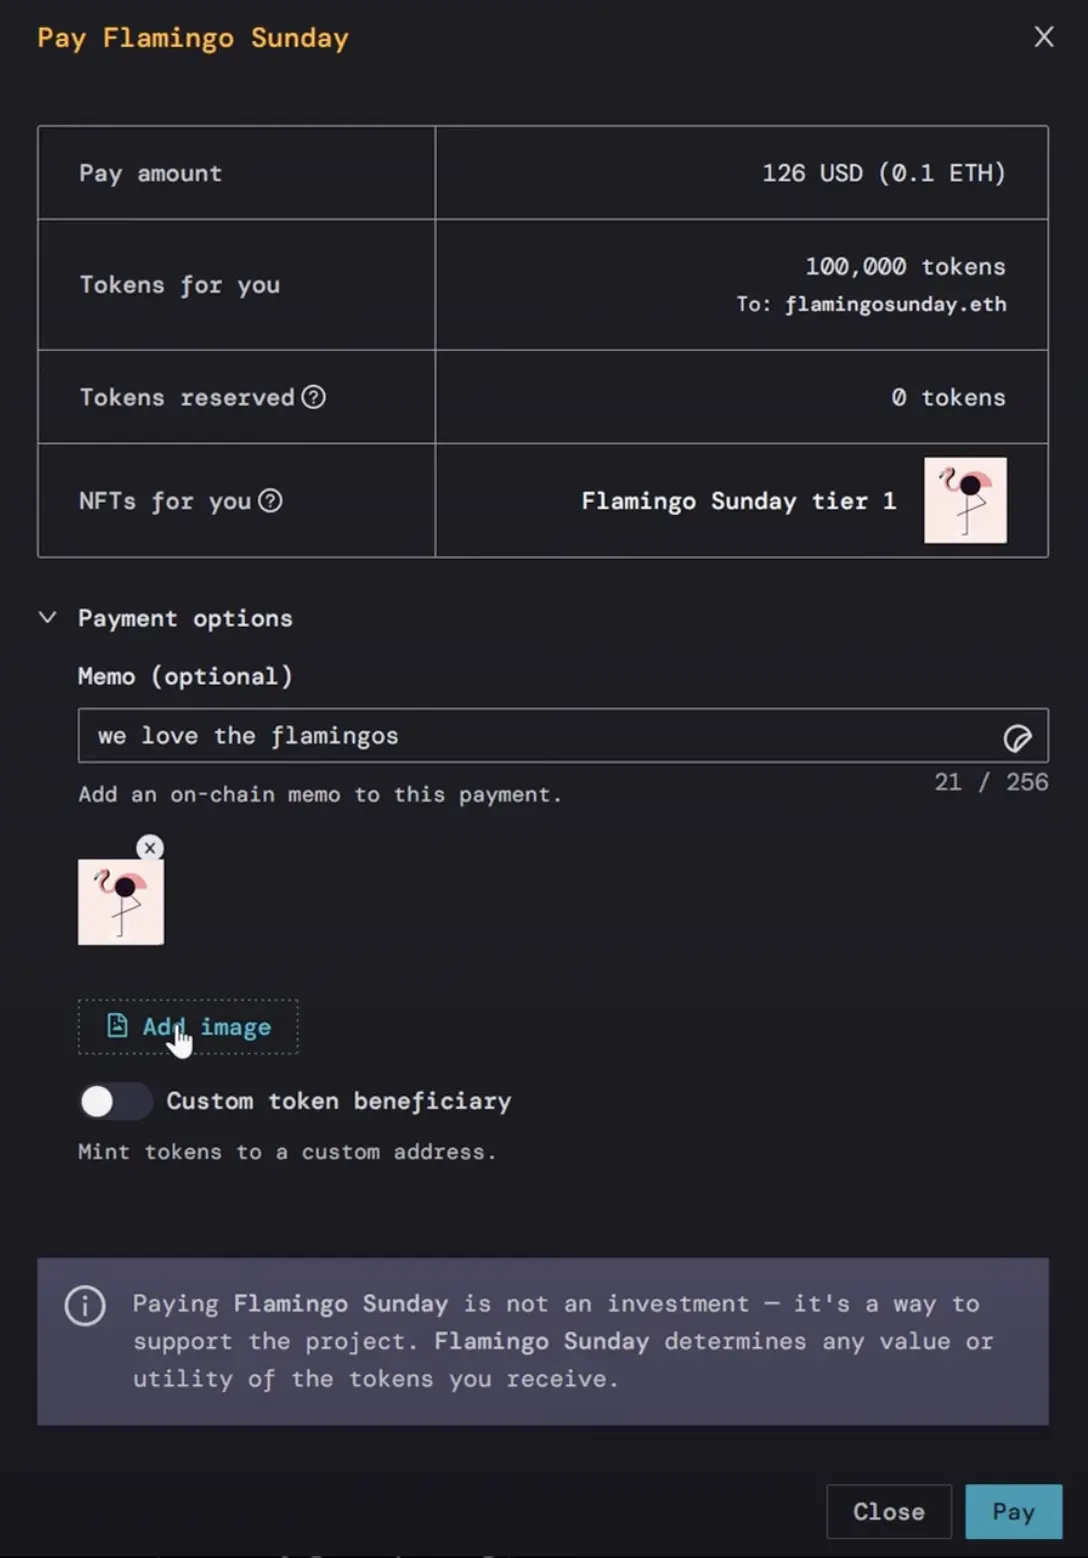
Note that the NFT images might take awhile to display properly. If someone wants to purchase an NFT at the 0.1 ETH tier, for example, they just click on the NFT, click the customized pay button, click I understand to acknowledge the safety warning, and then click Pay. You can even leave a little on-chain memo like “we love the flamingos”, an image, or Banny sticker with your contribution.

How to pay

So we’ll refresh the page and now you can see the NFT that we just purchased in the Activity feed on the right.

If you need help along the way, jump into the Support channel in the Juicebox Discord.

🐦 Follow Juicebox on Twitter: @JuiceboxETH

🚀 Trending projects on Juicebox

📚 Project Creator Docs

📹 YouTube Tutorials

· 3 分钟阅读
Brileigh
Matthew

Tutorial on how to seta JB project handle using ENS

Setting a handle for your project on Juicebox is a great way to customize your page by linking your ENS to your project. Project handles on Juicebox make it easier for people to find your project and help set it apart with a vanity URL. This guide will show you how to set the handle directly from juicebox.money and manually using the ENS app in less than 5 minutes.

You can follow along in this article or the Youtube video.


Before you start, you need to have:

  • An ENS name that you own and control
  • A Juicebox project that you are the owner of

Step 1: Add Handle

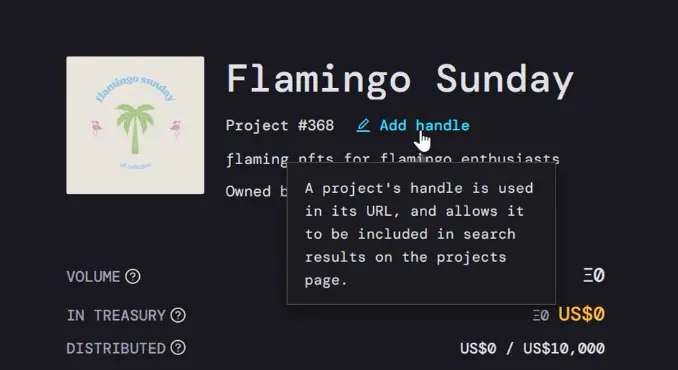
Click right underneath the Project title where it says Add handle.

add handle

Step 2: Set ENS name

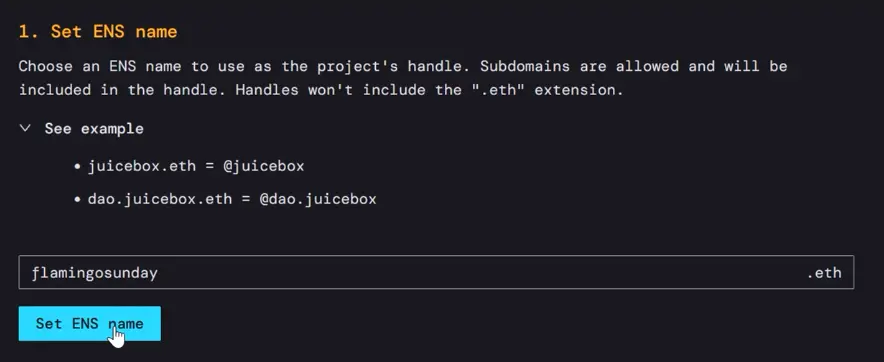
Enter an ENS name that you own, and click Set ENS name This will prompt a transaction that you’ll have to confirm with your wallet.

Set ENS name

Step 3: Set text record

After the transaction is confirmed, you’ll see that it lists the ENS chosen as the project handle, but you’re not done yet. Next you need to set the text record for that ENS name, so click the button below that says Set text record. Then confirm the transaction with your wallet.

Set text record

It might take a few minutes to update, but you can refresh your project page and see the project handle below the project title. The project URL with the project ID number will still work, but you can also use your new URL which is juicebox.money/ @yourensname

all-done

And that’s it!

You can also set this text record manually using the ENS app.

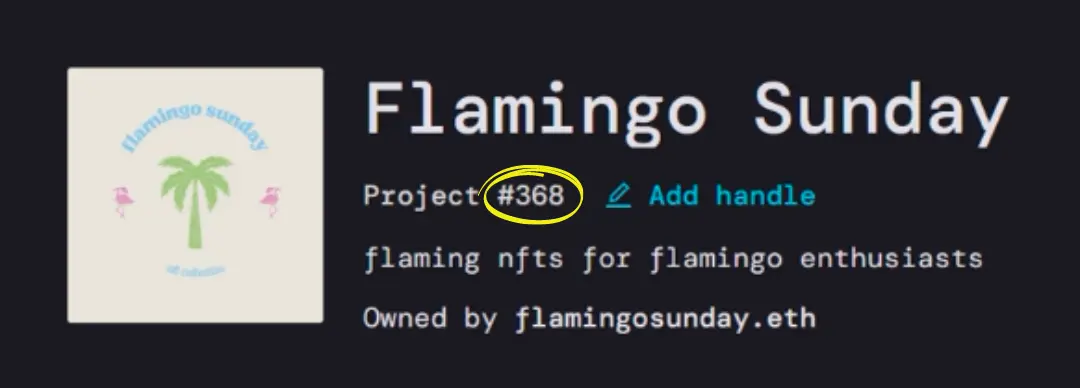
Before you do that, take note of your project number which you can always find under the project name or you can look at the URL for your project. In this example, our project is #368.

Project number

(Using ENS) Step 1: Add / Edit Record

Go to app.ens.domains, go to My Account on the left and choose the ENS address that you want to use. Then you’ll click Add / Edit Record on the right side

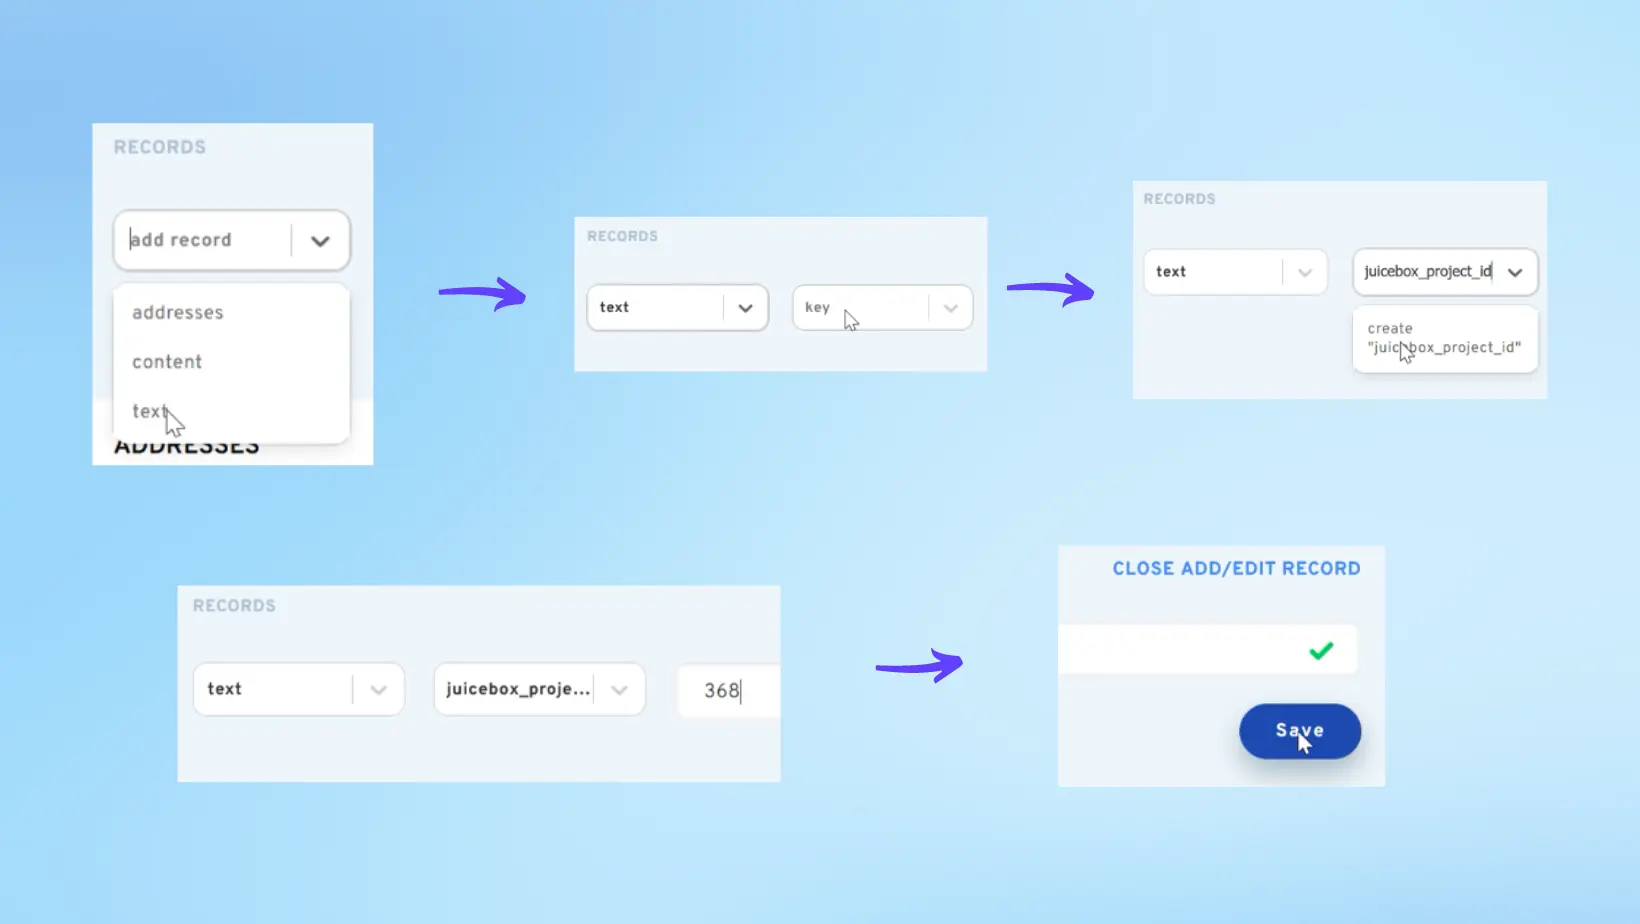
(Using ENS) Step 2: Create juicebox_project_id

You’ll choose text in the drop-down menu on the left and in the next drop-down where it says key we’ll click and start typing juicebox_project_id and then click the message that appear below that says create juicebox_project_id. Then we’ll click the field to the right and enter our project number which is 368.

set ens manually

(Using ENS) Step 3: Save and confirm

Press Save and then scroll down to the bottom of the page to click Confirm. This will prompt a transaction that you’ll need to confirm your wallet. Once confirmed, you’ll see that it’s been added to the list of text records for that ENS address.

ENS text record

Now you can go back to your project on Juicebox, refresh the page, and your handle is now set to your ENS name! Please note that your old URL with the project ID will still work but we can now use juicebox.money/@flamingosunday.

That's it

And that's it!

If you need help along the way, drop into the Support channel in the Juicebox Discord.

🐦 Follow Juicebox on Twitter: @JuiceboxETH
🚀 Trending projects on Juicebox

📚 Project Creator Docs

📹 YouTube Tutorials

· 3 分钟阅读
nnnnicholas

Sending ETH to an ENS address is one of the simplest ways for donors to interact with a Juicebox project. For example, sending ETH to auditfund.eth pays that ETH directly into the Audit Fund Juicebox project, and issues the corresponding tokens to the sender, all from within their wallet of choice!
In this tutorial, I'll show you how to configure an ENS address to forward ETH to a Juicebox project.

You can also watch the video walkthrough by JBDAO contributors Matthew and Brileigh:


Before you start

Have a Juicebox Project

Before you can receive donations, you'll need a Juicebox Project. Learn how to Make Your Juicebox Project.

Have an ENS Domain

You'll need to own or be the controller of an ENS address (such as yourname.eth) to follow the rest of this tutorial. Register an address at ENS Domains.

Optional: Set up your Juicebox Project Handle

It's not necessary to complete this tutorial, but it's also a good idea to set up your project handle. Project handles gives your project a vanity url like juicebox.money/@auditfund, rather than the default juicebox.money/v2/p/256, and will make your project appear in the site's search. They're free and only cost a little gas for the setup transactions.

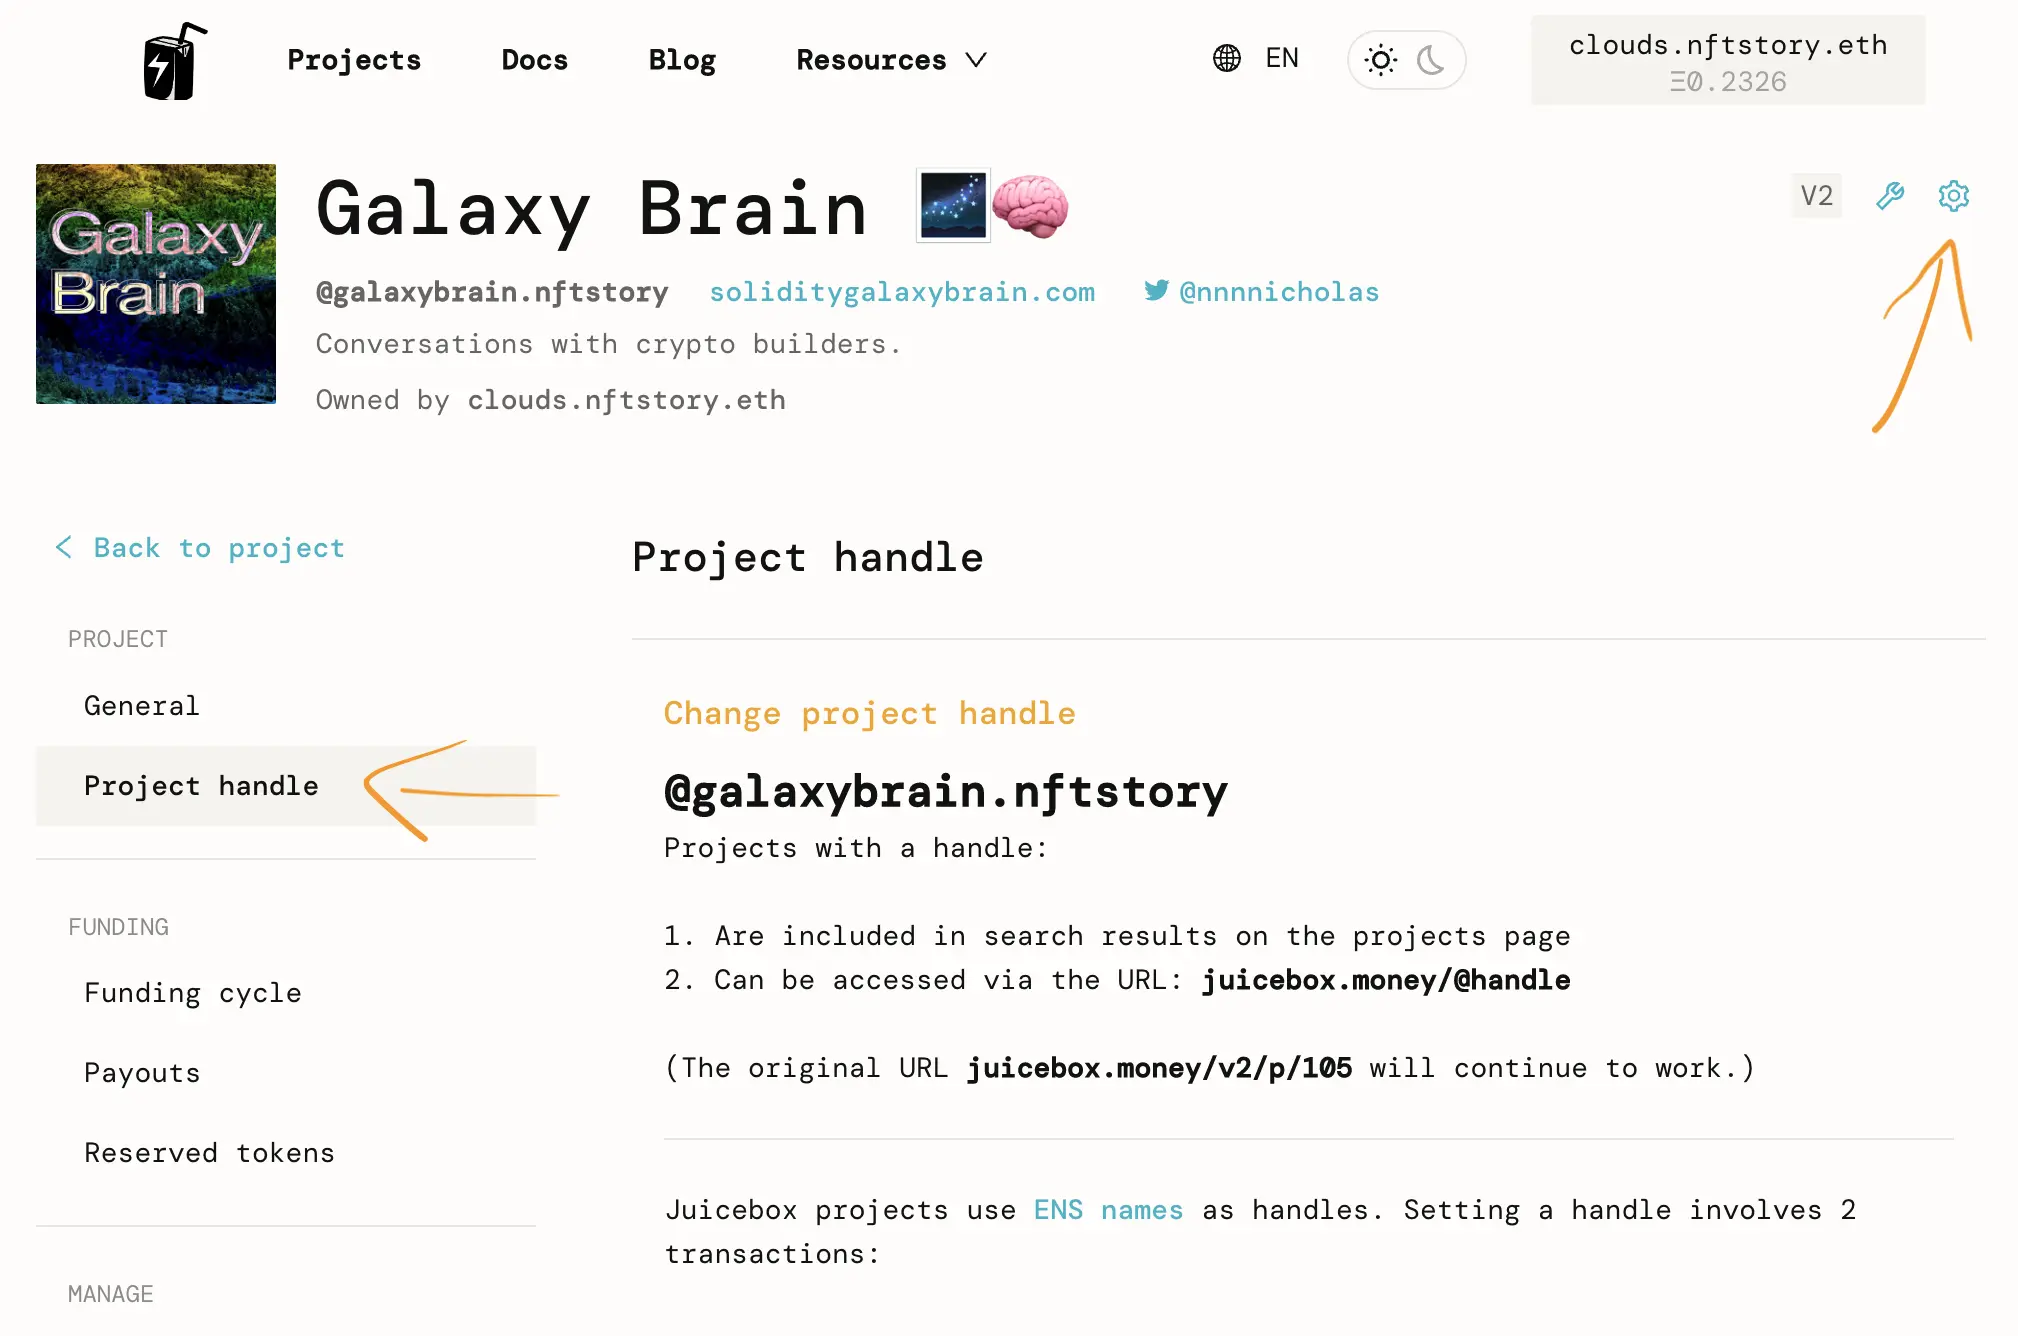
To set up a project handle, go to the project's page on juicebox.money, connect wallet with the project owner's wallet, click the cog icon to access the Project Settings, then select Project handle in the menu and follow the instructions on that page.

1. Create a Payment Address

A payment address forwards ETH it receives to a given project. Anyone can create a payment address for a project.

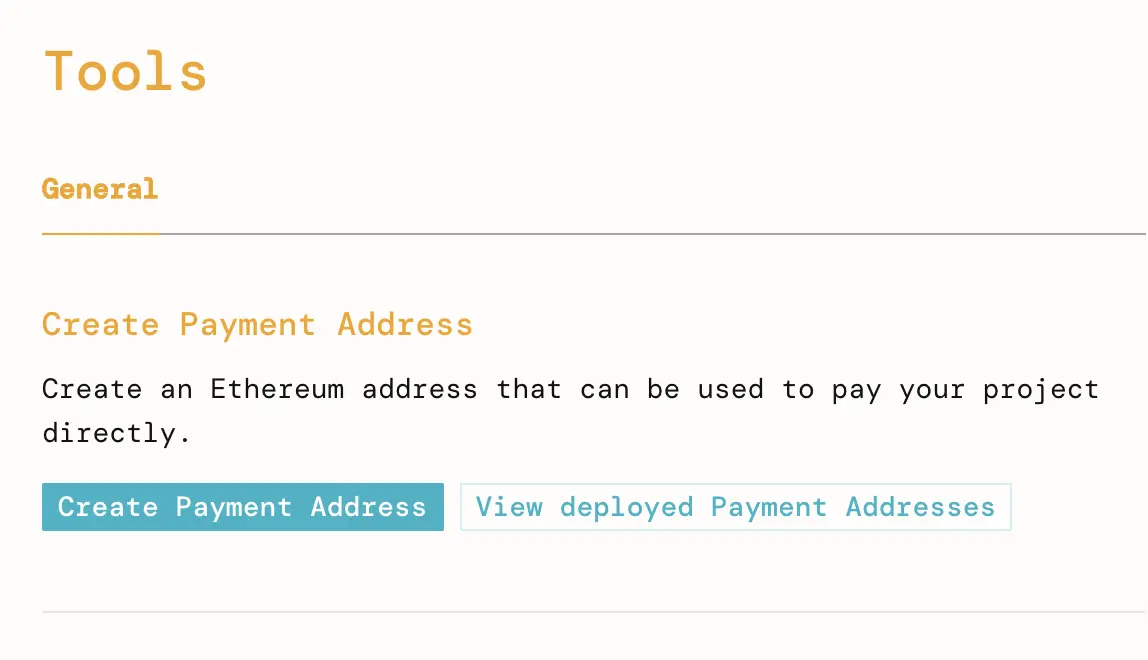
On the project page, click the tools button.

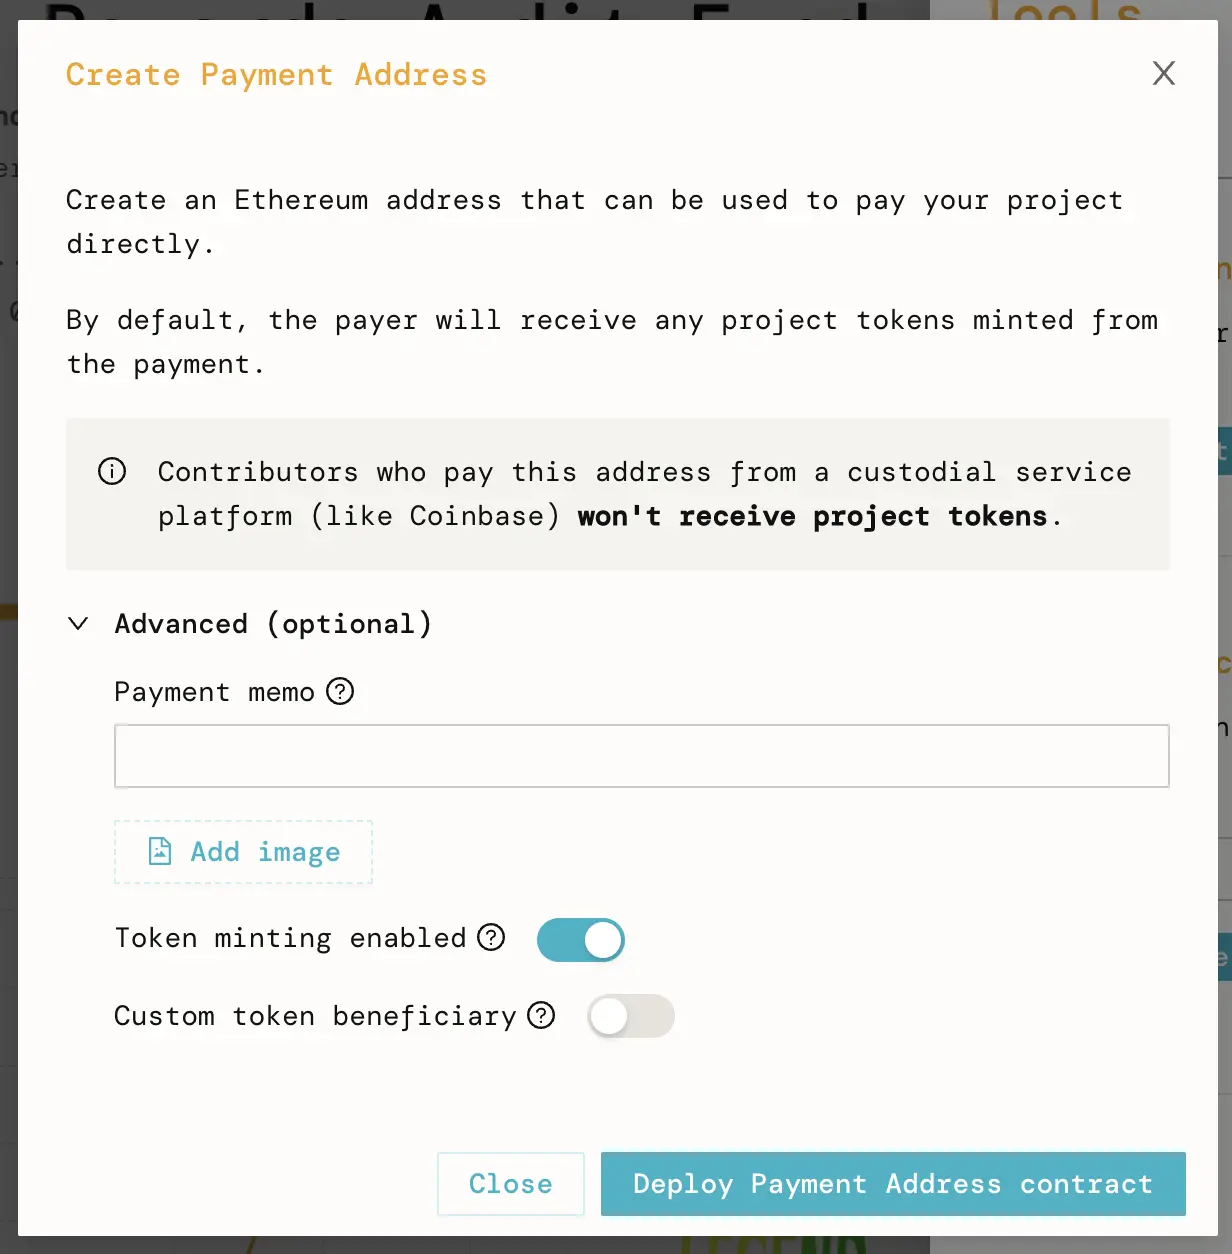
Click Create Payment Address and follow the instructions on the page.

If you insert text or a link to an image (https or ipfs) in the payment memo, that memo will appear in the project's Activity Feed each time anyone sends ETH to the ENS address we'll configure in the next steps.

2. Configure the Payment Address in the ENS address's records

Go to https://app.ens.domains/name/YOURNAME.eth/details. You'll have to substitute YOURNAME for the .eth address you're trying to configure.

Click Add/Edit Record, paste the payment address you generated into the Addresses: ETH input. Click save and confirm the transaction in your wallet.

The ETH record is now set. ETH transactions sent to this ENS address will be directed to the payment address, which will in turn forward the ETH to the Juicebox project and issue the project's tokens to the address that sent the original ETH transaction, if the project payer was configured to do so.

Conclusion

In this tutorial you've learned how to configure an ENS address to receive donations at a Juicebox project. Let potential supporters know that they can simply send ETH to yourname.eth to pay your project, and receive membership tokens, too.

Advanced Note: This approach works great for receiving ETH donations. To accept other tokens sent to the ENS address, your project will need to configure Payment Terminals for the tokens you would like to receive. If you're interested in this, say hello in the #🚀|project-creators channel in the Discord.

· 1 分钟阅读
nnnnicholas

In this video, I'll show you how to:

  • Create a list of addresses that hold your project's tokens using Juicebox.money
  • Create a list of addresses that have voted in your project's Snapshot
  • Create a JokeDAO contest
  • Airdrop voting tokens using Coinvise

The Snapshot GraphQL query used in the video:

query {
votes (
first: 1000,
skip: 0,
where: {
space_in: ["jbdao.eth"],
},
orderDirection: desc
) {
voter
}
}

For support, visit discord.gg/juicebox.

· 3 分钟阅读
nnnnicholas

In this guide, I’ll show you how to deploy an NFT to Ethereum with Thirdweb's NFT Edition Drop and forward the mint sale proceeds to a Juicebox Project.

Thirdweb contracts have no fees.

Before you start, you should have:

  • At least one piece of artwork for your NFT (image, audio, video).
  • A Juicebox project you’d like to fund. This can be your project or someone else’s.

1. Navigate to Project tools

Go to the project you would like to pay on juicebox.money. Click the Tools button at the top-right of the page.

Project tools on juicebox.money

2. Create payable address

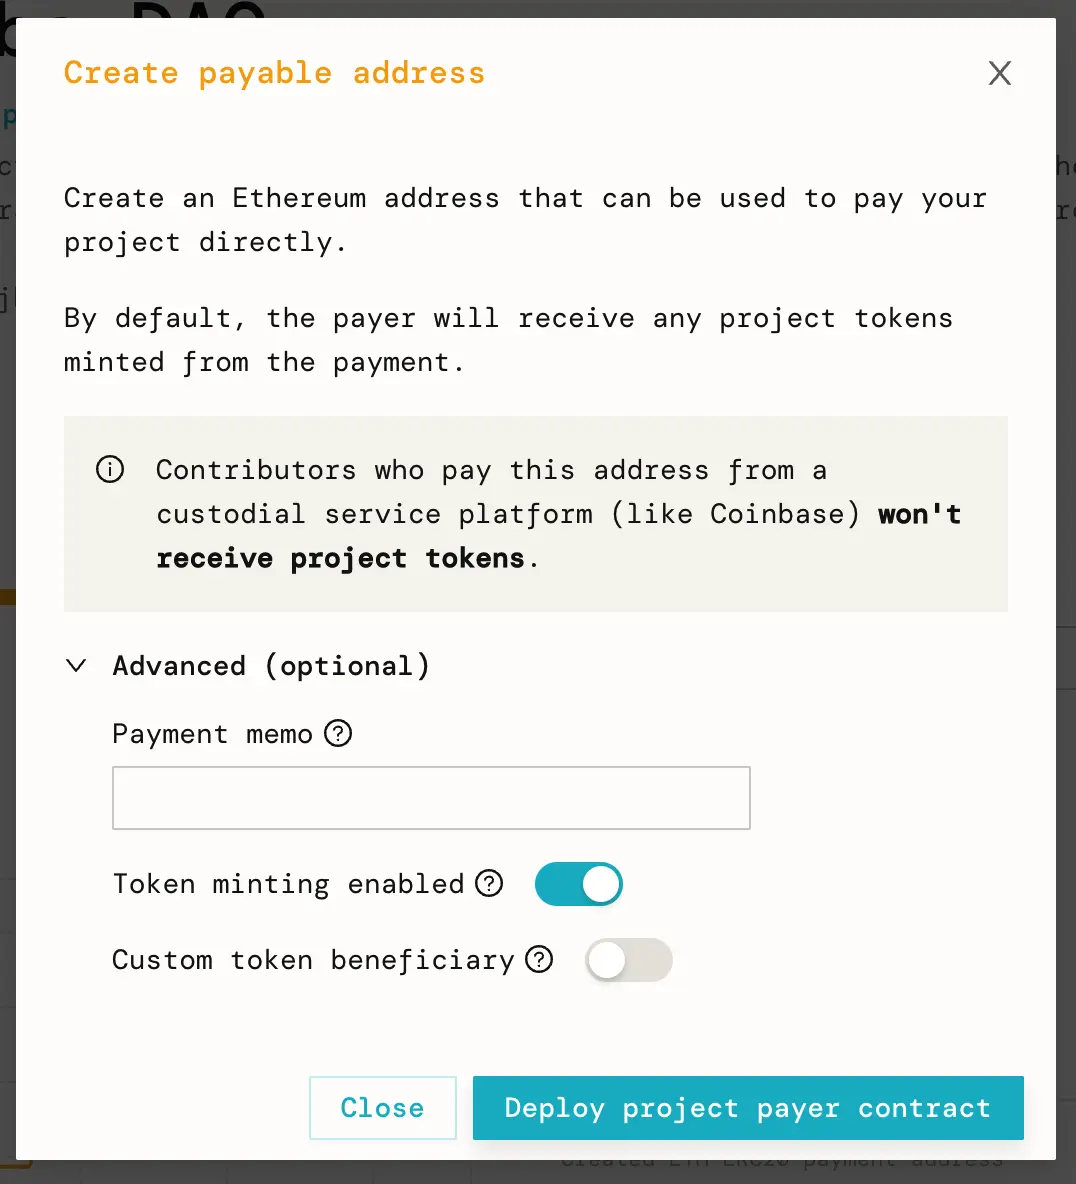
Click Deploy project payer contract in the project tools.

3. Deploy your Project Payer

Click Deploy project payer contract. Leave the Advanced features set to their defaults. Verify that the transaction looks good in your wallet, then sign it.

Bonus: If you include text or an ipfs://Qm... link to an image in the memo field, every contribution to the project made via this Project Payer will have that text and/or image in the Juicebox project's activity feed. An image representing your colleciton is a good choice.

4. Copy Project Payer address

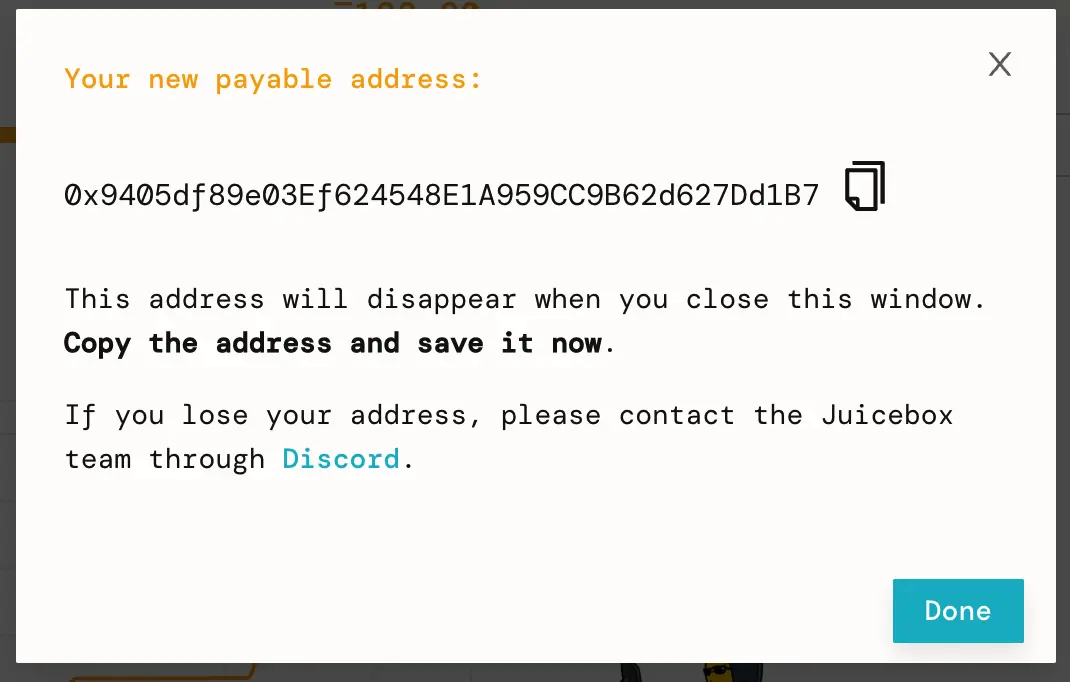
When the transaction succeeds, a pop-up will display the new Project Payer’s address.

Project Payer creation successful pop-up.

A new event called “Created ETH-ERC20 payment address” will also appear in the project’s activity feed with the same information. Copy the Project Payer address to your clipboard.

The new Project Payer in the project's Activity feed.

5. Create your NFT Collection

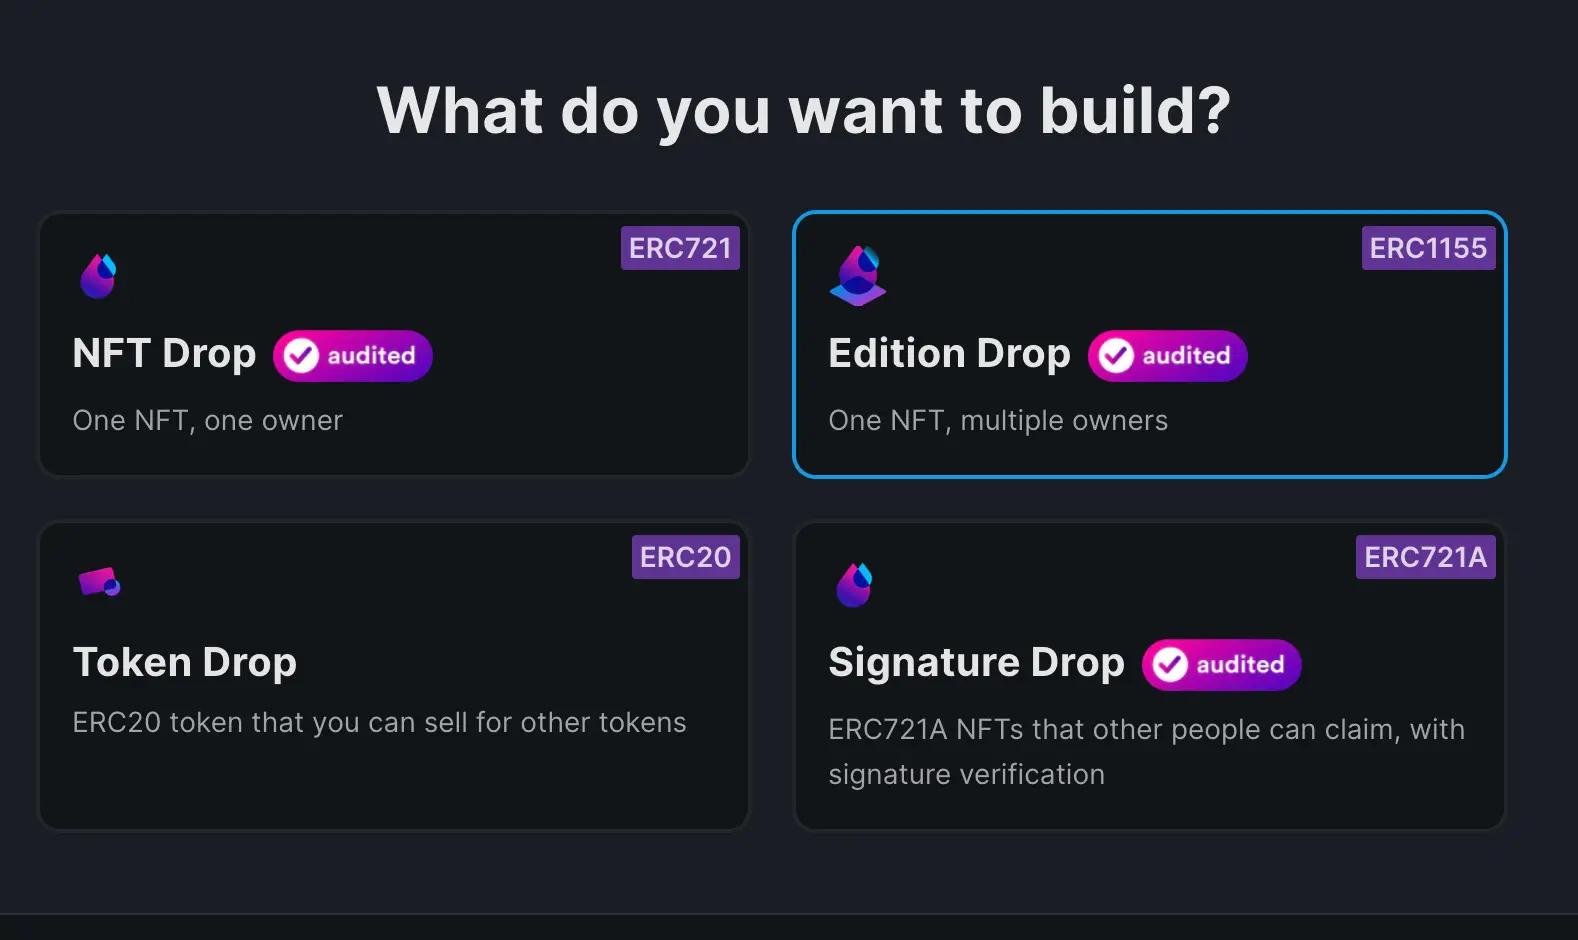
Go to thirdweb's drop page and select an NFT drop type, or browse the differences between their drop types in their docs. I’ll be selecting Edition Drop.

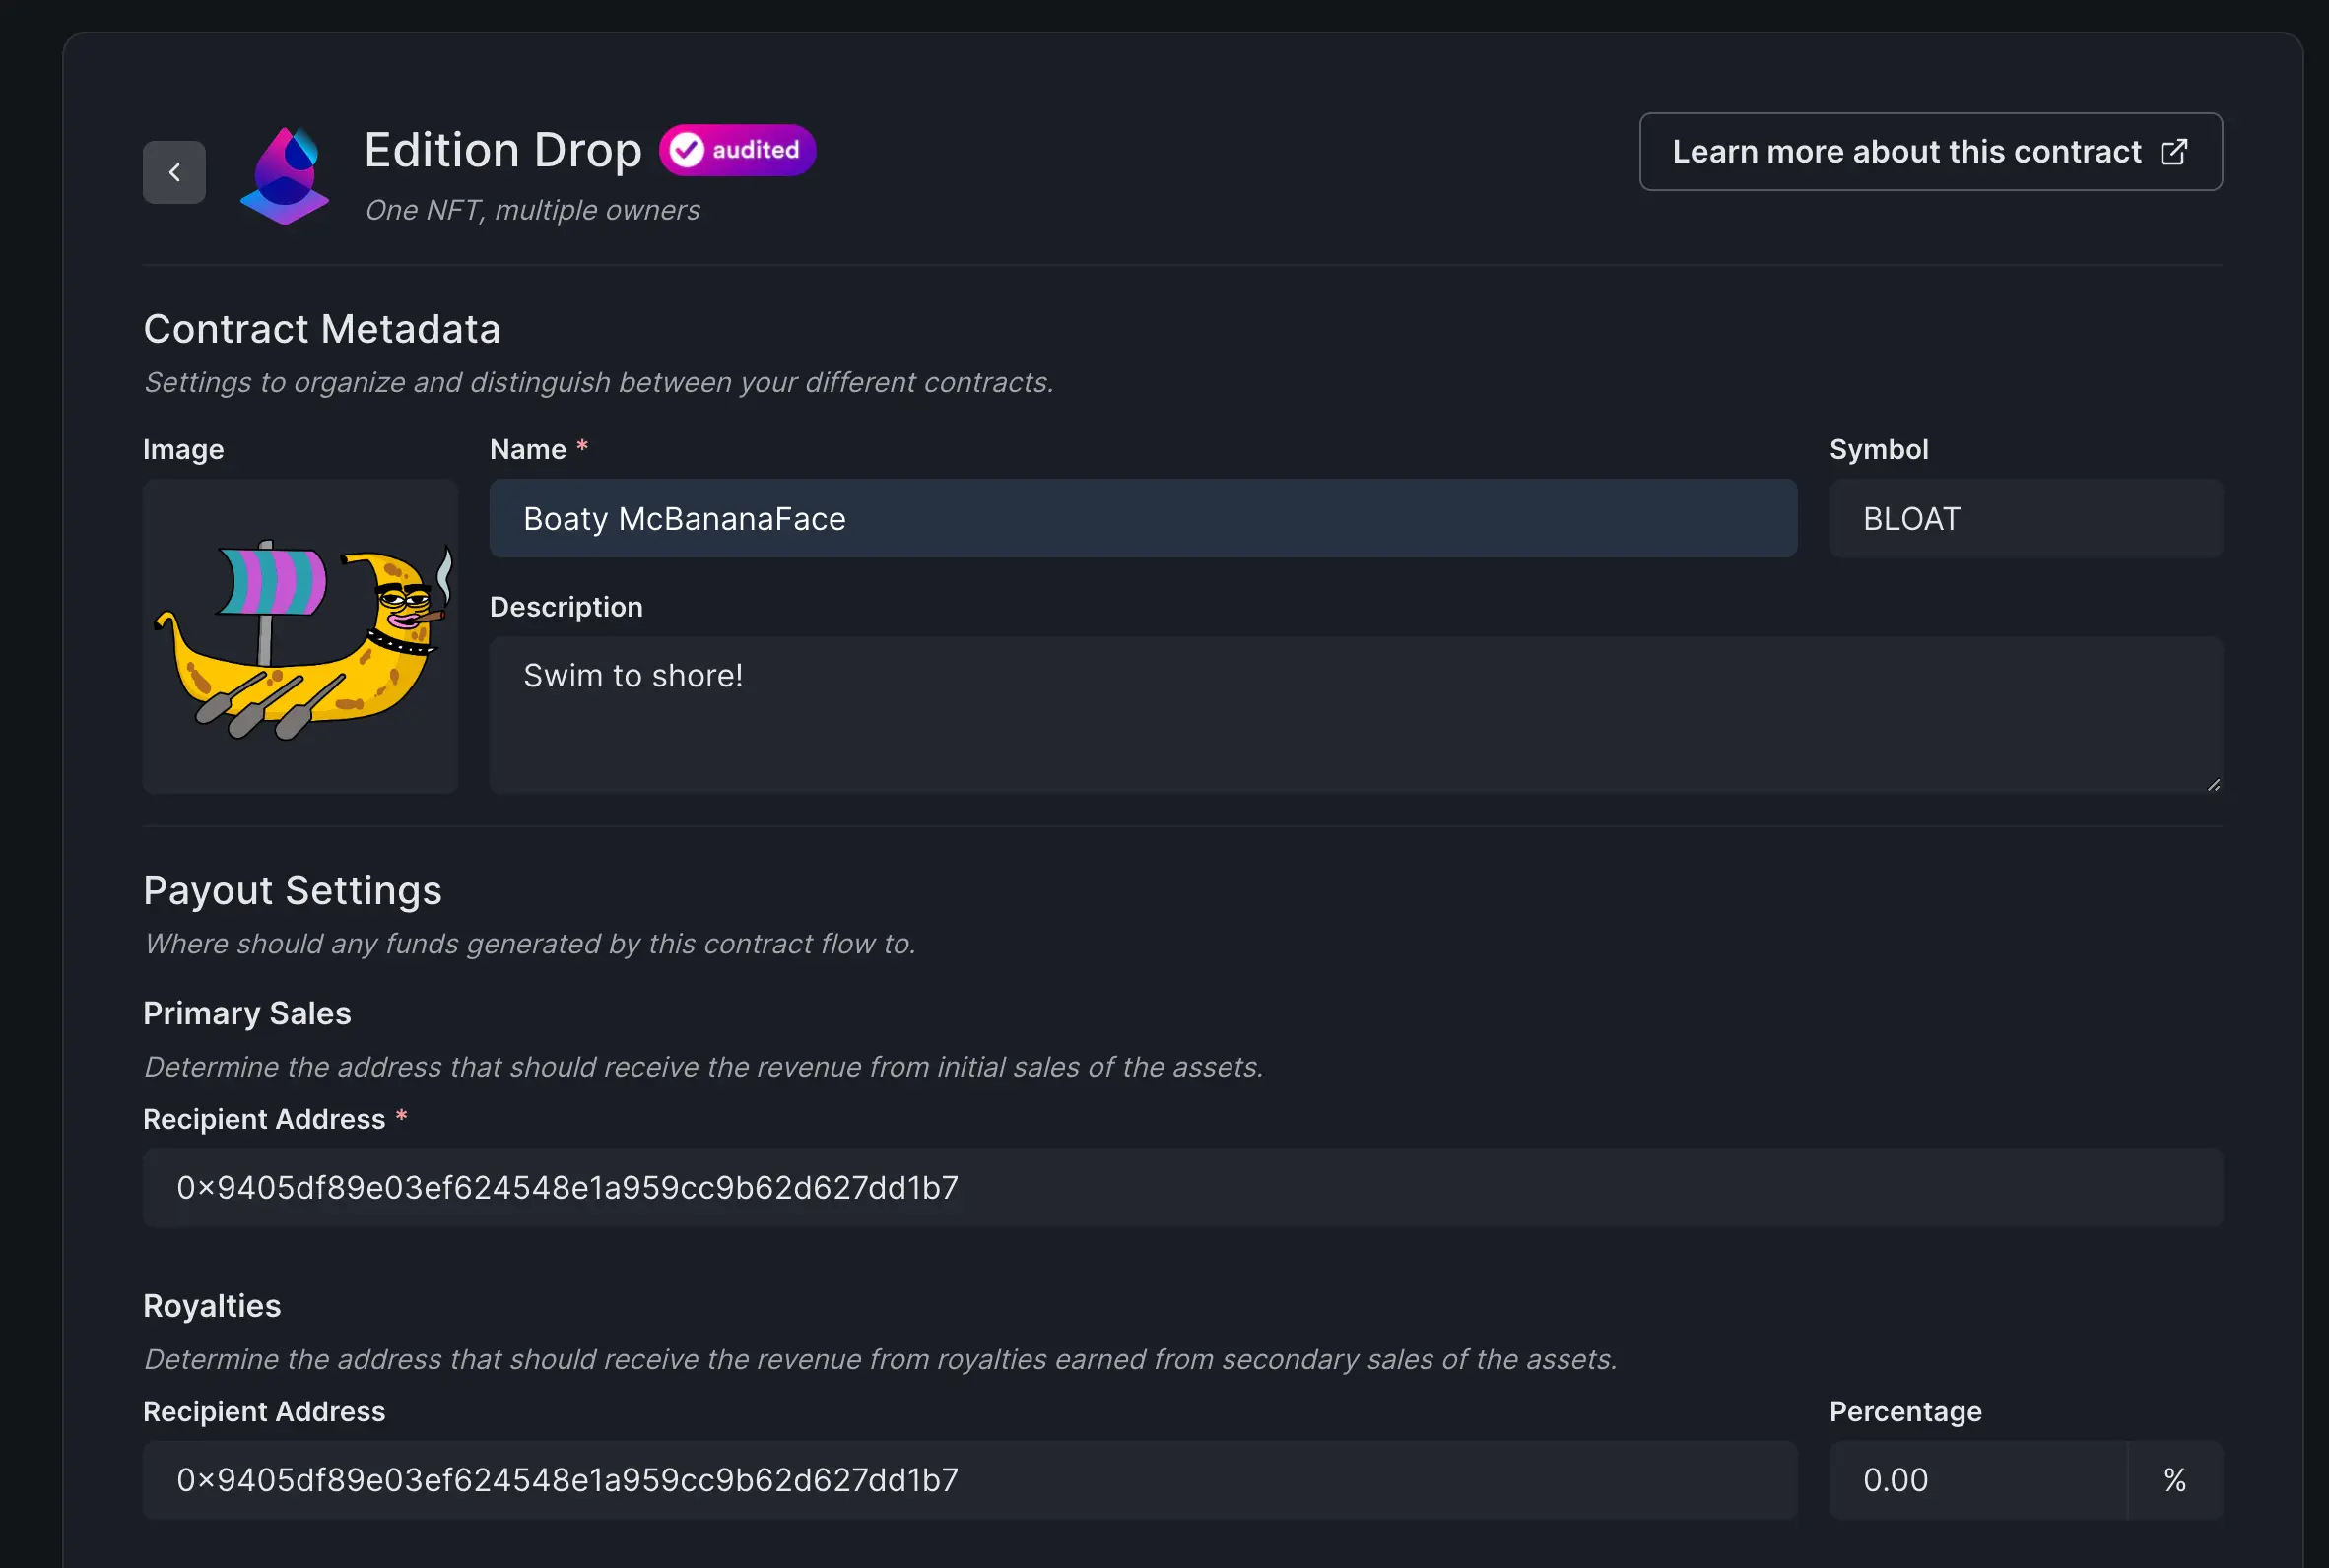
First, fill out your NFT Collection’s metadata. Then, paste the Project Payer address we copied earlier into the Funds Recipient input. Click Deploy to create your NFT collection.

I'm going to do an Edition Drop.

Paste the Project Payer address into the Primary Sales and Royalties recipient inputs.

6. Create an NFT

On the Collection page, click Create to create your first NFT in the collection.

Click Create on the Collection page.

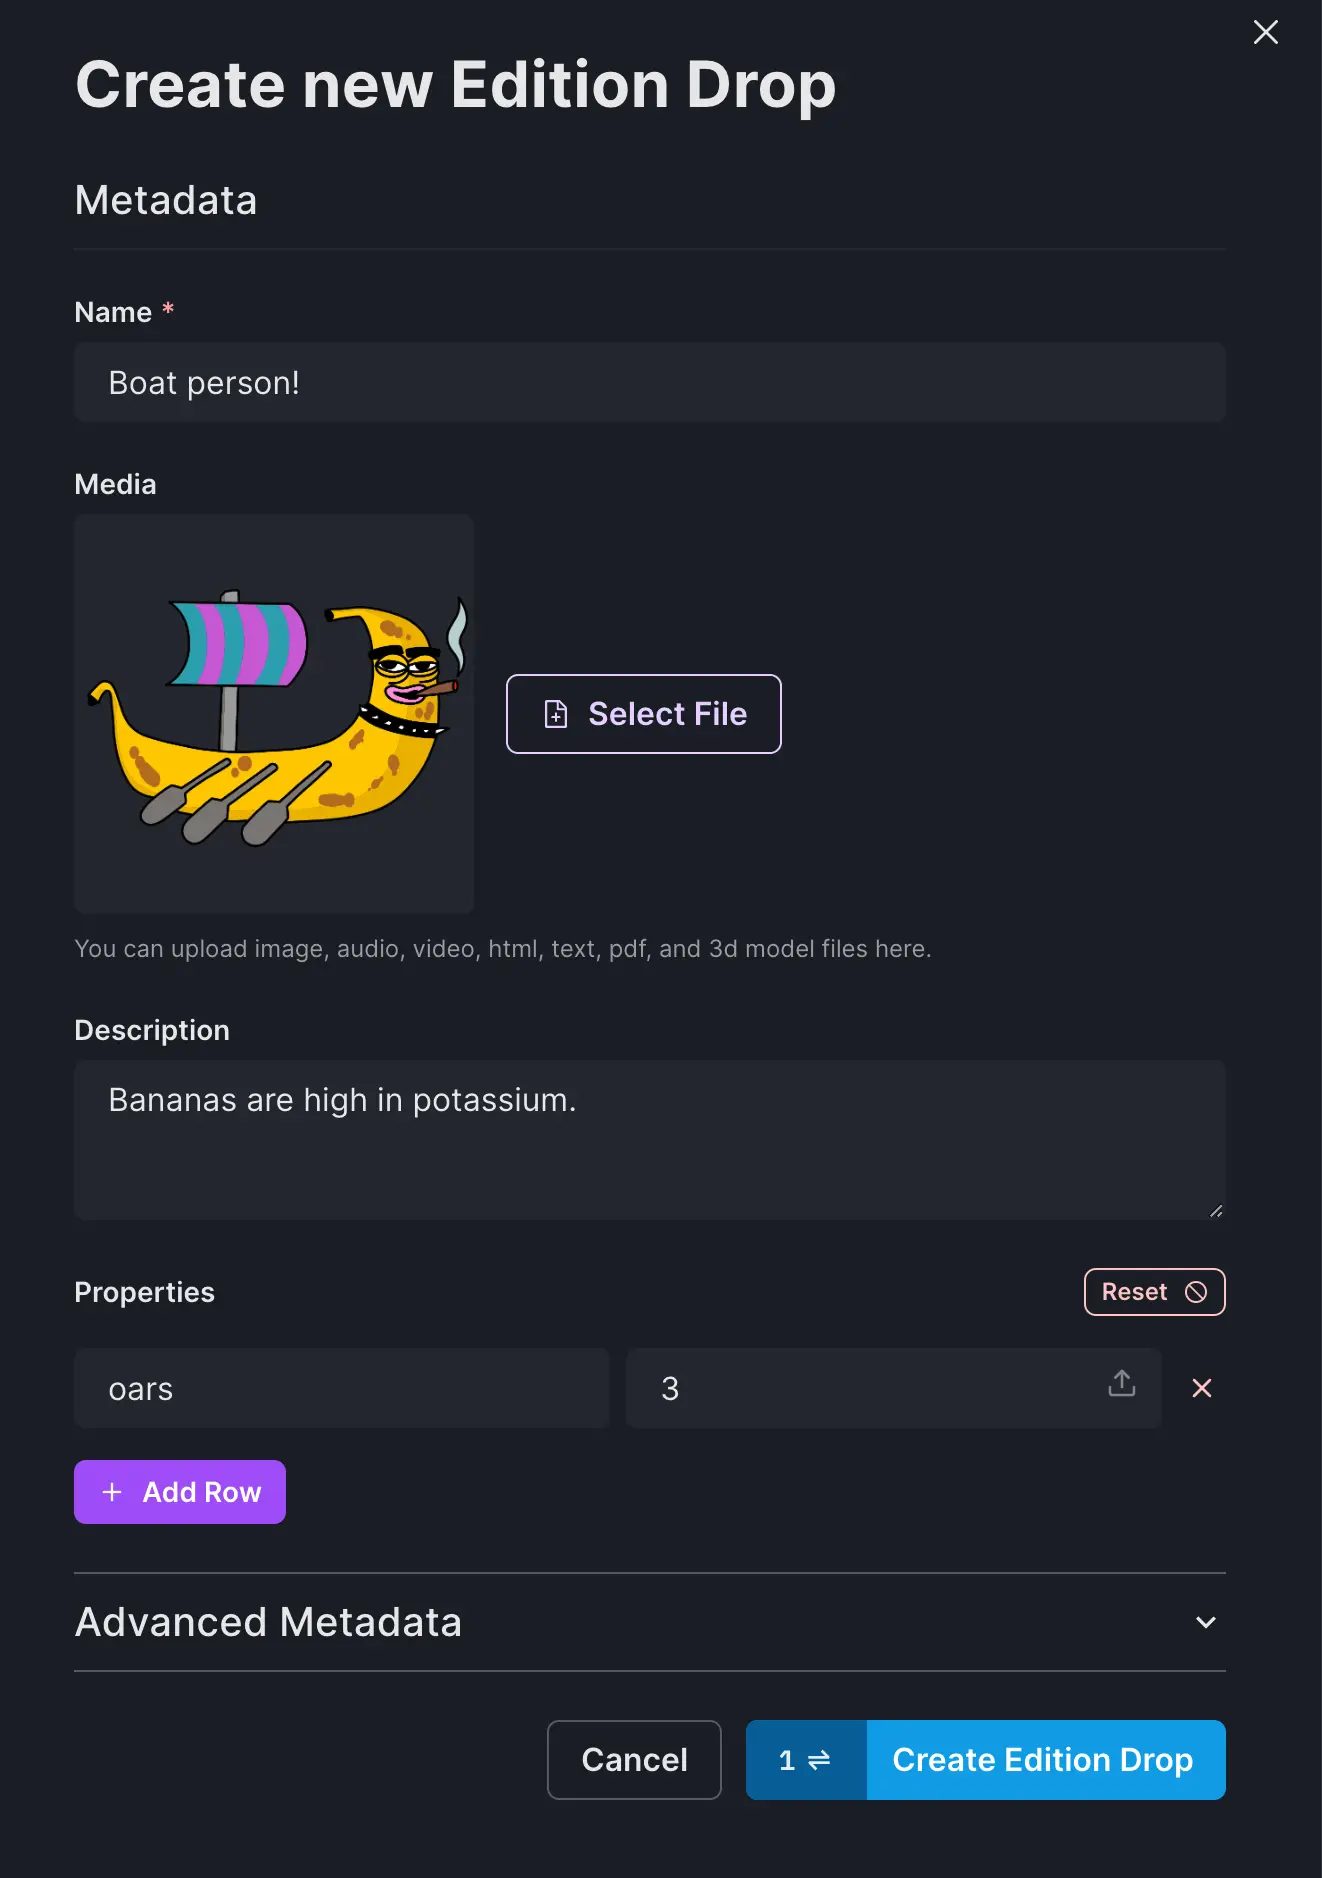
Input your NFT's metadata and click Create Edition Drop

Input your NFT's metadata.

7. Create a Claim Phase

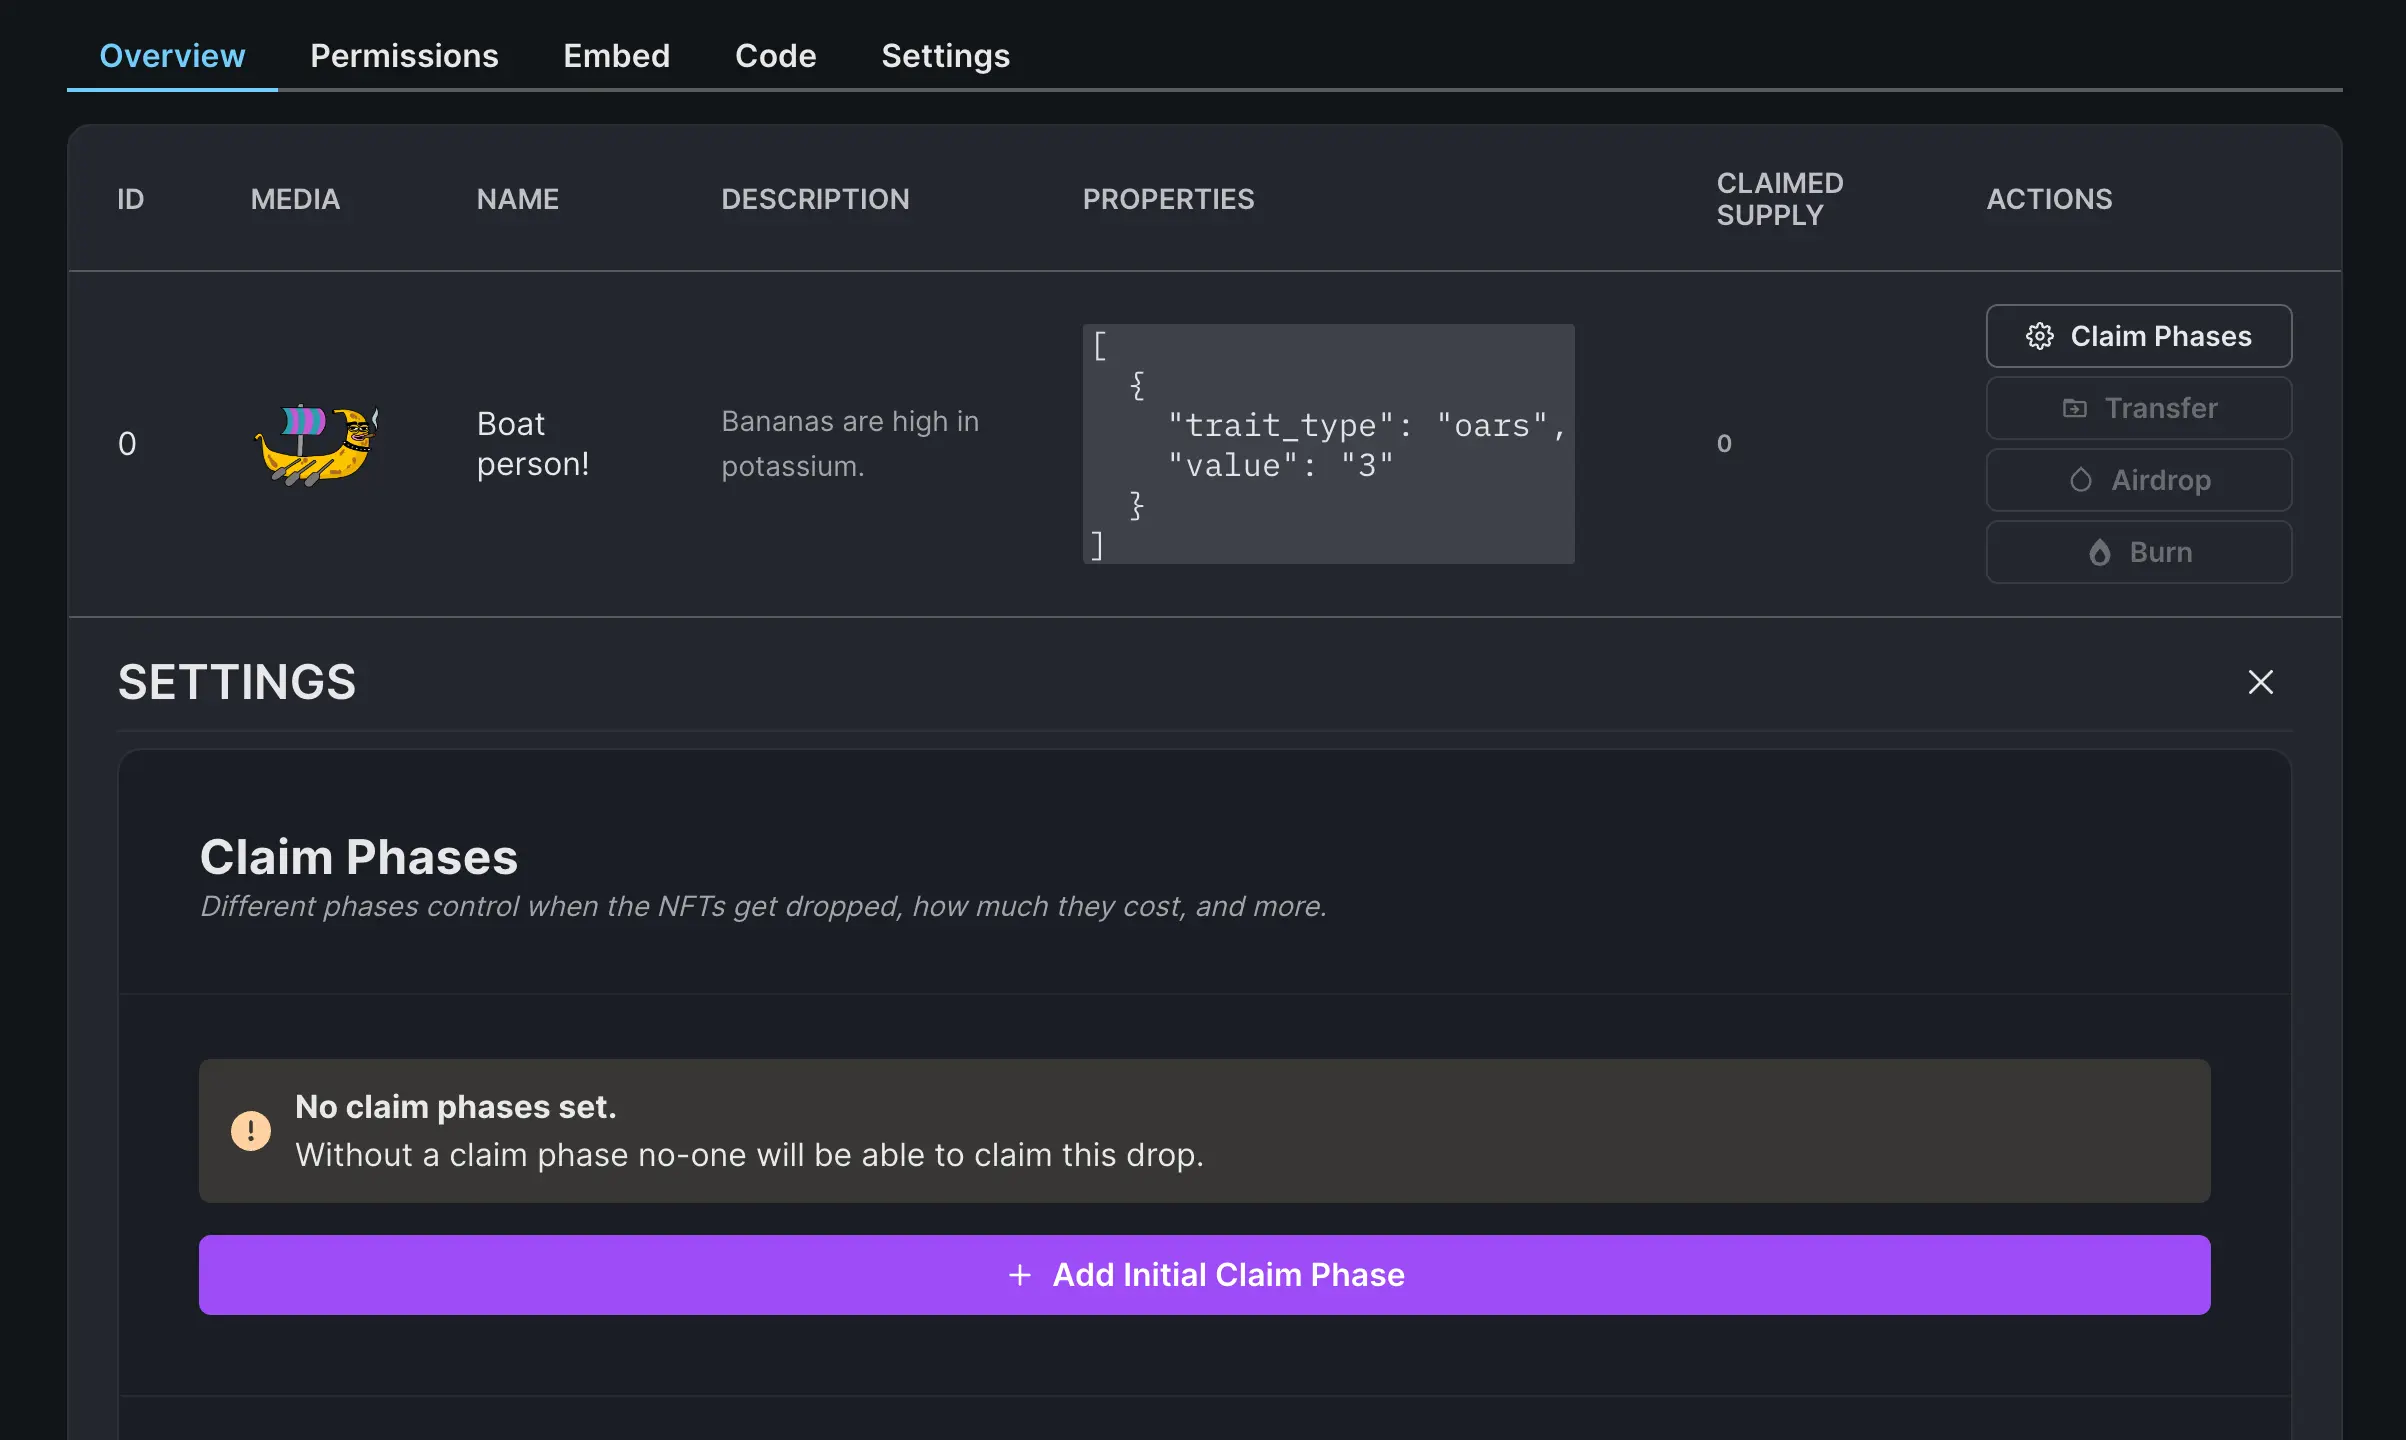
Return to the Collection page, click Claim Phases, then Add Initial Claim Phase

Create a new Claim Phase.

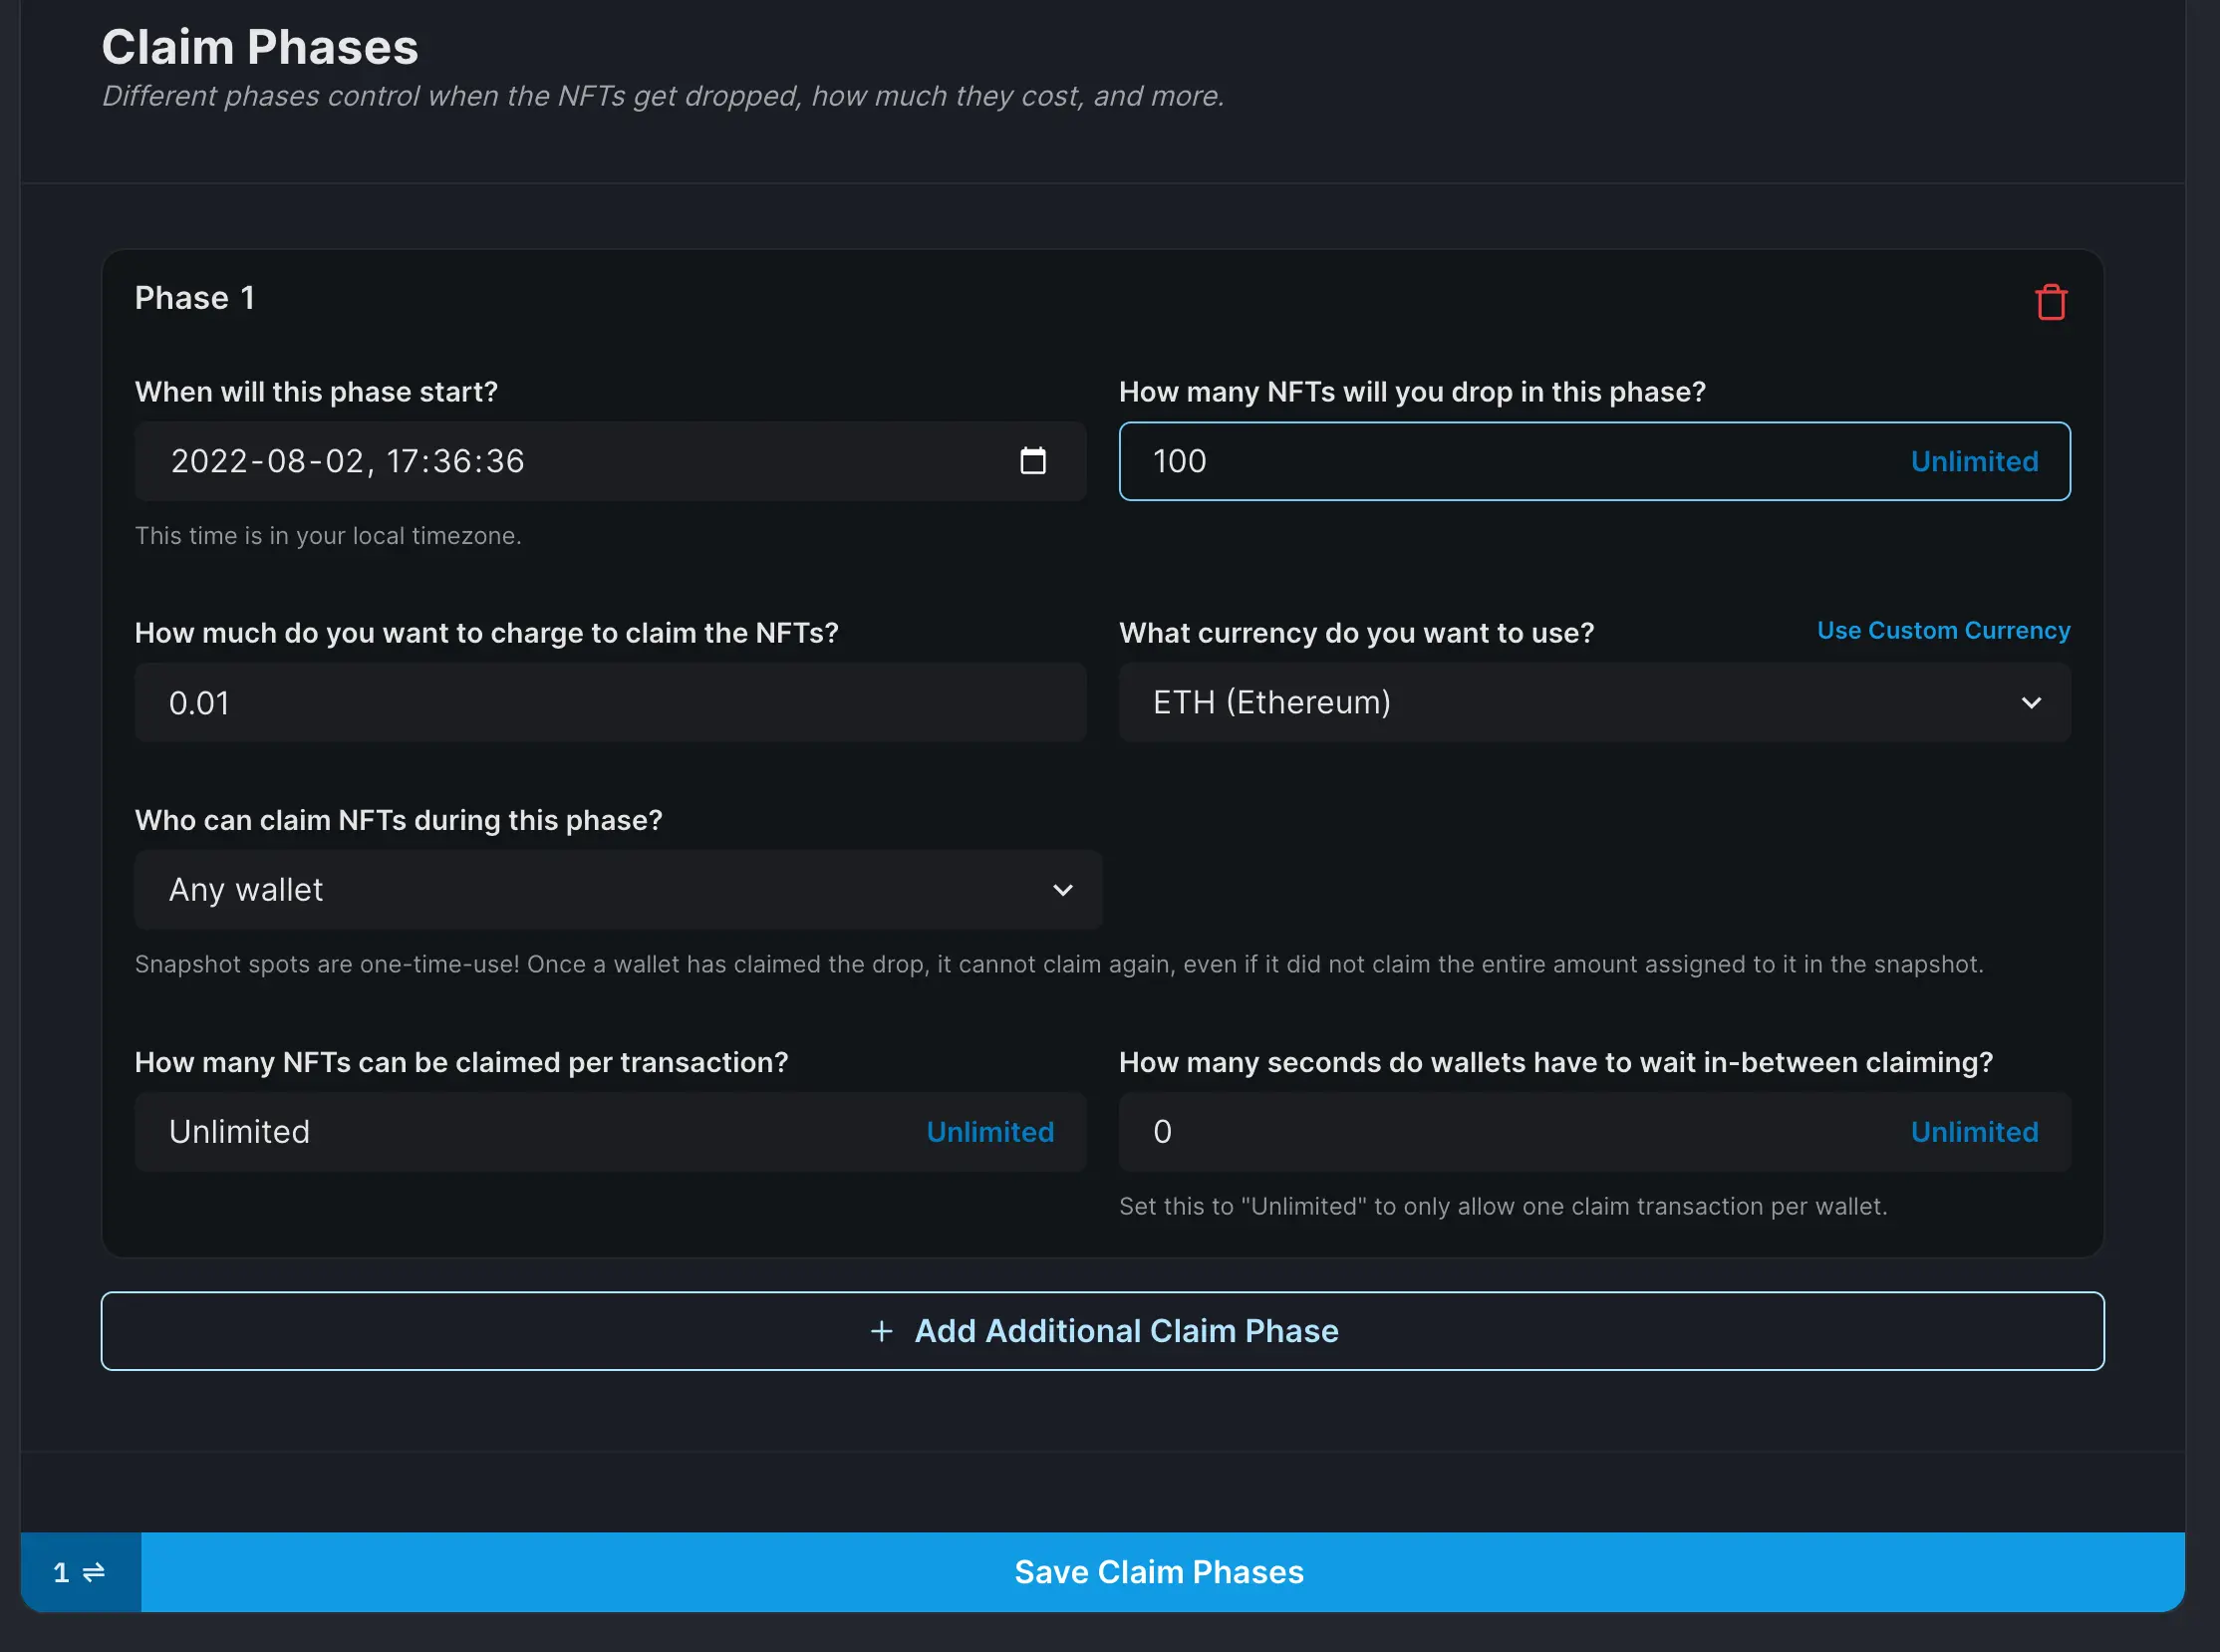
Set a start date, price, and quantity for your claim phase, then click Save Claim Phases when you are satisfied.

Configure the Claim Phase and Save.

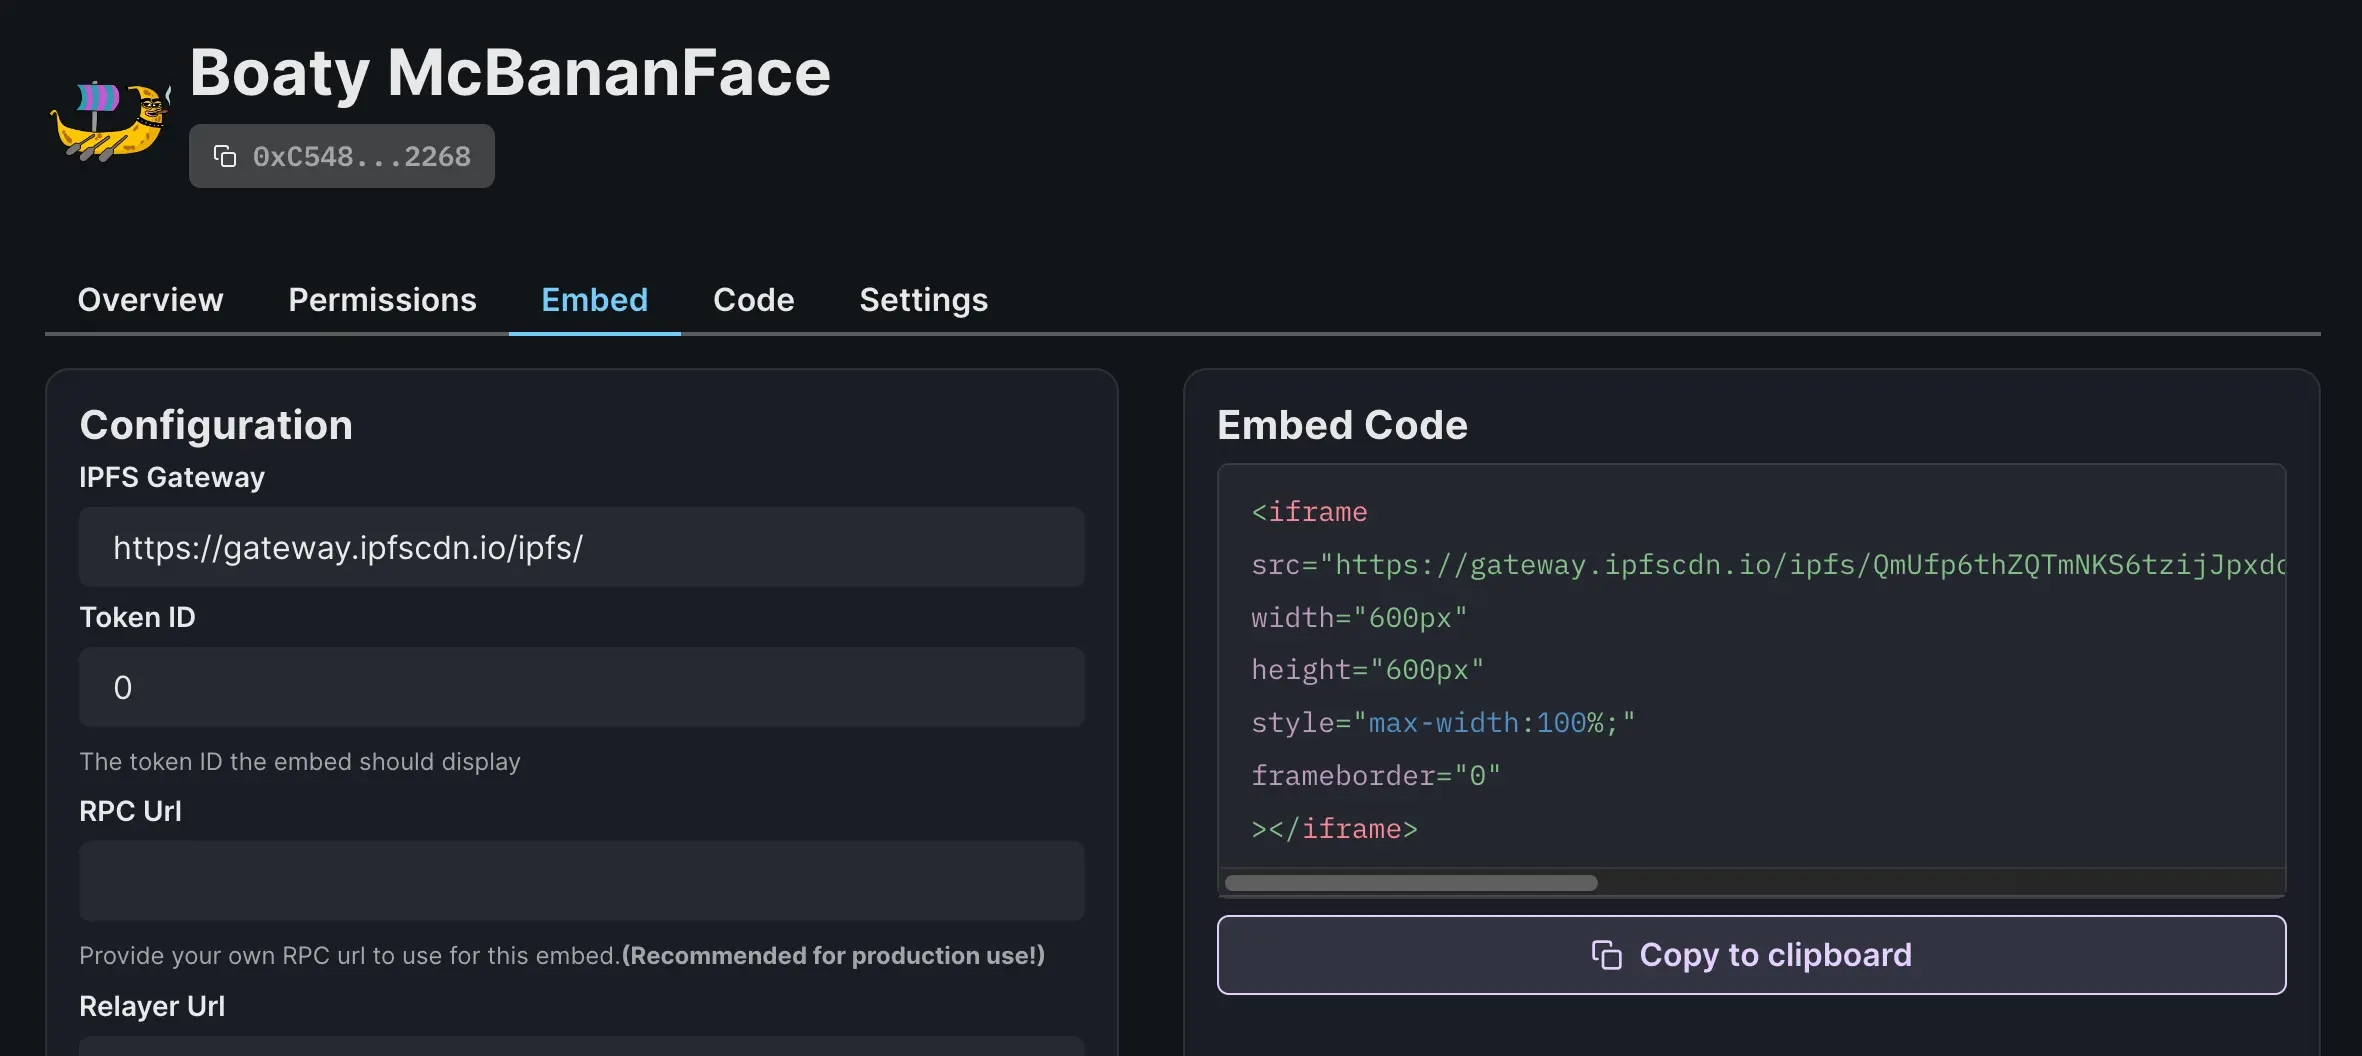
Switch to the Embed tab, then copy-paste the iframe embed code into your own website.

Switch to the Embed tab and click `Copy to clipboard`

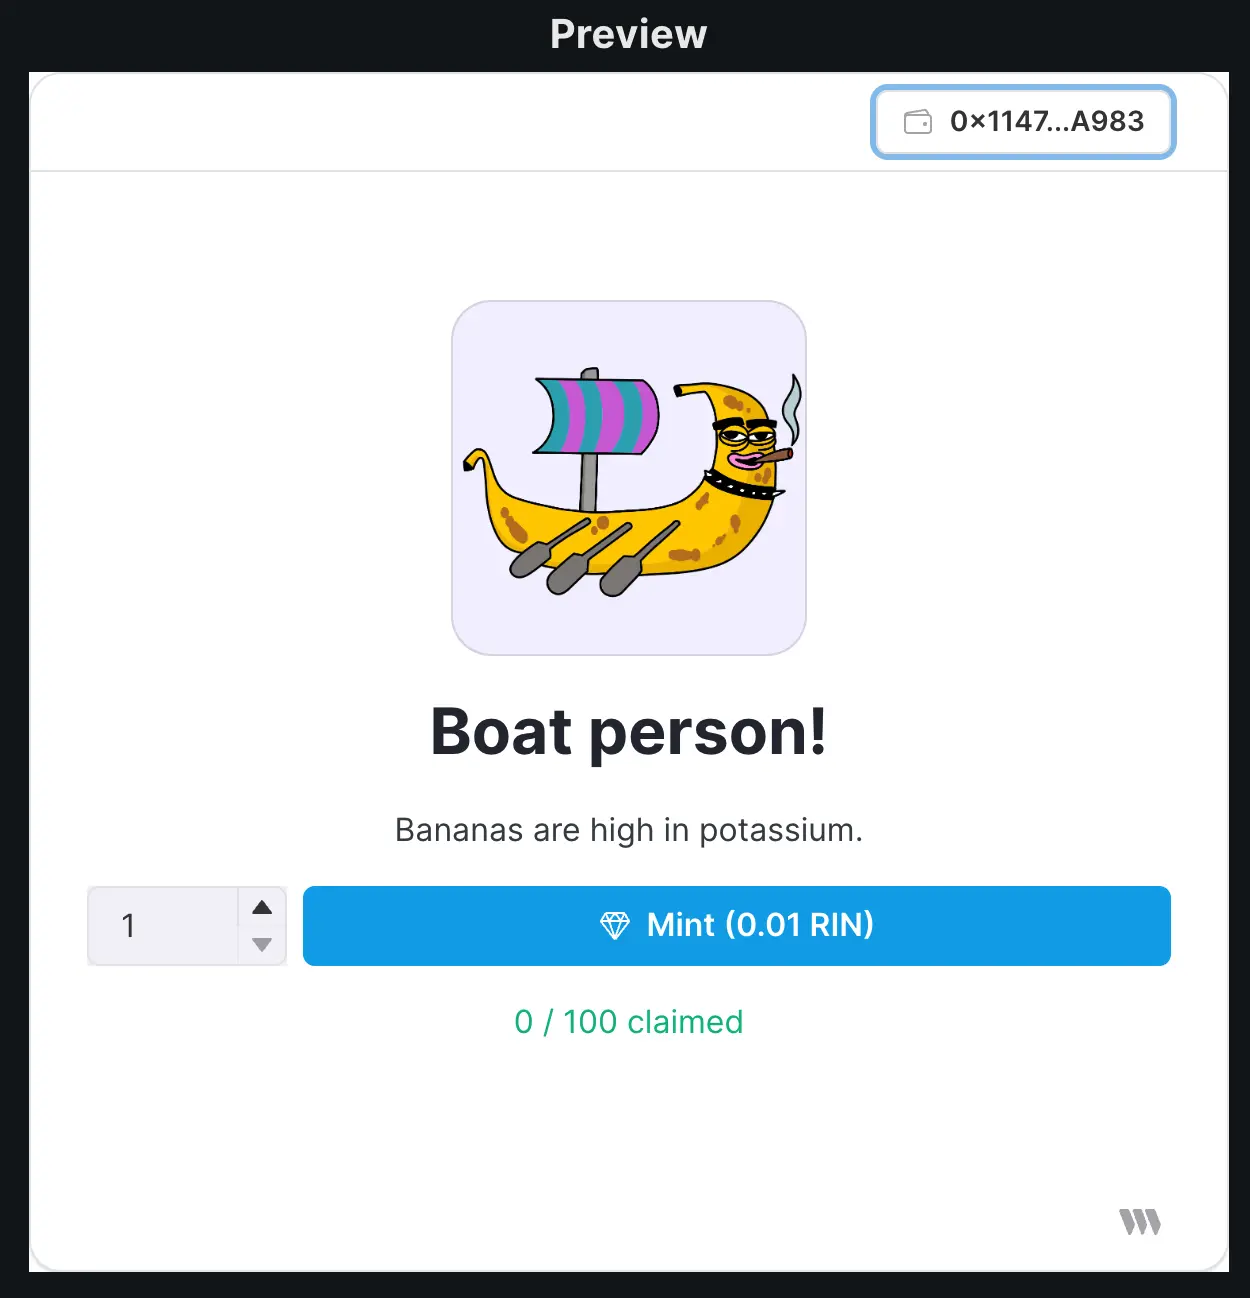
You can mint from the preview at the bottom of the page if you would like to test the NFT drop and Juicebox integration.

Mint embed preview.

NFT mint proceeds are forwarded directly to the Juicebox project and show up on the Juicebox Project's Activity feed.

That’s it! Try minting an NFT to see it in action!

For support, visit discord.gg/juicebox.

· 2 分钟阅读
nnnnicholas

In this guide, I’ll show you how to deploy an NFT drop to Ethereum with Zora’s creator tools, and forward the mint sale proceeds to a Juicebox Project.

As of 2022-08-01, Zora charges a 5% fee on primary sales. This may change in future.

Before you start, you should have:

  • At least one piece of artwork for your NFT (image, audio, video).
  • A Juicebox project you’d like to fund. This can be your project or someone else’s.

1. Navigate to Project tools

Go to the project you would like to pay on juicebox.money. Click the Tools button at the top-right of the page.

Project tools on juicebox.money

2. Create payable address

Click Deploy project payer contract in the project tools.

3. Deploy your Project Payer

Click Deploy project payer contract. Leave the Advanced features set to their defaults. Verify that the transaction looks good in your wallet, then sign it.

Bonus: If you include text or an ipfs://Qm... link to an image in the memo field, every contribution to the project made via this Project Payer will have that text and/or image in the Juicebox project's activity feed.

4. Copy Project Payer address

When the transaction succeeds, a pop-up will display the new Project Payer’s address.

Project Payer creation successful pop-up.

A new event called “Created ETH-ERC20 payment address” will also appear in the project’s activity feed with the same information. Copy the Project Payer address to your clipboard.

The new Project Payer in the Project's Activity feed.

5. Create your NFT

Go to create.zora.co/create and select an NFT drop type. I’ll be selecting Editions. Fill out your NFT’s data and upload the NFT media. Paste the Project Payer address we copied earlier into the Funds Recipient input.

6. Forward ETH to the Juicebox Project

As your NFTs sell, ETH accumulates in the NFT contract. To move the funds to the Juicebox project, navigate to create.zora.co/collections, select your NFT collection, then click Withdraw, and sign the transaction. The payment to the Juicebox project will appear in the Activity feed when the transaction succeeds.

That’s it! Try minting an NFT to see it in action! For support, visit discord.gg/juicebox.