Discord Server Templates
Discord is among the most popular social platforms in crypto. It allows users to create free, invite-only servers for their communities. Discord servers support messaging across multiple channels, voice/video calls, and the configuration of complex permission structures. Discord also supports bots and other automations through its API.
Get Discord
If you don't already have an account, create one at discord.gg. You can access Discord via a web browser or through its native apps on Windows, macOS, Android, iOS, or Linux. If you are a complete beginner, take a look at Discord's beginner's guide.
1. Templates
Need a different template? Ask in the Juicebox Discord.
First, pick a template to automatically configure channels, roles, permissions, and server settings.
| Template | Description |
|---|---|
| Discord For DAOs | This server works best for crypto-native communities and projects building in the open. |
| Discord For NFT Projects | This server works best for NFT projects using Juicebox to manage revenues. |
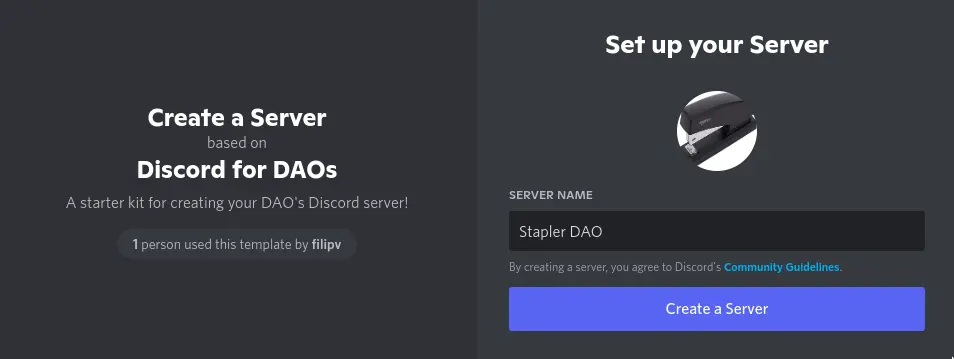
Name your server and upload a logo.
You will be brought to your new Discord server! Acquaint yourself with the preconfigured channels and roles.
1.1 Note on Permissions
Discord permissions are cumulative—users gain permissions from all of their roles, with positive permissions overriding negative ones. Channel permissions and category permissions behave differently; they override the permissions of users and roles within specific channels. All of the templates come with sensible defaults: non-admin users will not be able to send messages or create discussion threads within information/announcement channels.
To test a role's permissions, click on your server's name (at the top of your channels list), and navigate to your Server Settings. Navigate to the Roles page, and click on the role you would like to test. Within the Display tab, scroll to the bottom and select View Server as Role →. This will let you test what actions the role can take and what channels it can see.
2. Server Settings
Click on your server's name (at the top of your channels list), and navigate to your Server Settings. Our templates come with sensible defaults, but you may desire to reconfigure the following options:
| Setting | Sidebar Menu | Description |
|---|---|---|
| Show Boost progress bar | Overview | When enabled, a server boost progress bar will display in your channel list. Server boosts allow for further customization. |
| Upload Emoji | Emoji | Add custom emojis that anyone can use in your server. |
| Upload Sticker | Stickers | Add custom stickers that anyone can use in your server. |
| Verification level | Safety Setup | The criteria users must meet before they can send messages. |
| Enable 2FA Requirement | Safety Setup | Require members with moderation powers to have two-factor authentication enabled. This setting is recommended. |
3. React Roles and Embeds
React roles allow server members to easily self-assign roles by reacting to a message. The Discord bot carl.gg allows server owners to set up react roles, write custom embeds, and configure automod features if desired. To add carl.gg to your server:
- Visit carl.gg, sign in with your Discord account, and click
Manageon the home page. - Select your server in this menu. You will be redirected to a Discord authentication page. Click
Continue, then scroll down and clickAuthorize. You may need to fill out a captcha. - You will be redirected back to carl.gg. Click
SKIPto open your dashboard.
3.1 Your "README"
- Open your server's carl.gg dashboard.
- Open the
Reaction rolespage in the sidebar. ClickCreate new reaction role. - In the Mode category, select
Post embedand select your#✨|read-mechannel. Then clickShow embed builder.
Type a brief server intro using the Title and the Description fields. This message will be the first thing users see when they join your Discord server. You can format this message with markdown.
The title:
Welcome to the Stapler DAO Discord server!
With the description:
Stapler DAO is disrupting the stapler industry with groundbreaking blockchain technology.

If you have questions, visit our [website](http://info.cern.ch/).

Click the 📢 for announcement notifications!
Will be formatted like so:

Once your message is written, click Add emoji, select the loudspeaker emoji, and select the announcements role. Users that click the loudspeaker will now be notified when you tag the @announcements role. Click Create to publish your message.
3.2 Contributor Roles
- Open your server's carl.gg dashboard.
- Open the
Reaction rolespage in the sidebar. ClickCreate new reaction role. - In the Mode category, select
Post embedand select your#✨|read-mechannel. Then clickShow embed builder. Fill out theTitleandDescriptionfields with a brief description of your contributor roles.
The title:
React to receive contributor roles!
With the description:
💻・Developer
👪・Community Management
👀・Visibility
🏛️・Governance
🛹・Onboarding
💸・Finances
🤝・Partnerships
Will be formatted like so:

Once your message is written, click Add emoji to add reaction emojis and their corresponding roles. These should be added one at a time, with each emoji corresponding to one role:

Click Create to publish your message.
3.3 Links Embed
A links embed will guide your community to DAO's resources and websites. To create one:
- Open your server's carl.gg dashboard. Open the
Embedspage in the sidebar. - Fill out the
Titlefield—Stapler DAO Links, for example. - Add your links to the
Descriptionfield, formatted in markdown. An input of[Juicebox Docs](https://docs.juicebox.money)will be formatted to: Juicebox Docs. If you have many links, you may want to separate them with bolded category titles. An input of**Example Text**will be formatted to: Example Text. - Select your
#🔗|linkschannel in theDestinationfield. ClickPostto publish your links embed.
4. Twitter Feed
IFTTT allows you to create simple automations for popular web services. IFTTT's free plan will allow you to create a live Twitter feed in your Discord server:
- Open your server's settings and open the
Integrationspage. - Click
Create Webhook. Assign a screen name and profile picture here. Assign this integration to the#🐦|twitter-feedchannel.

An example webhook configuration
- In a new tab, open IFTTT. If you do not already have an account, create one at ifttt.com/join.
- Sign in to IFTTT and navigate to ifttt.com/create.
- Click
Addnext to If This and select theTwitterservice. Select theNew tweet by youtrigger. - Add your Twitter account and select it. If desired, you can include retweets and @replies. Click
Create trigger. - Click
Addnext to Then That and select theWebhooksservice. Select theMake a web requestaction. - Open your webhook in your server's settings, and click
Copy Webhook URL. Paste this URL in IFTTT'sURLfield. - Select
POSTas your Method. Selectapplication/jsonas your Content Type. Paste this into the Body field:
{ "content":"{{LinkToTweet}}" }
- Click
Create action,Continue, andFinish.
The Tweet:

Will be rendered like so:

5. Next Steps
You are done! Optionally:
- To enable features like discovery, server metrics, and a welcome screen, navigate to the
Enable Communitypage in your server settings and clickGet Started. - Add new categories and channels for different languages.
- Add new reaction roles with carl.gg.